
You just discovered water damage on your wall, and now you’re staring at it wondering if the whole section needs to come out or if you can dry it and move on. Here’s the straight answer: if it’s been wet longer than 48 hours, feels soft when you press it, shows any mold, or touched contaminated water, replacement isn’t optional. You might save it only if clean water was involved, you caught it fast, and the damage stayed surface-level. But about 90% of wet drywall ends up replaced anyway because of how porous it is.
Assessing Water Damage: Immediate Indicators for Replacement or Repair
Replace the drywall if it feels soft or crumbles when you press it, shows visible mold, has been wet for over 48 hours, or touched contaminated water. You might be able to repair it only if clean water was involved, you caught it under 24 hours, and there’s no structural damage. But here’s the thing: about 90% of wet drywall ends up needing replacement anyway because of how porous it is.
Replace immediately when:
- Water’s been sitting there longer than 48 hours, doesn’t matter what kind or how bad it looks
- The drywall feels soft, spongy, or crumbles when you barely touch it
- You see any mold growth (black, green, grey patches anywhere on the surface)
- The water came from sewage, toilet overflow, or outdoor flooding
- There’s warping, sagging, or buckling anywhere on the wall or ceiling
Water damage pros sort water into three categories that tell you what to do next. Category 1 is clean water from supply lines, broken pipes, or rain. You might save it within 24 hours if you move fast with professional drying equipment and get all the moisture out. Category 2 is gray water from dishwashers, washing machines, sink drains, or sump pump failures. This usually means partial removal using flood cuts because of contaminants like detergents, food particles, and bacteria that create health risks. Category 3 is black water from sewage lines, toilet backups, or outdoor flooding. This means complete replacement down to the studs because harmful bacteria, viruses, and pathogens contaminate everything.
The critical window is the first 24 hours after clean water exposure. Deploy commercial-grade dehumidifiers and high-velocity air movers immediately, and you might save minimally saturated drywall. But here’s reality: even with rapid professional response, about 90% of cases still require replacement. Moisture penetrates deeper than surface meters detect, gypsum starts breaking down within hours, and that 48-hour mark triggers mold colonization that makes replacement mandatory regardless of how dry the surface feels.
Critical Signs Your Water Damaged Drywall Must Be Replaced
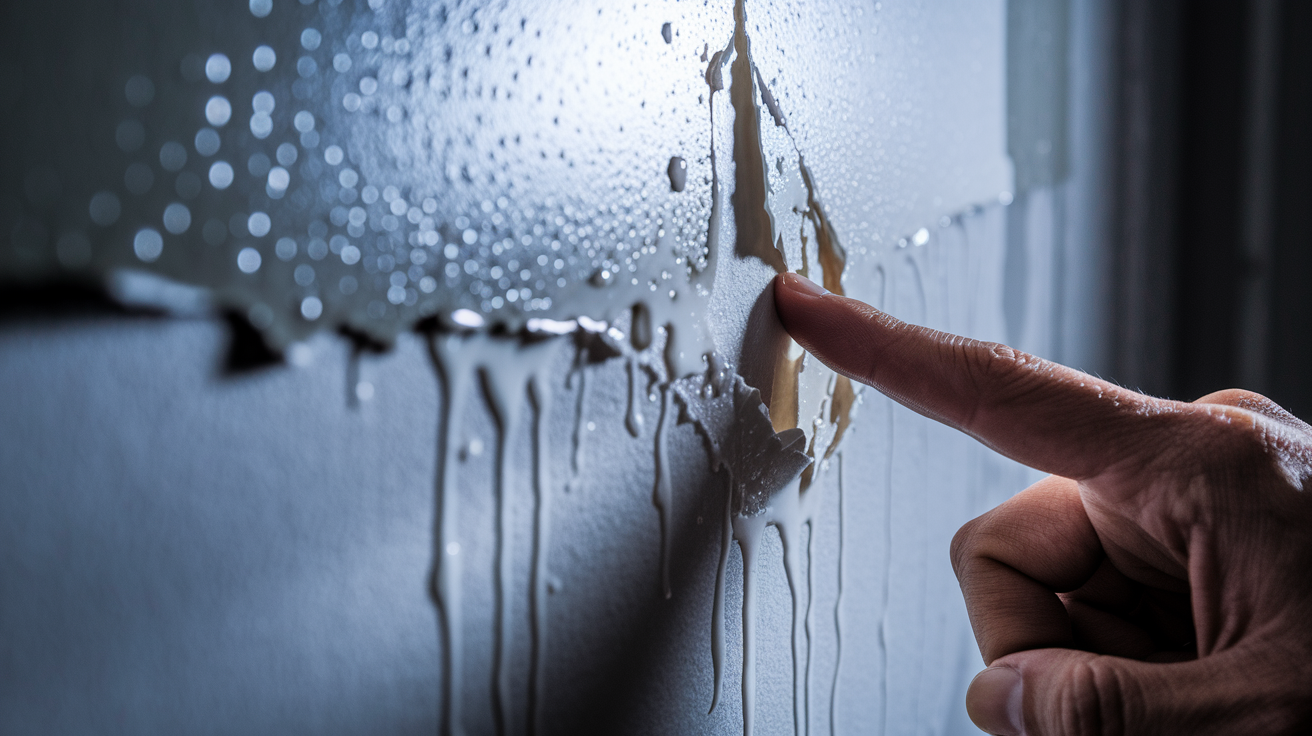
Start by looking at the damaged area from different angles under good lighting, then gently press the drywall with your fingertips. Healthy drywall feels firm and solid. Compromised drywall gives under pressure, feels spongy, or shows surface depression that doesn’t spring back.
Run your hand slowly across the wall feeling for temperature differences, texture changes, and soft spots extending beyond visible staining. Check corners, seams, and areas near baseboards where water pools and wicks upward.
Warning signs requiring immediate replacement:
- Soft, spongy, or crumbly texture when pressed (the gypsum core has lost structural integrity)
- Sagging or buckling panels pulling away from studs or bowing outward
- Persistent yellow or brown water stains remaining after the surface dries
- Bubbling or peeling paint and texture indicating trapped moisture beneath the surface
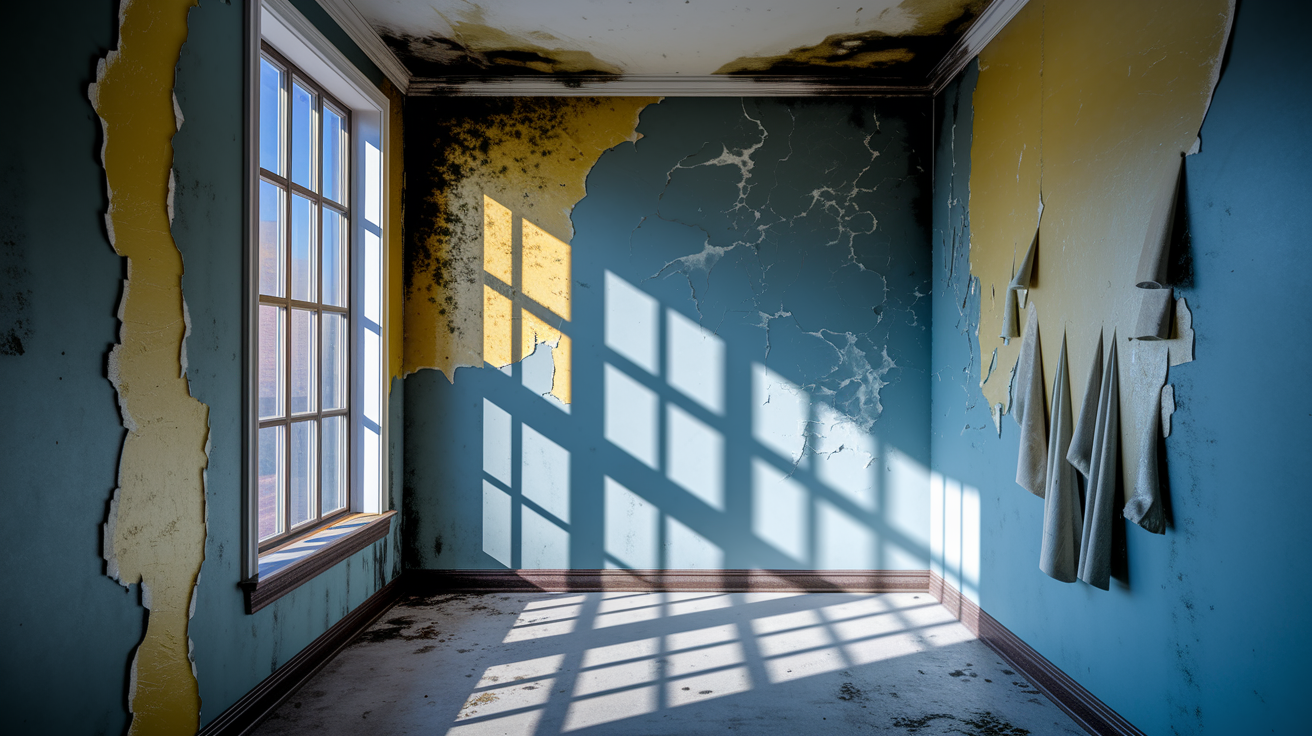
- Visible mold appearing as black, green, or grey patches, fuzzy growth, or discoloration
- Warping or swelling extending beyond surface level, creating waves or ridges
- Musty odors indicating hidden moisture and microbial growth inside wall cavities
- Dark patches along seams and joints where tape has separated or compound has failed
When you see multiple warning signs at once (soft texture combined with discoloration and musty smell), the damage has gone beyond surface level into the gypsum core and paper backing. At this point, the drywall has lost its job as a wall surface. The material that’s supposed to give you a smooth, rigid surface for paint has basically become compressed wet cardboard that will never return to its original state, even after complete drying.
How Drywall Absorbs and Retains Moisture
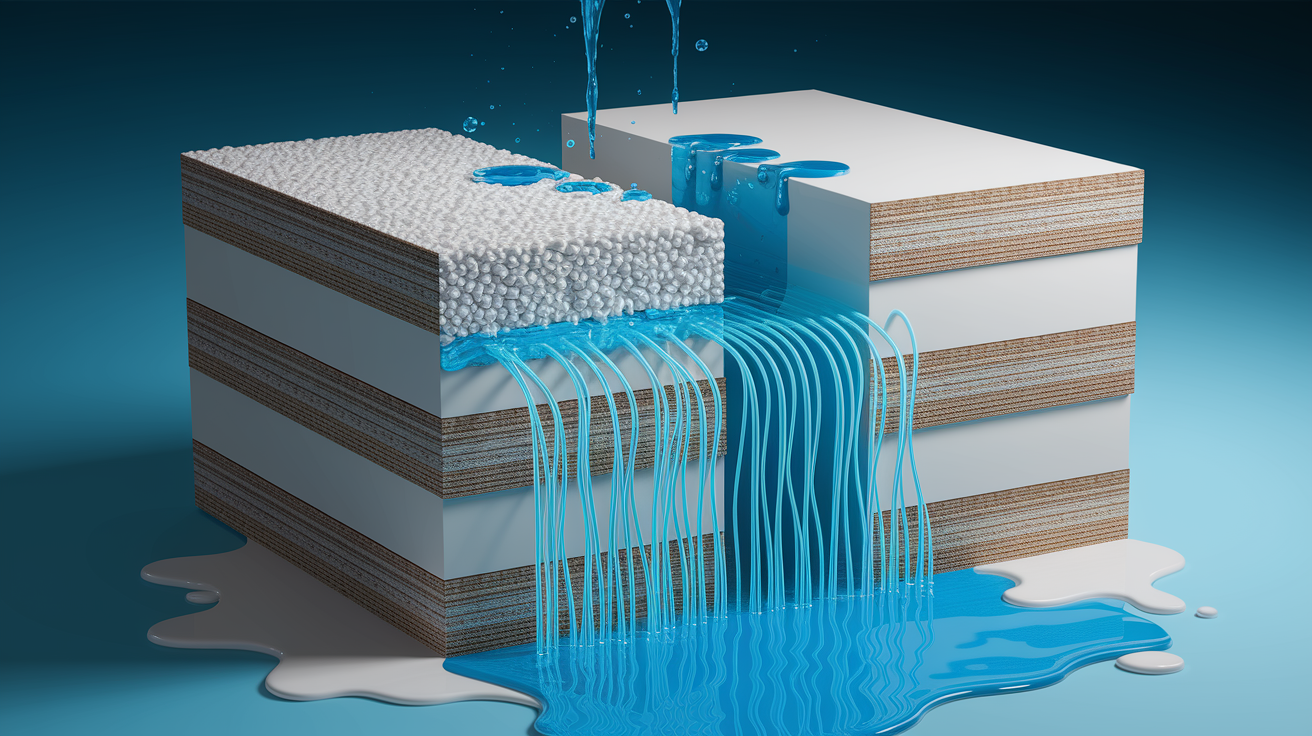
Drywall consists of a gypsum core sandwiched between two layers of thick paper facing. The gypsum acts like chalk or plaster (highly porous and absorbent). The paper backing wicks water like a towel. When water hits this combination, the gypsum starts absorbing moisture immediately, the paper fibers swell and begin separating from the core, and the material starts losing rigidity within hours as the bond between layers weakens. Think of it like a graham cracker left in milk. It might look intact at first, but the internal structure has already started breaking down.
Water doesn’t just stay where it first contacts drywall. Capillary action pulls moisture upward and outward through the porous gypsum core, often drawing water several inches above the highest visible stain. This means a water line you can see at two feet above the floor might have wicked moisture up to three feet or higher inside the wall cavity. The paper facing acts as a highway for moisture to travel, and the damage extends far beyond what your eyes tell you. This hidden saturation zone is why pros always cut well above visible damage during flood cuts.
Clean water exposure under 24 hours is your only realistic salvage window, and even then, success requires immediate professional help. The moment you discover the damage, you’re racing against absorption rates, mold spore activation, and structural breakdown. If you catch a supply line leak within hours and the saturation is minimal, aggressive drying might prevent replacement.
Immediate actions for attempting salvage:
- Stop the water source immediately (shut off the supply valve, fix the leak, or contain the entry point)
- Remove all standing water using a wet vacuum, pump, or extraction equipment before it soaks deeper
- Position high-velocity fans perpendicular to wet walls for maximum air circulation across surfaces
- Deploy commercial-grade dehumidifiers (household units lack the capacity for structural drying)
- Monitor moisture levels with pin-type meters daily, taking readings at multiple depths and locations
Drying takes minimum several days to several weeks depending on saturation depth, wall cavity access, and environmental conditions. Surface drying is meaningless. You need the gypsum core and the back paper facing to reach safe moisture levels below 15%. Professional moisture verification with calibrated meters is essential before sealing walls with new paint or texture. The porous nature of drywall means you can’t see or feel when the core is still damp, and sealing in moisture guarantees mold growth. Also understand that even if you get complete drying, surface cleaning does nothing against mold spores that have already contacted the paper facing. The porous structure provides too many protected spaces for spores to colonize.
Mold Development Timeline and Mandatory Replacement Triggers
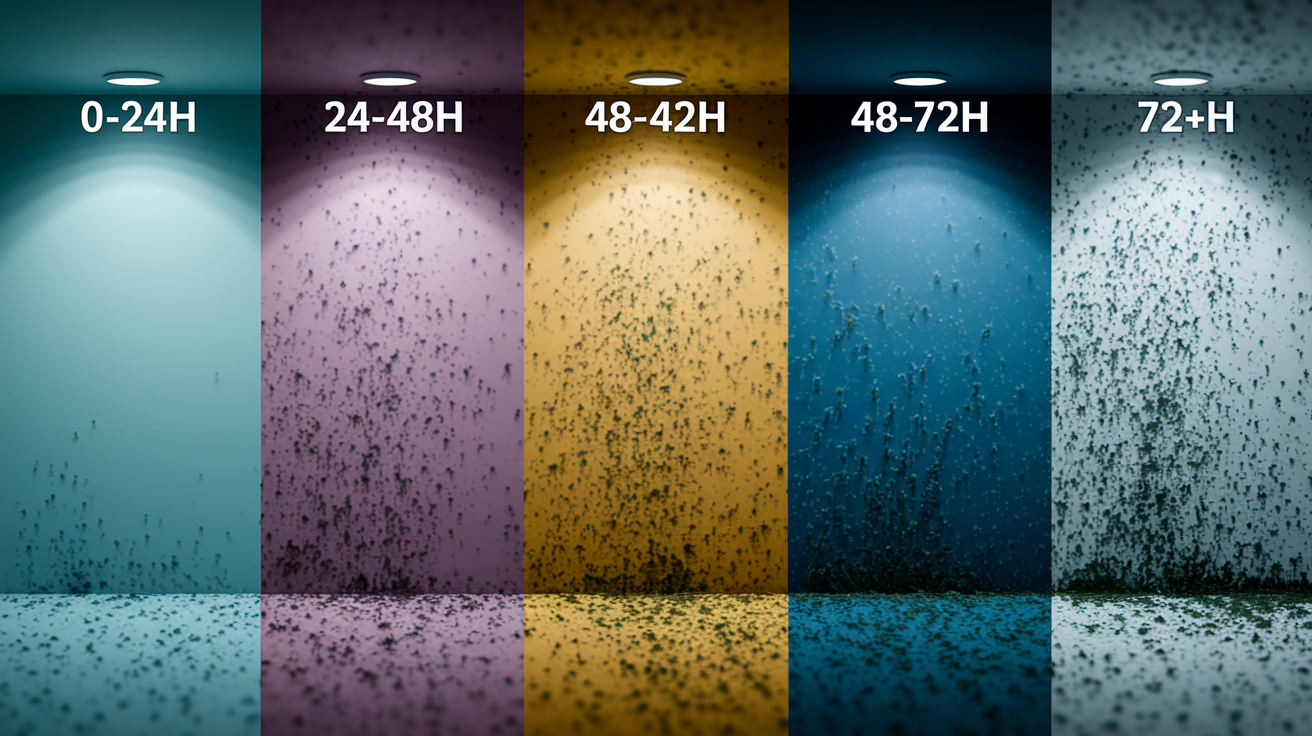
Mold spores exist everywhere in the air, dormant and waiting for the right conditions. When moisture seeps into wall cavities and drywall stays wet, those spores activate and begin colonizing within 24 to 48 hours. This isn’t a maybe. It’s a biological certainty. The clock starts the moment water penetrates beyond the surface, and that 48-hour window is why water damage creates such time pressure. Miss that window, and you’re not just dealing with wet building material anymore. You’re dealing with active mold growth that spreads through wall cavities you can’t see.
Common mold species in damp wall cavities include Aspergillus and Cladosporium. Both thrive in the dark, enclosed spaces behind drywall where wet paper facing and organic dust create ideal growth conditions.
| Time After Water Exposure | Mold Development Stage | Action Required |
|---|---|---|
| 0-24 hours | Spores present but dormant, no visible growth | Aggressive drying may prevent colonization |
| 24-48 hours | Spore activation and initial colonization begins | Replacement becomes likely even with drying efforts |
| 48-72 hours | Active growth spreading across surfaces | Replacement mandatory, containment necessary |
| 72+ hours | Established colonies producing new spores | Full remediation with HEPA filtration required |
Mold exposure creates respiratory issues including coughing, wheezing, and throat irritation. People with asthma or allergies experience worse reactions. Prolonged exposure to mold spores (especially in enclosed spaces during DIY removal) can trigger more severe immune responses. The porous structure of drywall makes surface cleaning completely ineffective because mold penetrates into the paper layers and gypsum core where bleach and antimicrobial sprays can’t reach. You might kill surface growth, but the root structure and dormant spores remain embedded in the material, ready to reactivate when humidity rises. This is why proper mold remediation on drywall requires professional containment with plastic barriers to prevent spore spread, HEPA filtration systems to capture airborne spores during removal, and complete disposal of contaminated material rather than attempting to clean it. Once mold is established in drywall, replacement isn’t just the best option. It’s the only option that actually solves the problem.
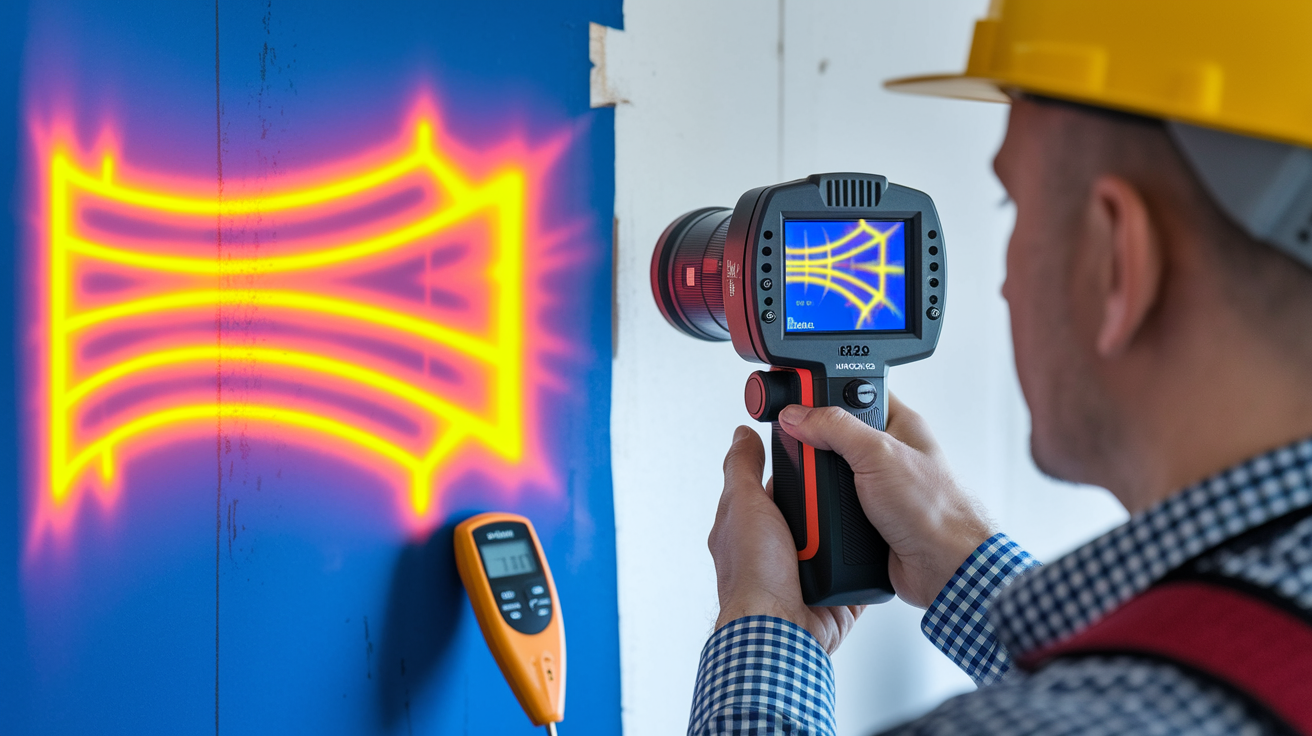
Professional Assessment Tools and What Inspectors Find Behind Walls
Visual inspection only shows you surface-level damage, missing the critical problems hidden inside wall cavities where most long-term damage occurs.
Professional diagnostic tools:
- Pin-type and pinless moisture meters measuring saturation levels deep inside drywall, studs, and insulation (readings above 15% indicate elevated moisture requiring action)
- Infrared thermal imaging cameras detecting temperature variations from hidden moisture, showing cool spots where evaporation is actively occurring behind walls
- Hygrometers monitoring relative humidity levels within wall cavities through small inspection holes (readings above 60% create mold-friendly conditions)
- Invasive inspection access through strategic cuts to directly examine studs, electrical wiring, insulation condition, and structural framing hidden behind drywall
Hidden components vulnerable to water damage include wood studs and framing members that support the entire wall structure, electrical wiring and outlet boxes that create shock and fire hazards when wet, insulation material like fiberglass batts or blown cellulose that compresses and loses effectiveness, vapor barriers and moisture protection layers that prevent future intrusion, and adjacent wall cavities that moisture reaches through capillary action, often spreading several inches beyond the obvious damage zone where you see staining. A leak in one room can saturate the wall cavity and travel horizontally through open stud bays, damaging drywall several feet away from the original water source.
Professional inspectors commonly find compressed, mold-infested insulation that’s lost 50% or more of its R-value and now harbors active mold growth against studs and back of drywall. They discover wood rot in bottom plates and studs where prolonged moisture exposure has softened structural framing, requiring carpentry repairs before new drywall installation. Wet electrical outlets and wiring create immediate hazards. Water and electricity don’t mix, and compromised systems need licensed electrician evaluation before restoration. Failed vapor barriers with tears or detachment allow continued moisture intrusion from exterior walls or concrete foundations, meaning new drywall will just get wet again without addressing the source.
Professional assessment prevents the expensive mistake of hanging new drywall over hidden damage that continues rotting studs, growing mold, or compromising electrical safety. What looks like a simple drywall replacement often reveals problems that would have worsened silently, eventually creating structural failure, electrical fires, or health hazards that cost exponentially more to fix later.
The Flood Cut Method for Water Damaged Drywall Replacement
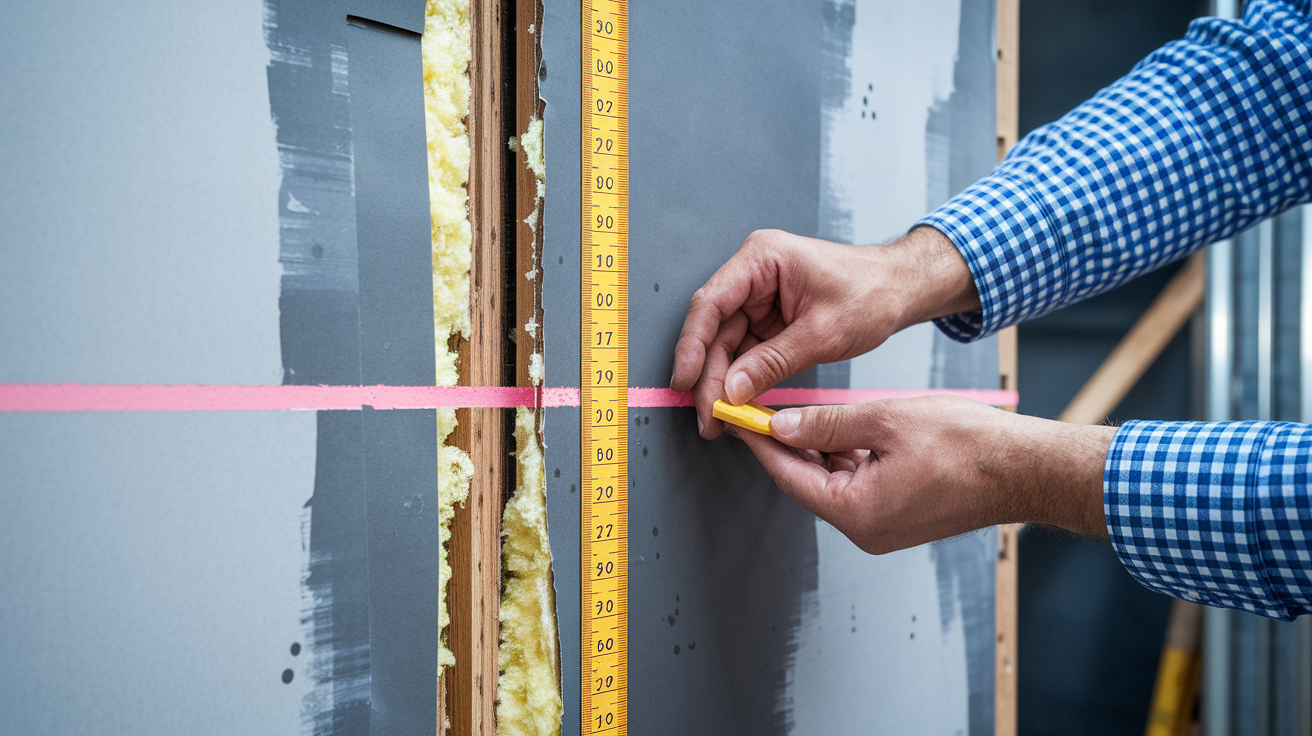
A flood cut is the strategic horizontal removal of drywall above the highest point of water damage, creating a clean, straight edge for replacement panels.
The standard flood cut height is 12 to 24 inches above the highest visible water staining, though severe flooding often requires cuts up to 4 feet above the water line. This margin accounts for capillary action that wicks moisture upward through porous gypsum and paper facing well beyond what you can see. Cutting at the visible damage line leaves saturated material in place that will grow mold and deteriorate. The cut height also creates practical advantages. 24-inch cuts allow removal of the bottom sheet of drywall while leaving the top section intact, and 4-foot cuts align with standard drywall sheet dimensions, creating seams at convenient heights for taping and finishing.
Complete wall replacement becomes necessary in about 25% of water damage cases when saturation is extensive, damage reaches ceiling level, mold growth is widespread throughout the cavity, or structural framing has deteriorated. Trying to save a heavily damaged wall by cutting high and leaving small sections in place costs more in labor and creates weak points where old and new material meet. When replacement costs approach the price of full removal anyway, complete replacement gives you a blank slate and eliminates any question about hidden damage remaining.
Ceiling water damage follows different rules because gravity works against you. Water saturates ceiling drywall from above, sagging the material as gypsum absorbs moisture and pulls away from fasteners. Unlike walls where water runs downward, ceiling water spreads outward in all directions from the leak source, potentially saturating large areas even from a small entry point. Wet ceiling drywall becomes a collapse hazard. The weight of saturated gypsum and insulation above can cause sudden failure. Any ceiling showing sag, bulging, or discoloration typically requires removal of the entire affected section plus a 12-inch margin in all directions because you can’t see how far moisture has spread across the horizontal plane above your head.
Step-by-Step Water Damaged Drywall Replacement Process

Professional water damaged drywall replacement moves through distinct phases over several days to weeks depending on damage extent and drying requirements.
Containment and Protection
Technicians seal the work area with heavy plastic barriers attached to ceiling and walls with tape, creating a contained zone that prevents dust, debris, and mold spores from spreading to unaffected rooms. They place plastic sheeting over floors and furniture, seal HVAC vents to prevent contamination of ductwork, and establish negative air pressure using fans and HEPA filters that exhaust air outside so airborne particles can’t escape the work zone.
Removal of Damaged Drywall
Workers cut along marked lines with utility knives or oscillating tools, removing screws and carefully pulling damaged sections away from studs without disturbing adjacent good material. They bag and dispose of mold-contaminated drywall as construction waste. This material cannot be recycled and must leave the property immediately to prevent spore spread. Removal exposes wall cavities for direct inspection of hidden damage.
Drying and Disinfection
Industrial dehumidifiers and air movers run continuously for minimum 48 to 72 hours, often longer for deep saturation or humid conditions. Technicians take daily moisture readings in studs, remaining drywall, and insulation, waiting until readings drop below 15% before proceeding. They apply antimicrobial treatments to wood framing and any remaining surfaces that contacted contaminated water. Final moisture verification with calibrated meters confirms the wall cavity is dry enough for enclosed new drywall.
Installation of New Drywall
In bathrooms, kitchens, basements, and other moisture-prone areas, professionals install purple-board or green-board moisture-resistant drywall with fiberglass facing instead of paper. They fasten sheets with proper screw spacing (12 inches on center for walls, 8 inches for ceilings), ensuring edges land on stud centers for solid backing. They stagger seams so vertical joints don’t align, creating a stronger finished wall.
Taping, Mudding, and Sanding
Technicians apply paper tape or fiberglass mesh over all seams, then cover with joint compound in three separate coats over three days. The first coat embeds the tape, the second feathers edges wider, and the third creates a smooth finish ready for texture. Sanding between coats removes ridges and high spots, creating a flat surface that disappears under paint.
Texture and Paint Application
If the existing wall has texture like orange peel or knockdown, they match it by applying thinned joint compound or texture spray, then letting it dry completely before sealing. Primer goes on first, especially over new joint compound that absorbs paint differently than drywall facing. Final paint coats seal everything, with edges feathered into existing paint for seamless appearance.
All professional restoration work follows IICRC S500 guidelines and EPA standards, meaning certified technicians document moisture readings, contain work areas properly, dispose of contaminated materials correctly, and verify complete drying before closure.
Cost Breakdown for Water Damaged Drywall Replacement

Total replacement cost depends on damage extent across square footage, location accessibility like high ceilings or tight spaces, and complications like mold remediation or structural repairs discovered during removal.
| Cost Category | DIY Range | Professional Range |
|---|---|---|
| Materials per sheet (4×8 standard) | $30-$70 | $30-$70 |
| Tools and supplies (tape, mud, screws, primer) | $300-$400 | Included in labor |
| Labor per hour | Your time | $40-$100 |
| Small project total (one room, 2-3 sheets) | $500-$800 | $1,200-$2,500 |
| Large project total (multiple rooms, 10+ sheets) | $2,000-$3,500 | $5,000-$15,000 |
DIY replacement requires days to weeks of your time depending on project size. Figure one full weekend minimum for a single-room flood cut with drying time, removal, installation, and three coats of joint compound spread across a week. Professional crews complete the same work in days instead of weeks, arriving with industrial equipment and trained teams that work efficiently. Your DIY cost savings disappear fast if mistakes require re-doing work, if you damage electrical or plumbing behind walls, or if inadequate drying leads to mold growth that requires professional remediation later. Hidden costs that appear during wall opening include mold remediation adding $1,500 to $4,000 for containment and HEPA filtration, wet insulation replacement running $2 to $4 per square foot, rotted studs requiring carpentry at $75 to $150 per hour, and compromised electrical systems needing licensed electrician inspection and repairs. Professional water damage restoration often proves cost-effective because crews identify and fix all problems in one mobilization, preventing the common DIY scenario where you replace drywall only to discover ongoing moisture intrusion or hidden damage that forces you to tear out new work and start over.
Insurance Claims and Documentation for Water Damaged Drywall

Homeowners insurance typically covers sudden and accidental water damage like burst pipes, appliance malfunctions, or roof leaks from storm damage, but excludes gradual damage from long-term leaks, lack of maintenance, or flooding from outside sources which requires separate flood insurance.
Essential documentation for insurance claims:
- Photos and videos of all damage from multiple angles before any cleanup or repairs begin
- Date and time of water event with written description of what happened
- Source of water intrusion clearly identified (burst pipe, roof leak, appliance failure, etc.)
- Receipts for emergency services like water extraction, temporary repairs, or hotel stays
- Contractor estimates and invoices showing scope of work and itemized costs
- Moisture readings and assessment reports from professional inspection documenting extent
Working with a restoration company simplifies the insurance process because experienced contractors know exactly what documentation adjusters require, they photograph and measure damage according to insurance standards, and they often communicate directly with your adjuster to negotiate scope and cost. The restoration company typically requires your deductible payment upfront, then bills insurance directly for the remaining balance after adjuster approval. Make sure any contractor you hire has experience working with insurance claims and can provide references from recent insurance restoration projects.
Most policies require claim filing within 48 to 72 hours of discovering damage, though reporting the incident immediately protects your coverage even if full documentation takes days to compile. Common coverage exclusions include flood damage from rising water or surface runoff. This requires separate FEMA flood insurance and isn’t covered under standard homeowners policies. Damage from neglect or lack of maintenance gets denied, so if a slow leak damaged drywall over months or years without repair attempts, the insurer argues you failed to maintain the property properly. Mold coverage is often limited or excluded entirely, with many policies capping mold remediation at $10,000 or requiring separate mold endorsements for full coverage.
Safety Concerns When Handling Water Damaged Drywall
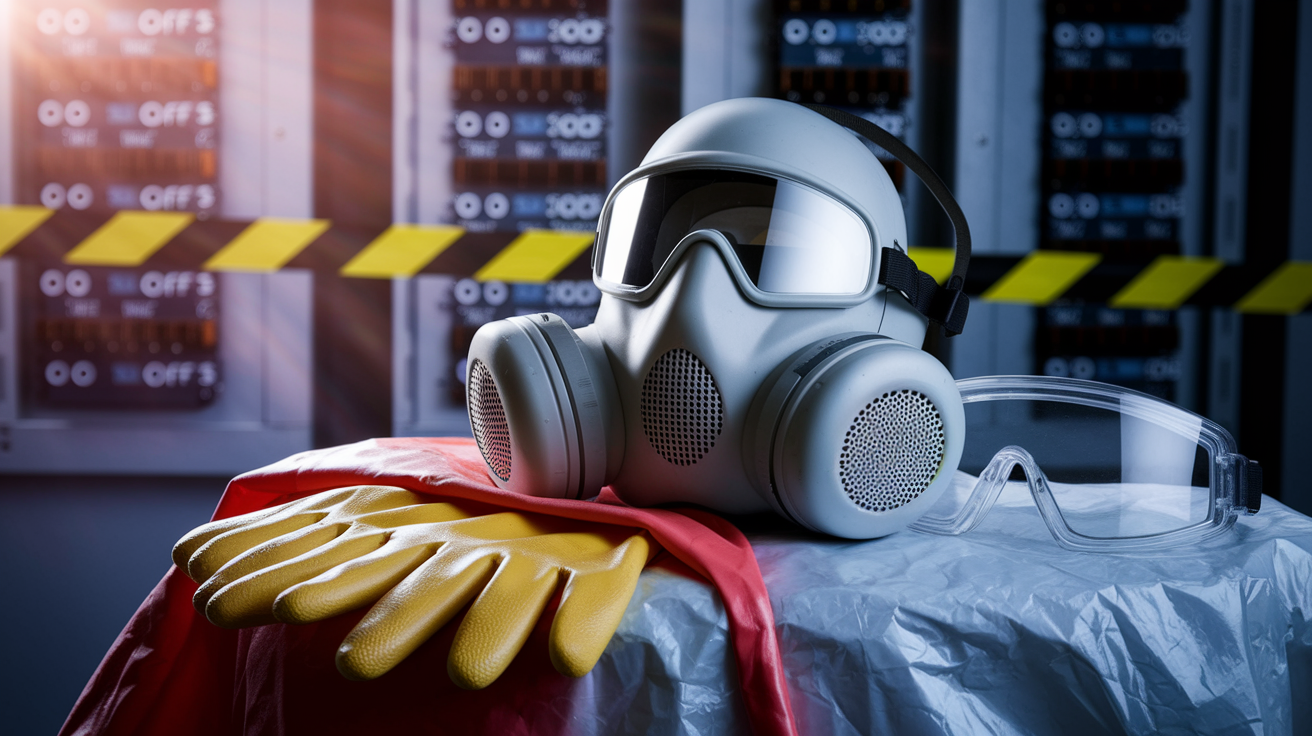
Electrical shock risk is the first safety concern with any water damage. Water conducts electricity, and wet drywall can create electrical pathways between wiring and metal studs or plumbing. Before touching any wet wall, shut off power to affected circuits at the main breaker panel. Don’t assume wet outlets are safe because the breaker didn’t trip. Ground faults and energized wiring can exist behind walls even when outlets appear dead. Leave power off until a qualified electrician inspects all wiring, outlets, and junction boxes exposed during drywall removal, confirms no short circuits or ground faults exist, and verifies safe restoration of power after drying.
Respiratory protection is mandatory during removal of mold-contaminated drywall. Standard dust masks don’t filter mold spores. You need N95 respirators minimum, or better yet, P100 filters rated for mold remediation. Disturbing moldy drywall releases thousands of spores into the air that you’ll breathe without proper respiratory protection. Work in well-ventilated areas with windows open and fans exhausting contaminated air outside, not recirculating it through the house. Disposable coveralls prevent spores from contaminating your clothing and spreading to other areas. If you start coughing, feeling dizzy, or experiencing breathing difficulty, stop work immediately, leave the area, and get fresh air.
Contaminated water handling requires full protective equipment including waterproof gloves, eye protection, and rubber boots because sewage contains harmful bacteria like E. coli and Salmonella, viruses like hepatitis and norovirus, and parasites that cause serious illness. Never touch sewage-contaminated materials with bare hands, avoid splashing that could contact eyes or mouth, and wash thoroughly with antibacterial soap after any exposure. When DIY becomes too dangerous for amateur handling: any sewage or toilet backup immediately requires professional remediation with proper containment, extensive mold growth covering more than 10 square feet needs professional HEPA equipment and containment, structural compromise like rotted studs or sagging framing requires licensed contractors and engineering assessment, and electrical damage beyond simple outlet replacement needs licensed electrician expertise.
Climate Impact on Drying and Replacement Decisions
Humid climates slow evaporation rates dramatically because air already saturated with moisture can’t absorb more water vapor from wet building materials. Summer humidity above 60% means drywall takes twice as long to dry compared to arid conditions, and that extended wet time increases mold growth likelihood. Running dehumidifiers becomes essential instead of optional, and even then, complete drying might take weeks instead of days. High humidity areas often push toward replacement rather than attempted salvage because the environmental conditions work against successful drying within the critical mold-prevention window.
Cold temperatures create freeze-thaw cycles that make water damage worse over time. When wet drywall experiences freezing conditions (common in unheated basements or exterior walls during winter), absorbed water expands as it freezes, physically tearing apart gypsum structure and separating paper facing from the core. Each freeze-thaw cycle causes progressive deterioration, and what might have been salvageable after initial water exposure becomes structurally compromised after temperature cycling. Cold also slows evaporation since water molecules move more slowly at low temperatures, meaning winter water damage takes longer to dry and gives mold more time to establish.
Well-ventilated spaces with natural airflow and low humidity offer the best chance for successful drying because moisture wicks from walls into moving air that carries vapor away from the surface. Poorly ventilated spaces like closed bathrooms, finished basements without windows, or walls with vinyl wallpaper that traps moisture create worst-case drying scenarios where moisture has nowhere to go even with fans running.
Climate factors often favor replacement over attempted drying because the combination of high humidity, temperature extremes, and poor ventilation means successful drying would require professional-grade equipment running for weeks at substantial cost, monitoring and assessment to verify complete moisture removal throughout the drying period, and risk that hidden moisture remains despite surface readings looking acceptable. At that point, replacement provides certainty. You’re starting with confirmed dry material instead of hoping you’ve successfully dried compromised material that may fail later.
DIY Water Damaged Drywall Repair Versus Professional Services
Evaluating whether to tackle drywall replacement yourself or hire professionals depends on honestly assessing damage complexity, your skill level with tools and finishing techniques, time availability to complete multi-day projects properly, and tolerance for potential mistakes that could cost more to fix than hiring professionals initially.
| Factor | DIY Appropriate | Professional Required |
|---|---|---|
| Water type | Clean water (supply line) | Gray or black water (sewage, flooding) |
| Damage extent | Single small area, partial wall | Multiple rooms, whole walls, ceilings |
| Mold presence | None or minimal surface spots | Growth behind walls, musty odor, coverage over 10 sq ft |
| Timeline | Flexible schedule, can work over weeks | Urgent situation, need rapid completion |
| Skills needed | Basic tool use, patience for finishing | Structural repairs, electrical work, advanced finishing |
| Cost | $500-$1,500 range acceptable | $3,000+ with hidden damage likely |
DIY makes sense for small, manageable scenarios like a single wall section in a bedroom from a clean water supply line leak that you caught within hours, where damage is limited to one or two drywall sheets, no mold growth is visible or suspected, the area is easily accessible without ladder work on high ceilings, and you have time over a week or two to properly dry, remove, install, tape, mud, sand, and finish new drywall while learning techniques through the process. Cosmetic imperfections matter less in closets, basements, or garages where you prioritize function over perfect appearance, and your budget truly limits options to DIY or living with damage.
Professional help becomes necessary when you’re dealing with contaminated water from sewage, toilet overflows, or outdoor flooding that requires containment and protective equipment beyond homeowner capability. Mold growth visible on surfaces or suspected behind walls from musty odors needs professional HEPA filtration and containment to prevent spreading spores throughout your home during removal. Electrical concerns like wet outlets, damaged wiring, or water near electrical panels require licensed electrician expertise before drywall work proceeds safely. Extensive damage across multiple rooms or whole walls turns DIY into a months-long project that professionals complete in days with crews and industrial equipment. Structural issues like rotted studs, sagging framing, or compromised floor joists need contractor assessment and carpentry repairs before drywall installation. Time constraints from urgent situations like selling a home, returning after evacuation, or preventing further damage mean professional speed justifies the cost difference. Hidden damage discoveries like wet insulation, damaged HVAC ducts, or compromised plumbing behind walls expand simple drywall jobs into complex projects requiring multiple trades (electricians, plumbers, HVAC techs) that only licensed contractors can coordinate properly.
Preventing Future Water Damage to Drywall
Prevention costs a fraction of replacement expenses and avoids the disruption, health concerns, and stress of dealing with water damage and mold growth.
Interior Prevention:
- Install and maintain basement dehumidifiers keeping humidity below 50% year-round to prevent condensation on cool surfaces
- Insulate pipes in unheated spaces like crawlspaces, attics, and exterior walls to prevent freeze damage and condensation
- Repair plumbing leaks immediately when you notice drips, water stains, or increased water bills signaling hidden leaks
- Use moisture-resistant drywall (purple-board or green-board) in bathrooms, kitchens, laundry rooms, and basements where humidity is consistently elevated
- Ensure proper bathroom and kitchen ventilation with exhaust fans vented outside (not into attics) running during and 15 minutes after showers or cooking
- Monitor appliance hoses and connections on washing machines, dishwashers, water heaters, and refrigerator ice makers annually, replacing any showing wear or age beyond manufacturer recommendations
Exterior Prevention:
- Keep gutters and downspouts clear of debris with twice-yearly cleaning, and extend downspouts minimum 6 feet from foundation to direct water away from basement walls
- Seal foundation cracks and gaps with hydraulic cement or polyurethane sealant before water intrusion occurs
- Grade soil away from foundation with 6-inch drop over 10 feet so surface water runs away from the house instead of pooling at walls
- Inspect and maintain roof flashing around chimneys, vents, and valleys where leaks commonly develop
- Test sump pump operation seasonally by pouring water into the pit to confirm activation and discharge, and consider battery backup for power outage protection
Schedule annual inspection routines each spring after winter freeze-thaw cycles and each fall before winter. Walk your property looking for early warning signs like minor water stains that could indicate slow leaks, cracks in foundation or grout that could admit moisture, rust stains on water heaters or under sinks suggesting corrosion before failures, and soft spots in caulking around tubs and showers where water could penetrate walls. Catching small problems early prevents major water damage events that require drywall replacement and costly restoration.
When Recurring Water Damage Signals Bigger Problems
Repeated water damage appearing in the same location tells you the underlying cause hasn’t been fixed. You’re treating symptoms instead of solving the problem. Foundation cracks that let groundwater seep through during rain, chronic plumbing leaks from corroded pipes that temporarily patch but continue failing, roof drainage problems where gutters overflow in the same spot, or grading issues that direct surface water toward your basement all create cycles where water finds the same vulnerable entry point repeatedly. Each occurrence causes cumulative damage, and eventual costs exceed what permanent solutions would have required initially.
Temporary fixes create expensive, frustrating cycles where you patch drywall, paint over stains, and hope this time it’s solved. Until the next rain or plumbing failure brings water back to the same spot. You waste money on repeated small repairs that never add up to a solution, your drywall develops permanent weakening and discoloration that compounds with each event, and stress builds from never knowing when the next water intrusion will occur. Eventually you’re replacing the same section of wall multiple times instead of investing once in fixing the actual problem.
Building code compliance and property disclosure become issues when recurring water damage indicates known defects. Many jurisdictions require moisture barriers and proper drainage for habitable spaces, and repeated water intrusion suggests code violations that could complicate refinancing or sale. If you sell property with known recurring water damage history without disclosing it, buyers can sue for fraud when problems reappear. Home inspection reports flag repeated repairs in the same location as red flags requiring investigation, potentially killing sales or forcing price reductions that exceed repair costs.
Comprehensive permanent solutions require upfront investment but eliminate recurring expenses and damage. Foundation crack injection with polyurethane or epoxy seals structural openings permanently instead of surface patching that fails under hydrostatic pressure. Whole-house re-piping replaces corroded supply lines causing repeated leaks instead of patching individual failures as they occur. French drain installation or exterior waterproofing solves chronic basement seepage by managing groundwater before it reaches foundation walls. Roof replacement addresses underlying structural problems instead of patching individual leaks that migrate to new locations. These solutions cost more initially but provide decades of protection and preserve your home’s value instead of slowly destroying it through repeated water damage cycles.
Final Words
Does water damaged drywall need to be replaced? In most cases, yes.
Once you spot soft texture, mold growth, or exposure beyond 48 hours, replacement is your safest bet. Clean water caught within 24 hours might be salvageable with aggressive drying, but that’s the exception.
Don’t gamble on hidden mold or structural damage just to save a few sheets of drywall. Quick action, honest assessment, and knowing when to call a pro will protect your home and your health.
You’ve got this.
FAQ
What happens if you don’t replace wet drywall?
If you don’t replace wet drywall, mold growth begins within 24 to 48 hours, paper facing delaminates, the gypsum core crumbles, and structural integrity is permanently lost, creating ongoing health hazards and eventual collapse.
How long does it take for mold to grow on wet drywall?
Mold grows on wet drywall within 24 to 48 hours once moisture seeps into wall cavities. Common species like Aspergillus and Cladosporium colonize quickly in damp, porous conditions.
Can drywall still be used if it gets wet?
Drywall can still be used if it gets wet only when clean water exposure is under 24 hours, moisture is minimal, and professional drying equipment removes all saturation without mold or structural compromise.
Will wet drywall grow mold?
Wet drywall will grow mold if moisture remains for 24 to 48 hours. The porous gypsum core and paper facing trap moisture in wall cavities, creating ideal conditions for rapid mold colonization.
How far above visible water damage should you cut drywall?
You should cut drywall 12 to 24 inches above visible water damage using the flood cut technique. This margin eliminates all saturated material drawn upward through capillary action beyond what you can see.
Is moisture-resistant drywall necessary after water damage?
Moisture-resistant drywall is necessary after water damage in bathrooms, kitchens, basements, and any area prone to repeated moisture exposure. It provides better long-term protection than standard drywall in vulnerable locations.
What tools do professionals use to detect hidden water damage?
Professionals use pin-type and pinless moisture meters, infrared thermal imaging cameras, hygrometers measuring wall cavity humidity, and invasive inspection methods to detect hidden water damage behind walls and in structural components.
Does homeowners insurance cover water damaged drywall replacement?
Homeowners insurance covers water damaged drywall replacement when damage results from sudden, accidental events like burst pipes. Gradual leaks, flood damage, and neglect are typically excluded from standard coverage.
How long does professional drywall replacement take after water damage?
Professional drywall replacement takes several days to two weeks after water damage, depending on damage extent, required drying time, number of finish coats, and whether mold remediation or structural repairs are needed.
When should you call a professional instead of DIY drywall replacement?
You should call a professional instead of DIY drywall replacement when water is contaminated, visible mold is present, electrical wiring is affected, damage exceeds 4 feet in height, or structural integrity is compromised.
What PPE is required when removing water damaged drywall?
PPE required when removing water damaged drywall includes N95 or P100 respirators for mold spores, safety goggles, waterproof gloves, long sleeves, and disposable coveralls, especially when handling contaminated water or mold-infested materials.
Can you paint over water damaged drywall instead of replacing it?
You cannot paint over water damaged drywall instead of replacing it. Paint traps moisture and mold behind the surface without addressing structural deterioration, delaying inevitable replacement while health hazards worsen.