
Ever watch water drip straight down your fascia from a spot that should be bone-dry? That’s your end cap failing, and it’s more common than you’d think. The good news: most gutter end cap leaks come down to old sealant giving up after years of weather beating. You don’t need a contractor for this. With the right sealant, some prep work, and about an hour, you can stop that drip before it rots your fascia or stains your siding.
Diagnosing and Repairing Your Leaking Gutter End Cap

Water dripping where the end cap meets the gutter body, dark stains running down your fascia, a little pool forming right at the closed end. These are your signs. You’ll probably notice it after a heavy rain, or catch the drip mid-storm when water’s hitting hardest. Either way, you can’t ignore it for long.
Most of the time, the problem is adhesive failure. The sealant that used to bond the cap to the gutter has broken down from years of temperature changes, UV exposure, and freeze-thaw cycles. Metal expands and contracts with the seasons, and eventually those tiny movements create gaps that let water escape.
Before you grab supplies, run through this quick diagnostic:
1) Check leak location relative to the downspout. If the leaking cap sits within 2 feet of where the downspout connects, your downspout’s probably clogged and forcing water backward. If the cap’s far from the downspout outlet, you’re likely dealing with wrong pitch that’s sending water the wrong direction.
2) Look for standing water inside the gutter after rain stops. Puddles that sit instead of draining mean pitch or drainage problems that resealing alone won’t fix.
3) Inspect the cap itself for visible damage. Check for cracks in the cap material, separation gaps between cap and gutter body, or crimped edges that’ve pulled loose.
4) Check for debris packed near the end cap. Leaves, twigs, or granules from roof shingles can dam up water and force it past even a good seal.
Quick resealing fix for most leaks starts by clearing visible debris from around the cap. Wipe the joint area dry with a clean rag. If it’s actively wet from recent rain, wait for it to dry or speed things up carefully with a propane torch held 6 to 8 inches away for just a few seconds. Load quality gutter sealant like Geocel 2320 or a butyl rubber type into your caulk gun. Apply a continuous, generous bead along the joint where the cap meets the gutter, working both the interior seam (inside the gutter) and the exterior edge (visible from outside). Run a gloved finger along the bead to press sealant into any gaps and smooth the surface. Let it cure undisturbed for 24 to 48 hours before the next rainfall.
Material selection matters more than you’d think. Weather-resistant sealants rated specifically for aluminum gutters and outdoor exposure last 10 to 20 years under normal wear. Cheap all-purpose caulk starts cracking and peeling within months, and you’ll be back on the ladder doing this again by next spring. If the crimped edge where the cap wraps around the gutter has pulled loose, press it back firmly with pliers before you seal. Otherwise you’re just covering a gap that’ll keep opening.
This straightforward resealing stops about 70 to 80 percent of end cap leaks. But if water still drips after your sealant has fully cured, or if your diagnostic flagged standing water and pitch issues, you’re looking at system level repairs. The cap seal is only doing its best to hold back water that shouldn’t be flowing there in the first place.
Tools and Materials Required for End Cap Repair

Having everything ready before you climb the ladder prevents frustrating mid-project runs to the hardware store. Gather your supplies, set them in a bucket you can hang from the ladder, and you’ll move through the repair smoothly.
You’ll need:
Stainless steel wire brush (not a standard steel brush since stainless won’t leave rust particles behind), standard caulk gun (the ratchet type, not the cheap squeeze kind), gutter sealant like Geocel 2320 or butyl rubber sealant rated for outdoor aluminum use, putty knife or plastic scraper (metal scrapers can gouge softer aluminum), clean rags (at least three since you’ll go through them), work gloves (nitrile or rubber to keep sealant off your hands), safety glasses (old sealant flakes off unpredictably), sturdy ladder with stabilizer bar (keeps ladder off gutters, preventing dents). Optional but useful: small propane torch for drying hidden moisture in seams.
For the sealant itself, don’t compromise. Look for products labeled with UV resistance and waterproofing properties designed specifically for gutter systems. Roofing cement works in a pinch for emergency situations, but it stays tacky and collects dirt, turning into a maintenance headache within a season. Quality gutter sealants cure to a flexible, paintable finish that moves with temperature changes without cracking. Butyl rubber and advanced polymer formulations both work well. Just confirm the label says “aluminum gutters” and shows a 10 year or longer lifespan. A single tube runs $8 to $15 and handles multiple end caps, so there’s no reason to go cheap.
Inspection and Surface Preparation for Effective Repairs

Inspection tells you whether you’re fixing just the cap seal or uncovering a bigger issue that needs attention. Start by looking for standing water inside the gutter. If it’s sitting there hours after rain stopped, your pitch is wrong or your outlet is blocked. Check whether debris is packed near the end cap or clogging the outlet section near the downspout. Inspect the cap closely for cracks in the material or visible separation from the gutter body where the crimped edge has pulled away. Look at your fascia board behind the leak for soft spots, dark staining, or peeling paint. Signs that water’s been running down for a while. The best time to inspect is right after a heavy rain, when active leaks are obvious and you can see exactly where water’s escaping.
Surface preparation matters more than most people realize. Old sealant residue, aluminum oxidation, and trapped moisture all prevent new sealant from bonding properly. Skip the prep work, and your “repair” might fail within weeks even though it looked good when you finished. Aluminum gutters form a white or gray powdery oxidation layer that feels slightly chalky. This has to come off completely. Steel gutters develop rust formation instead, showing as orange or reddish flaking. Either way, bare metal is your goal.
Complete cleaning and prep sequence:
1) Remove all debris and standing water from the gutter section. Scoop it out by hand or with a small plastic scoop. Don’t just push it toward the downspout. Get it out of the gutter entirely.
2) Scrub the end cap joint thoroughly with your stainless steel wire brush. Work the brush back and forth along the seam until you see bare metal shining through on both the gutter edge and the inside surface of the cap. Pay extra attention to the corners where the cap wraps around. That’s where leaks start.
3) Remove all old sealant residue with your putty knife or scraper. Peel off the old bead, even if it looks mostly intact. You’re bonding to metal, not old caulk.
4) Wipe the entire joint area clean with a dry rag to remove oxidation powder, loose metal particles, and any remaining dust from the wire brushing. If the rag comes away gray or white, keep wiping until it stays clean.
5) Optional but recommended: use your propane torch briefly to evaporate hidden moisture in the seams. Hold the flame 6 to 8 inches away and sweep it along the joint for 5 to 10 seconds per area. You’ll see moisture vapor rising. Don’t overheat vinyl gutter systems or get the flame near wood fascia. Just a quick pass to dry things out.
Wait for complete dryness before you apply sealant. At least 24 hours after rain if you’re not using the torch method. Aluminum oxidation powder can hide moisture underneath, and if you seal over dampness, the sealant won’t stick. You’ll think you fixed it, then watch it fail after the first rainstorm. If you’re seeing separation in the crimped edges where the cap wraps the gutter end, that’s a sign the connection has been working loose for a while. Press those edges back into place with pliers before sealing, or you’re just temporarily covering a gap that’ll keep opening.
Replacing a Damaged End Cap Completely

Sometimes resealing isn’t enough. If your end cap has a visible crack running through the material, heavy rust formation eating through steel, or crimped edges that are torn or completely missing, you’re looking at full replacement. Caps take direct hits from falling branches, ice buildup, and ladder impacts. They’re more fragile than they look.
Start removal by carefully working a putty knife under the crimped edge where the cap wraps around the gutter end. Pry gently, working your way around the perimeter. If someone installed the cap with pop rivets (small metal fasteners visible as round bumps), drill those out with a 1/8 inch bit. Once the cap pulls free, clean the gutter end thoroughly with your wire brush, removing all old sealant, oxidation, and debris. You want bare metal for the new cap to bond against.
Installation is straightforward if you work methodically. Apply a continuous bead of gutter sealant around the entire edge of the gutter end. Make it generous, because excess will squeeze out and you can wipe it away. Press your new cap firmly into place, seating it evenly so it sits flush against the gutter. Now work around the perimeter with pliers or a crimping tool, pressing the cap’s edge down against the gutter in small increments. Don’t try to crimp one section completely before moving to the next. Go around twice, tightening gradually to avoid warping the cap. Add an extra bead of sealant over the crimped edge on the outside for redundancy. For 6 inch gutters or if you want extra security, add one or two pop rivets through the cap into the gutter end, spacing them evenly.
New caps run $3 to $10 each for standard aluminum gutters at any hardware store. Make sure you match the cap to your gutter style. K-style (the common shape that looks like crown molding from the front) uses different caps than half-round gutters. For vinyl systems, you’ll find color-matched caps that snap into place. If you have copper materials, buy copper caps. Mixing metals causes galvanic corrosion where the different materials touch, and you’ll end up with worse problems than you started with.
Fixing Improper Gutter Pitch That Causes End Cap Leaks
Here’s the thing about end caps. About 50 percent of them never leak, because they sit at the high end of the gutter where water slopes away from them. If your end cap is leaking and it’s nowhere near the downspout, the water flowing past it shouldn’t be there. Your gutter pitch is wrong, sending water backward.
Proper pitch requires a minimum quarter inch drop for every 10 feet of gutter run, sloping down toward the outlet section where the downspout connects. That’s not much. Barely noticeable to the eye. But it’s enough to keep water moving instead of pooling. Too little slope and water sits. Too much slope and water rushes past the outlet without draining, continuing on to overwhelm the end cap.
Check your pitch by placing a long level on the gutter bottom near the end cap. Measure the drop over a known distance. 10 feet is ideal. If you’re seeing less than a quarter inch of drop per 10 feet, or if the gutter actually slopes upward toward the outlet (yes, this happens), you’ve found your problem. Pour a small amount of water in at the end cap and watch where it flows. It should head directly toward the downspout without pooling or reversing direction.
To adjust pitch, you’ll need to raise the end cap end of the gutter. Start by loosening the hanging brackets or ferrules that secure the gutter to the fascia board. Don’t remove them completely, just back the screws out a few turns. Work from the end cap toward the downspout, raising the high end incrementally and checking your pitch as you go. Once the slope looks right, re-tighten all the securing hardware firmly. If your hangers are spaced more than 24 inches apart, that’s part of your sagging problem. Add more hangers while you’re adjusting to support the gutter properly.
| Gutter Length | Minimum Drop Required |
|---|---|
| 10 feet | 0.25 inches |
| 20 feet | 0.50 inches |
| 30 feet | 0.75 inches |
| 40 feet | 1.00 inch |
This adjustment is moderately difficult for DIY. You’re working on a ladder, handling the weight of the gutter, and eyeballing small measurements. If you’re uncomfortable with it or if the gutter has sagged badly between hangers, professional installation runs $4 to $6 per linear foot and comes with the assurance that the pitch is correct and the hangers are properly spaced and secured.
Clearing Clogs That Force Water Past End Caps

If your end cap is leaking and it sits within a couple feet of the downspout, stop looking at the cap. Your downspout is clogged. Water’s backing up along the gutter and finding the easiest escape route, which is often the end cap seam, even if you just resealed it yesterday. No amount of sealant will hold back water that’s being forced sideways by pressure from a blockage.
The mechanism is simple but destructive. When the outlet section or downspout is blocked with leaves, granules from asphalt shingles, or a bird nest (yes, really), water has nowhere to go. It backs up along the gutter, rising higher until it finds a weak point. End caps are vulnerable because they’re just thin metal crimped and sealed around the gutter end. Heavy rainfall events create serious pressure, and even a well-sealed cap can be overwhelmed if the system can’t drain.
Clear the blockage from the top down.
Start by scooping debris out of the gutter itself, beginning at the end cap and working toward the outlet section. Get everything out. Wet leaves pack down like concrete. Flush the gutter with a garden hose, watching water flow toward the downspout. If it pools or drains slowly, keep clearing. Snake the downspout if water isn’t draining. Feed a plumber’s snake or stiff wire down from the top, or work up from the bottom. Check underground drains if you have them. Blockages can occur where the downspout connects to buried drainage pipe. Install gutter guards to reduce future debris accumulation. They don’t eliminate cleaning but they make it less frequent.
Ice formation during freeze-thaw cycles can create blockages that are hard to spot. Water freezes in the outlet section or at the downspout entrance, creating a solid barrier. When the next rain or snowmelt arrives, it can’t drain, and you get overflow at the end caps even though no leaves are visible. If you’re seeing leaks in winter or early spring, suspect ice before you start tearing apart your seals. Residential maintenance should include biannual cleaning. Once in late spring after tree pollen and seed pods finish falling, and again in late fall after leaves drop. Waiting until you see overflow means you’ve already got damage happening.
Temporary Fixes for Emergency End Cap Leaks
You’re watching water pour from your end cap during a storm, it’s Saturday night, and the hardware store opens Monday. Or the cap started leaking mid-November and snow’s coming. You need to stop the water damage now and plan a proper fix when conditions allow.
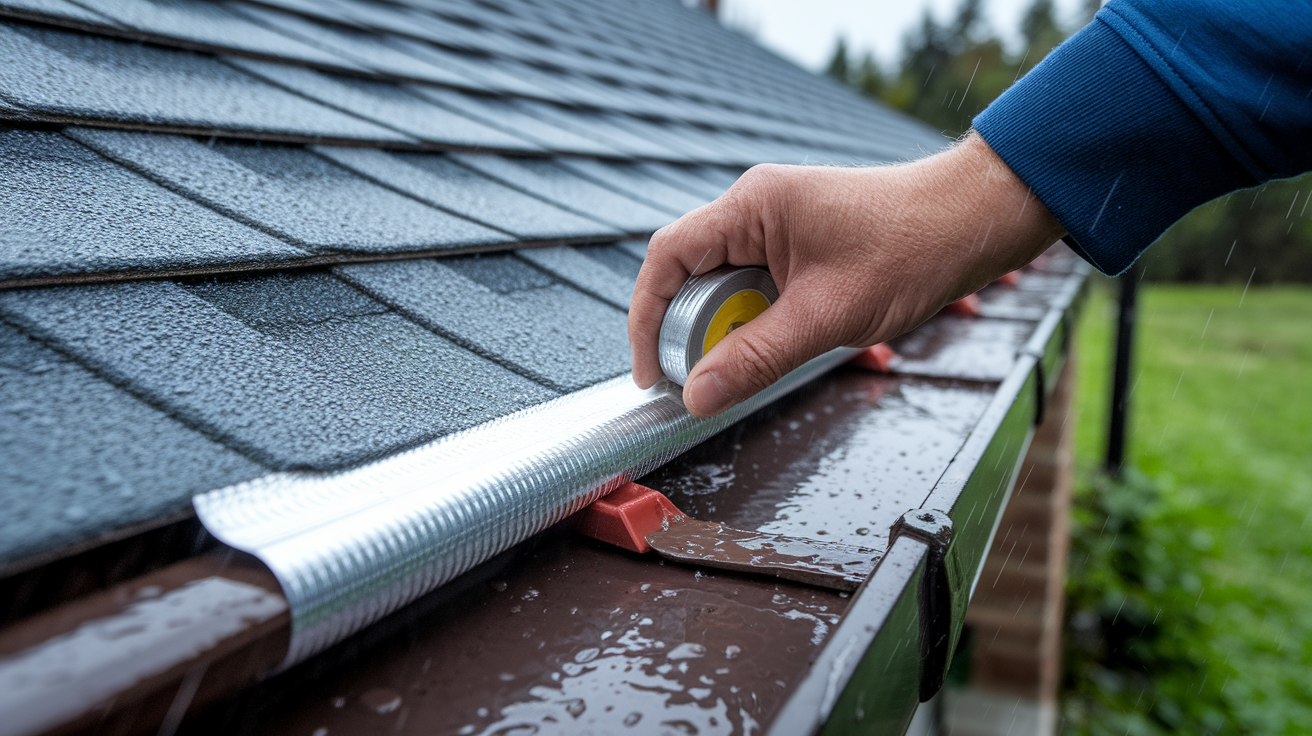
Temporary solutions aren’t elegant, but they buy you time. The goal is stopping water from reaching your fascia board and foundation, even if the fix looks rough. Start by pressing butyl rubber tape directly over the leaking seam from the outside. The sticky kind sold for roof repairs. Overlap it a couple inches beyond the leak on both sides and press firmly to bond. If you don’t have butyl tape, apply a thick bead of roofing cement directly over the gap, spreading it with a putty knife to cover the entire seam area. You can also use exterior-grade silicone caulk if that’s what you have. Just understand it won’t last beyond a few weeks. Some people reach for waterproof aluminum tape as a temporary barrier. It works, but only if the surface is completely dry when you apply it.
These methods give you maybe one to two weeks maximum before they start degrading, and that’s in good weather. Heavy rainfall will test even the best temporary patch. If you’re still seeing drips, place a bucket below the leak to catch water and protect your fascia board and foundation from constant soaking. The temporary fix is about damage control and planning. It’s not a repair, just a delay tactic until you can address the real problem. Whether that’s cleaning a clogged downspout, resealing properly with quality materials, or adjusting pitch, the permanent fix needs to happen soon. Temporary patches don’t address root causes. They just keep water from pouring into places where it causes immediate harm.
Preventing Future End Cap Leaks Through Maintenance

Prevention costs less and takes less effort than repair. A well-maintained gutter system can go years between serious problems, while neglected gutters become an endless cycle of emergency fixes.
Basic preventive actions that work:
Clean gutters twice yearly, once in spring after tree pollen and seed pods finish, and again in late fall after leaves drop completely. Inspect all seams and end caps during cleaning, looking for gaps, loosening crimps, or early signs of sealant cracking. Reseal any suspicious joints before leaks start. Catching it early means the repair is simple. Check gutter slope annually by pouring water in and watching flow direction, adjusting if water pools or drains sluggishly. Trim overhanging branches to reduce debris accumulation and prevent direct hits from falling limbs. Install gutter guards to minimize maintenance. They don’t eliminate cleaning but cut frequency in half.
Seasonal preparation matters more than most people realize. Inspect before winter arrives to catch any issues before freeze-thaw cycles make them worse. Ice formation can tear seals apart overnight, and by the time you notice in spring, you’ve got water damage happening inside walls. Check again after spring storms. High winds and heavy rain can loosen securing hardware, creating new gaps at end caps and seams. If something shifted during storm damage, you want to catch it before summer thunderstorms arrive.
Your monitoring schedule doesn’t need to be complicated. Walk your home’s perimeter after any significant rainfall, looking for drips, stains developing on fascia board, or water pooling near the foundation. A quick lap around the house takes five minutes and spots problems when they’re still minor. Address small issues immediately. A little sealant applied to a barely-visible crack prevents the crack from spreading into a full leak. Think of it like checking tire pressure: small effort, big payoff in avoiding larger problems. Quality sealants include protective coatings with UV resistance built in, but even the best formulations degrade over 10 to 15 years. Plan to inspect and touch up your end cap seals every 5 years or so, even if you don’t see active leaks. This keeps your drainage system functioning properly for decades.
Understanding Water Damage Risks from Leaking End Caps

A small drip seems harmless until you see what it does over time. Water running down from a leaking end cap doesn’t just disappear. It goes somewhere, and that somewhere is usually into materials that deteriorate when constantly wet.
Immediate risks show up within months. Your fascia board (the wooden trim board the gutter mounts to) starts staying damp. Wood that stays wet develops rot, turning soft and spongy. What started as solid lumber becomes structural weakness you can push your finger through. Soffit material behind the leak point soaks up moisture, staining and warping. Exterior paint on your siding below the leak bubbles and peels as water runs down the wall. The staining spreads outward from the drip point, creating dark streaks that announce “water problem” to anyone who looks. These repairs add up fast. Replacing even a short section of fascia board means carpentry work, new material, and repainting.
Foundation protection is the bigger concern. When water pours off a leaking end cap instead of flowing through the downspout to proper drainage, it lands right at your home’s base. A few gallons per rainstorm doesn’t sound like much until you multiply it by every storm for a season. The soil around your foundation stays saturated, creating pressure that pushes water toward your basement. Landscape erosion develops around plantings, washing away mulch and soil. Basement flooding risk climbs when water undermines the foundation drainage systems that are supposed to keep your basement dry. Foundation repairs are exponentially more expensive than gutter fixes. You’re talking thousands instead of tens of dollars.
Interior consequences develop when water finds its way behind siding and through wall penetrations. Mold growth starts in walls where moisture accumulates but air doesn’t circulate. That musty smell in the corner of a room? Could be mold colony growing on damp drywall behind your paint. If you’re facing a home sale, visible water damage reduces your home value and raises questions during inspection. Even worse, insurance claims can get complicated if an adjuster determines the damage came from preventable maintenance neglect rather than a sudden covered event. For additional guidance on managing water intrusion and damage, see this water damage restoration basics overview. Early intervention stops one small problem before it cascades into damage affecting multiple systems.
Cost Breakdown for End Cap Leak Repairs

Knowing what repairs cost helps you budget and decide whether to DIY or hire out the work. The good news: end cap repairs are among the least expensive gutter issues you’ll face.
DIY costs stay low if you already own basic tools. Gutter sealant runs $8 to $15 per tube, and one tube handles multiple end caps with material left over. Replacement end caps cost $3 to $10 each for standard aluminum gutters, though copper materials jump to $15 to $30 per cap. If you need to buy the wire brush and putty knife, add another $10 to $15. Total investment for a straightforward resealing job typically lands under $30 to $50, even if you’re starting from scratch with no tools. The main cost is your time. Figure 30 to 60 minutes per cap including prep, application, and cleanup.
Professional costs scale with complexity. A service call for simple resealing typically runs $75 to $150, which includes the technician’s time, materials, and the assurance that surface prep was done correctly. Full end cap replacement installed costs $50 to $100 per cap when you factor in the service call. More expensive per unit than DIY, but you’re paying for expertise and liability insurance if something goes wrong. Pitch adjustment is the bigger ticket item at $4 to $6 per linear foot because it involves repositioning and re-securing the entire gutter run. Replacing a damaged gutter section entirely ranges from $15 to $25 per linear foot installed, which becomes the right choice when you’re facing recurring leaks from deteriorated metal or when transitioning to seamless gutters to eliminate seam problems permanently.
| Repair Type | DIY Cost | Professional Cost |
|---|---|---|
| Resealing end cap | $8-15 | $75-150 |
| End cap replacement | $3-10 per cap | $50-100 per cap |
| Pitch adjustment | $0 (DIY labor) | $4-6 per linear foot |
| Gutter section replacement | $50-100 (materials only) | $15-25 per linear foot installed |
Check whether warranty coverage applies if your gutters were installed recently. Many contractors include a 1 to 3 year workmanship warranty that covers leaks developing from installation errors. Quality materials cost slightly more upfront but deliver significantly better longevity, making them cheaper over time. A $15 tube of premium sealant that lasts 15 years beats a $6 tube that fails in 18 months and requires doing the repair again. Material choice affects cost too: vinyl systems are the cheapest option, aluminum gutters sit mid-range for cost and durability, and copper commands premium pricing but can last 50-plus years with proper maintenance.
When to Call a Professional for End Cap Problems
Some situations call for professional help, whether for safety reasons or technical complexity beyond typical DIY capability.
Safety concerns should guide your decision first. Working above single-story height (roughly 12 to 15 feet) increases fall risk significantly, especially when you’re handling tools, sealant guns, and trying to position yourself for good access to the gutter. Unstable ladder positioning happens when the ground is soft, sloped, or when you’re reaching too far sideways to avoid moving the ladder. Working alone without someone to steady the ladder or call for help if something goes wrong adds risk. Physical limitations are real too. If climbing and balancing on a ladder makes you uncomfortable or if you have mobility or balance issues, the potential injury isn’t worth the modest savings of DIY.
Technical complexity is the other major factor. If multiple end caps are leaking across different sections of your home, you’re looking at system-wide pitch problems that require repositioning the entire gutter run and confirming proper slope. Sagging gutters pulling away from the fascia board signal either rotted wood behind the gutter or improperly secured hangers. Both need professional assessment of the structural mounting. Damaged or rotted fascia requires carpentry skills and matching wood repairs before the gutter can be properly secured. If your gutters are incorrectly sized for your roof runoff (too narrow for the water volume during heavy storms), you need professional measurement and potentially full replacement with larger capacity gutters. Recurring leaks after you’ve already attempted DIY repairs suggest an underlying cause you’re not seeing.
Professional installation makes sense in several scenarios. Transitioning to seamless aluminum gutters eliminates future seam problems entirely since the gutter runs continuously from end cap to downspout with no joints to leak. Adding capacity by upgrading from 5 inch to 6 inch gutters helps homes in high-rainfall areas handle storm volume. Integrating new flashing or drip edge requires coordinating gutter work with roofing components. Working on multi-story homes where fall hazards are significant (anything above 20 feet) is best left to professionals with proper safety equipment, lift access, and liability insurance covering fall accidents. Some manufacturer warranties require professional installation to remain valid, so check your documentation before deciding. The cost difference between DIY and professional is real, but so is the difference in outcome when the job requires expertise you don’t have or risks you shouldn’t take.
Final Words
A gutter end cap leaking isn’t something to ignore.
Whether you’re resealing a loose joint, replacing a cracked cap, or adjusting pitch to fix drainage flow, you now have a clear plan that works.
Most fixes take under an hour and cost less than $50 in materials. That’s way better than dealing with fascia rot or foundation problems down the road.
If you caught standing water or pitch issues during your inspection, tackle those next. They’re the real reason leaks keep coming back.
And if the job feels too high or too risky, call a pro. No shame in that.
FAQ
How do you fix a leaking gutter end cap?
You fix a leaking gutter end cap by cleaning the joint thoroughly with a wire brush, removing old sealant and debris, then applying a generous bead of weather-resistant gutter sealant like Geocel 2320 along both interior and exterior seams where the cap meets the gutter body. Allow 24-48 hours cure time before rain exposure.
Do gutter end caps need to be sealed?
Gutter end caps need to be sealed because they close the open end of the gutter channel and rely on sealant to create a watertight bond between the cap edge and gutter body. Without proper sealing, water escapes through gaps at the joint, causing drips that damage fascia boards and foundations.
How do gutter end caps prevent leaks?
Gutter end caps prevent leaks by closing off the terminal end of the gutter channel so water flows only toward the downspout outlet. When properly sealed and crimped to the gutter edge, caps create a watertight barrier. Caps installed on the high end naturally resist leaks because water slopes away from them.
How do you seal the end of a gutter?
You seal the end of a gutter by applying weather-resistant gutter sealant continuously along the joint where the end cap meets the gutter, covering both interior and exterior surfaces. Press the sealant into all gaps with a gloved finger, ensure the cap’s crimped edge is tight against the gutter, then allow full cure time.
What causes end cap leaks near downspouts?
End cap leaks within a couple feet of a downspout indicate the downspout connection is clogged, causing water to back up and escape through the cap seam. Clear debris from gutters and snake the downspout to restore proper drainage flow before resealing the end cap joint.
What does an end cap leak away from the downspout mean?
An end cap leak away from the downspout signals incorrect gutter pitch causing water to flow backward toward the capped end instead of draining properly. Check that gutters slope at least a quarter-inch per 10 feet toward the outlet, and adjust hanging brackets to correct reverse drainage.
When should you replace an end cap instead of resealing it?
You should replace an end cap instead of resealing when the cap has visible cracks, severe rust or corrosion damage, or the crimped edge connection is torn or completely separated from the gutter body. Resealing won’t hold if the cap’s structural integrity is compromised.
How long does gutter sealant last on end caps?
Gutter sealant lasts 5-20 years on end caps under normal weather conditions, depending on product quality and UV exposure. Weather-resistant sealants rated for aluminum gutters and outdoor use provide the longest service life, while cheap caulk fails within months due to temperature fluctuations and moisture.
Can you temporarily fix a leaking end cap?
You can temporarily fix a leaking end cap by pressing butyl rubber tape over the seam or applying roofing cement as an emergency barrier during storms. These quick fixes stop active water damage for 1-2 weeks maximum until you can complete proper cleaning, surface preparation, and permanent resealing.
Why does standing water in gutters cause end cap leaks?
Standing water in gutters causes end cap leaks by indicating improper pitch or clogged drainage that forces water backward toward the sealed end. When water can’t flow to the downspout, it finds weak points in the end cap seal and escapes, especially during heavy rainfall.
How much does professional end cap repair cost?
Professional end cap repair costs $75-150 for a service call to reseal leaking caps, $50-100 per cap for complete replacement and installation, or $4-6 per linear foot for pitch adjustment if drainage slope is causing the problem. DIY resealing typically costs under $30-50 for materials.
Should you use silicone or butyl sealant on gutter end caps?
You should use butyl rubber sealant or specialized gutter sealants like Geocel 2320 on end caps because they bond strongly to aluminum gutters and remain flexible through temperature changes. Standard silicone caulk lacks the durability and UV resistance needed for outdoor gutter applications exposed to constant moisture.