
You can seal a leaking gutter seam in about 30 minutes, but only if you pick the right product. Most DIY gutter repairs fail because homeowners grab whatever’s labeled “waterproof” at the hardware store without checking if it’s built for metal expansion, UV exposure, or the specific joint type that’s leaking. This guide shows you exactly which gutter seam sealer works for aluminum versus steel versus vinyl, how to prep the surface so it actually bonds, and the step-by-step application that stops water from dumping against your foundation.
What Gutter Seam Sealer Does and How to Choose the Right One

Gutter seam sealer is waterproof adhesive built for sealing the spots where gutter sections connect. Joints, corners, end caps, miter pieces. It creates a flexible barrier that keeps water flowing through your gutters instead of pouring out at connection points.
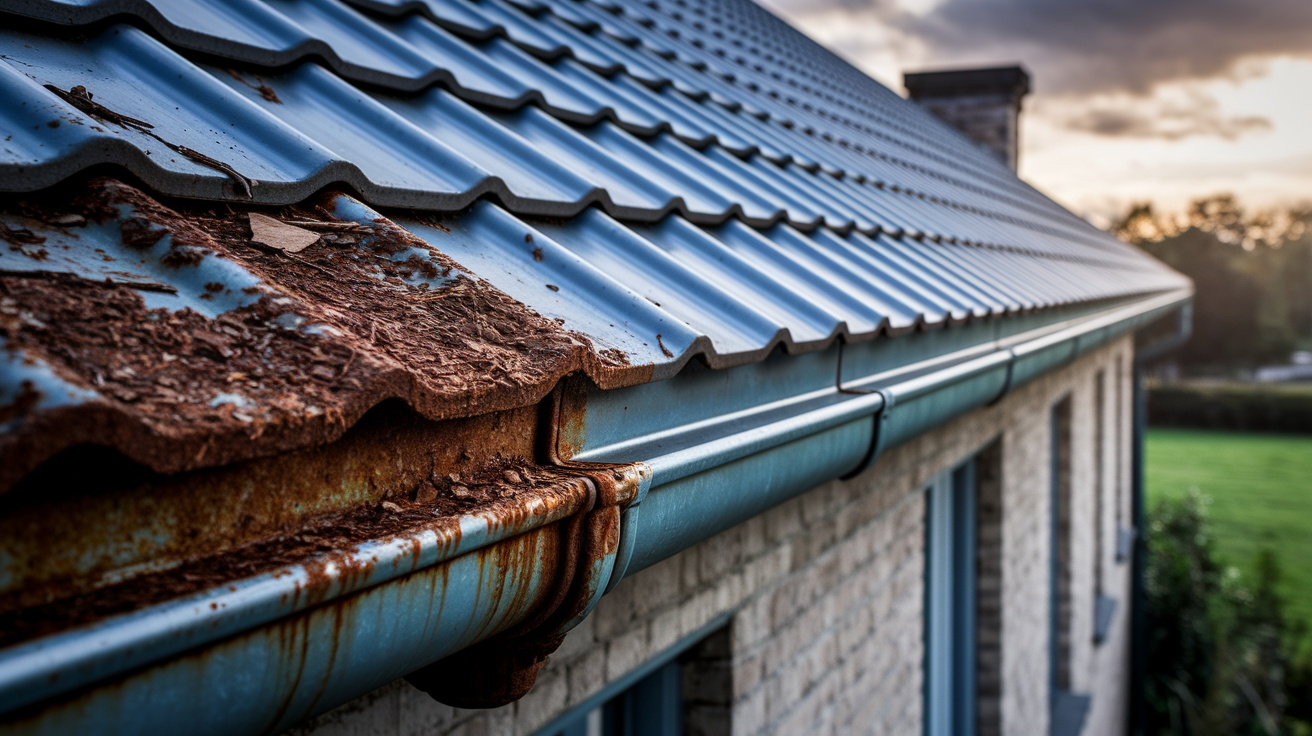
Without proper sealing, water escapes at these joints and goes straight to work damaging your foundation, roof edge, exterior walls, landscaping. A single failed corner joint can dump hundreds of gallons against your foundation during heavy rain. The sealant stops this by creating a continuous waterproof layer across every connection point.
When you’re picking a gutter seam sealer, durability matters most. You want something that won’t crack, peel, or lose its grip after a couple seasons. Flexibility is just as critical because gutters expand in summer heat and contract in winter cold, sometimes moving a fraction of an inch at each joint. Your sealant needs to stretch and compress with that movement without breaking the seal. Adhesion quality determines whether you get a permanent bond or a repair that fails after the next hard rain.
Application ease affects whether you can handle the repair yourself or need to hire help. Some sealants cure in an hour, others need 24 hours before rain exposure. That drying window determines how fast you can fix an active leak.
Types of Sealant for Gutter Seams and Their Performance

Different sealant formulas perform differently depending on your gutter material, climate, and the specific joint you’re sealing.
Silicone-Based Sealant for Gutter Joints
Silicone sealant is the most flexible option and handles temperature swings better than anything else. It stays workable from negative 60°F to 400°F. That covers everything from Minnesota winters to black metal gutters baking in Arizona sun. The flexibility comes from the silicone polymer structure, which expands and contracts without cracking or losing its bond.
It’s a one-part formula. You just cut the tube tip and apply. No mixing. Silicone resists mildew growth, which matters in humid climates where organic growth can break down other sealants. It also resists ozone, UV radiation, and freeze-thaw cycles without degrading. For aluminum gutters specifically, silicone is usually your best match because it bonds well to metal and moves with the material as temperatures change.
Polyurethane Sealant for Rain Gutter Repair
Polyurethane formulas create a strong bond to multiple materials. Galvanized steel, painted metal, vinyl, wood fascia boards. They’re crack-proof and shrink-proof once cured, meaning the seal maintains its original dimensions instead of pulling away from edges over time. Many polyurethane gutter sealants cure rapidly. Some are rain-ready in just a few hours instead of a full day.
The odorless formulation makes them easier to work with on a ladder without ventilation concerns. Polyurethane sticks to most metals without primer, which simplifies your prep work. The trade-off is slightly less flexibility than silicone, but modern polyurethane formulas still handle normal gutter movement without issue.
Butyl Rubber Sealing Compounds
Butyl rubber delivers strong waterproofing and excellent initial tack, which helps it stick to surfaces that other sealants struggle with. It forms a thick, gummy seal that works well for certain joint types, particularly vinyl gutter systems where flexibility isn’t as critical. Butyl stays somewhat pliable long term but doesn’t stretch as much as silicone or polyurethane when temperatures fluctuate.
It’s often the most affordable option and works fine in moderate climates. In areas with extreme temperature swings or on metal gutters that expand significantly, butyl may eventually crack at the edges.
| Sealant Type | Temperature Range | Flexibility | Best For | Curing Process |
|---|---|---|---|---|
| Silicone | -60°F to 400°F | Highest | Aluminum gutters, extreme climates | One-part, 24-hour cure |
| Polyurethane | -40°F to 180°F | High | Steel, multi-material bonds | One-part, rapid cure (3-6 hours) |
| Butyl Rubber | -20°F to 160°F | Moderate | Vinyl gutters, budget repairs | One-part, slow cure (12-48 hours) |
Preparing Gutter Seams Before Applying Sealant
Proper surface prep determines whether your seal lasts two years or twenty. A clean, dry surface creates the bond that prevents leaks. Contaminated or wet surfaces cause immediate adhesion failure. The sealant might look fine when you apply it, but it peels away during the first heavy rain.
- Remove all debris from the seam area using a stiff brush or shop vacuum. Clear leaves, granules from asphalt shingles, dirt buildup.
- Scrub the joint with a putty knife or wire brush to remove old caulk, paint flakes, oxidation, any residue that prevents direct contact with the metal or vinyl.
- Clean the area with rubbing alcohol or a degreaser if oil, tar, or waxy buildup is present. Wipe completely clean with a dry rag.
- For galvanized steel gutters with rust spots, use a wire brush or sandpaper to remove rust down to bare metal. Even light surface rust prevents proper bonding.
- Let the area dry completely. This may take several hours after cleaning or a full day after rain. Touch the seam to verify it’s bone dry before opening the sealant tube.
- Apply metal primer to bare steel or areas where old paint was removed if your sealant manufacturer recommends it for maximum adhesion.
Check the entire gutter run before you start sealing. Look at miter joints where two sections meet at a corner, inside and outside corner pieces, end caps, any spot where you see old caulk or water stains. Seal everything that needs attention in one session if weather permits. Dry conditions matter more than you’d think. Even morning dew or high humidity can leave enough moisture to interfere with curing.
Step-by-Step Sealant Application for Leaking Gutter Connections
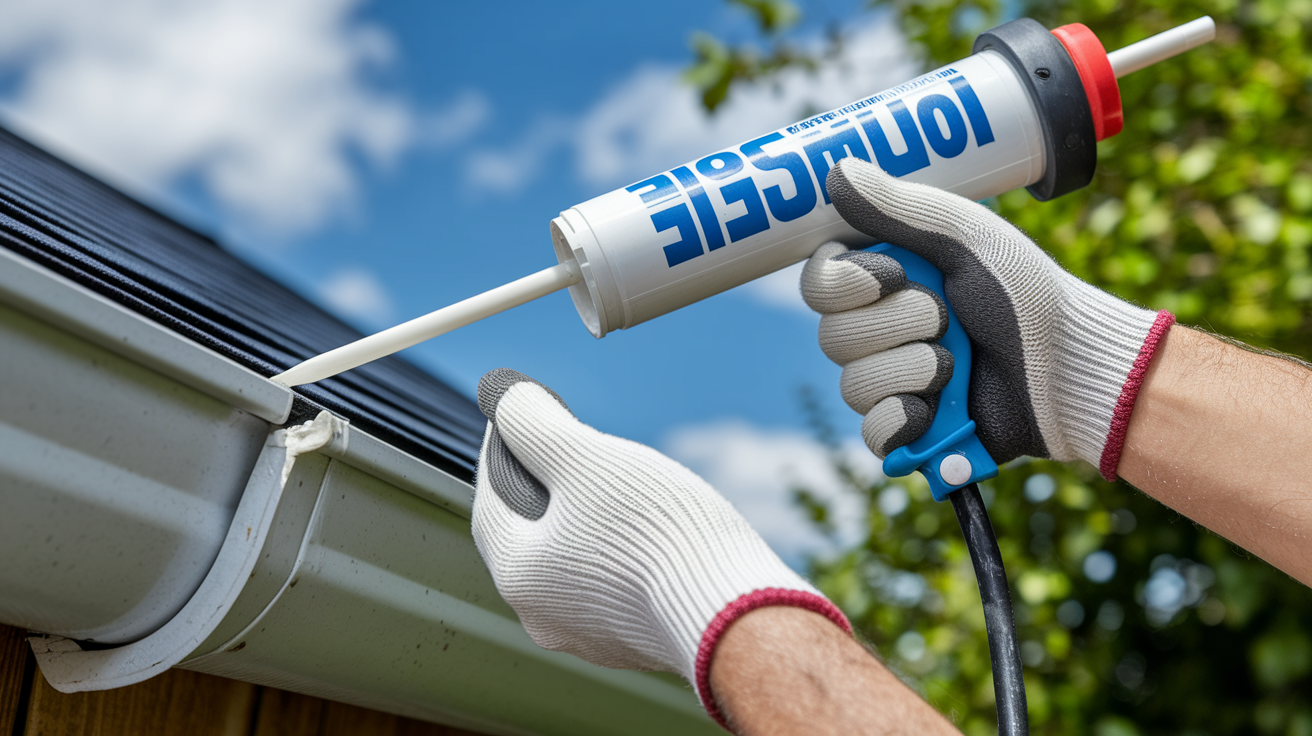
Most gutter sealants come in standard caulk tubes that fit a basic caulking gun. Load the tube, cut the tip at a 45 degree angle, puncture the inner seal with a nail or the gun’s built-in poker. Start with a small opening. You can always recut for a larger bead if needed.
Apply on a dry day with temperatures between 50°F and 85°F when possible. Morning application gives the sealant all day to set before evening dew forms.
- Start at one end of the seam or joint and squeeze the trigger steadily as you pull the gun along the connection. Maintain consistent pressure for an even bead.
- For a thin layer on tight seams, cut the tube tip small and move quickly. For gaps wider than 1/8 inch, cut a larger opening and move slower to fill the space completely.
- Pay extra attention to miter joints and corner pieces where two gutter sections meet at an angle. These spots leak most often and need complete coverage inside the joint.
- Use your finger or a caulk tool dipped in soapy water to smooth the bead and press it into the seam for better contact. This creates a smooth finish without gaps or air pockets.
- Apply sealant to the inside of the joint first where water actually flows. This is your primary waterproof barrier.
- For added protection on problem areas, apply a second bead on the outside of the joint after the inside application is complete.
- Wipe excess sealant off surrounding surfaces immediately with a damp rag before it starts to skin over.
Drying time varies by product and weather. Polyurethane may be touch dry in 2 to 3 hours but needs 24 hours before rain exposure. Silicone usually needs a full day. The curing process continues for several days as the sealant reaches full strength. After the manufacturer’s recommended cure time, test your repair by running water through the gutter with a hose. Watch the sealed joints from below to verify no drips appear. If the sealant is paintable and you want it to match your gutter color, wait until fully cured before applying exterior paint.
Common Problems That Gutter Seam Sealer Fixes

The most obvious sign you need sealing is water overflowing at a specific joint during rain instead of flowing toward the downspout. Standing water collects at poorly sealed connections, and you’ll see drips or streams coming from miter joints, corner pieces, or seams between gutter sections. Water stains appear on fascia boards directly behind failed seals, and foundation pooling happens when leaks consistently dump water at the same spot along your house perimeter.
Sagging sections at connection points indicate that water weight is pulling apart a weakened joint.
Gutter seam leaks develop where two sections meet because the joint is mechanically weaker than a continuous piece of gutter. Debris accumulation at these spots traps moisture against the metal or vinyl, which breaks down factory seals over time. Failed seals at fastener holes, rivet areas, and overlap sections create entry points where water gets behind the gutter, soaking fascia boards and roof edge. That leads to wood rot, which compromises the structural attachment of the entire gutter system. Water intrusion at corner joints can also seep into soffit vents and travel into your attic space.
DIY Sealing vs. Professional Gutter Repair Services

The decision between fixing it yourself or calling a contractor usually comes down to leak severity, how accessible the gutters are, and whether you’re comfortable working on a ladder.
| Factor | DIY Approach | Professional Service |
|---|---|---|
| Cost | $8 to $25 per tube of sealant plus tools if needed | $150 to $500 depending on number of leaks and access difficulty |
| Time Required | 2 to 4 hours for typical single-story repair including prep and cleanup | 1 to 2 hours on-site, scheduled days or weeks in advance |
| Warranty Coverage | Product warranty only (typically 1 to 5 years) | Labor warranty (1 to 2 years) plus product warranty |
| Safety Concerns | Ladder work required, fall risk on steep roofs or two-story homes | Contractor assumes liability and has proper equipment |
| Longevity | 3 to 10 years with quality products and proper application | 5 to 10 years with professional-grade materials and technique |
Emergency fixes make sense when you have an active leak and can’t get a contractor out for days. Temporary solutions like quick setting sealants or even waterproof tape can stop immediate water damage until you complete a permanent repair. These aren’t long term fixes. Products like Flex Seal spray work as stopgaps but typically last one or two seasons before degrading. For permanent bonding on straightforward seam leaks at accessible single-story gutters, DIY sealing with quality silicone or polyurethane usually succeeds if you follow proper prep and application steps.
Call a contractor when you’re dealing with multi-story homes where ladder access is dangerous, when you find extensive damage affecting multiple joints across long gutter runs, or when you need seamless installation where sections are custom fabricated on-site to eliminate most seams entirely. Professional services also make sense if previous DIY repairs have failed. The problem might involve structural issues with gutter pitch or fascia board deterioration that requires more than just new sealant.
Tools and Safety Equipment for Applying Sealer

You need some basic tools, most of which you might already have. A few specialty items make the job cleaner and easier.
The actual application goes faster than the prep work, so having the right cleaning tools saves more time than fancy applicators.
Required tools:
- Standard caulking gun (manual squeeze trigger type fits all standard 10 oz tubes)
- Putty knife or scraper for removing old sealant and debris
- Wire brush for scrubbing metal surfaces and removing rust or oxidation
- Cleaning supplies including rubbing alcohol or degreaser, rags, and a bucket of soapy water
- Stable extension ladder rated for your weight plus tool weight, positioned on level ground
- Extra sealant tubes. Buy one spare in case you need more coverage than expected.
Safety equipment:
- Work gloves to protect hands from sharp metal edges and chemical exposure. Nitrile or rubber gloves work well.
- Safety glasses because looking up while cleaning gutters drops debris directly toward your face.
- Ensure ladder stability by having a helper hold it or using ladder stabilizers that hook over the gutter edge.
- Be aware of VOC content in some sealants, which can cause headaches or dizziness in enclosed spaces. Not usually an issue outdoors but worth noting if you’re sensitive to chemical odors.
- Dispose of empty tubes and solvent soaked rags according to local hazardous waste guidelines, especially for polyurethane products.
Many polyurethane gutter sealants are odorless, which eliminates ventilation concerns during application. Even so, take breaks if you start feeling lightheaded from any product.
Optimal Application Timing and Weather Considerations

Timing your gutter sealing project around weather conditions makes the difference between a repair that lasts a decade and one that fails before the tube is empty.
Ideal application happens during moderate temperatures, typically between 50°F and 80°F, when the sealant flows smoothly without being too thick (cold weather problem) or too runny (hot weather issue). Temperature affects curing chemistry. If it’s too cold, the sealant may never fully harden, and extreme heat can cause it to skin over before you finish smoothing the bead, trapping uncured material underneath.
Check the forecast before starting and verify you have at least 24 hours of dry weather ahead. Rain during the curing period washes away uncured sealant or creates weak spots in the seal. High humidity slows curing for most sealants and can cause problems with adhesion. Morning application works well because it gives the product all day to begin setting, building strength before overnight dew forms. Avoid application during early morning or late evening when condensation may be present on the metal or vinyl surface.
For seasonal maintenance timing, spring is ideal in most climates. You’re sealing after winter freeze-thaw cycles have stressed existing seals but before summer storms arrive. Fall sealing also makes sense because it protects joints before winter weather. Avoid mid-summer application in hot climates where gutter surface temperatures can exceed 120°F. That heat causes application problems and can degrade certain sealants during curing. Similarly, skip winter application in cold climates when temperatures drop below the product’s minimum application temperature, usually around 40°F for most formulas.
Plan climate-specific timing strategies. In the Southwest, seal during mild spring or fall months. In the Southeast with year-round humidity, choose the driest part of your dry season. Northern climates should aim for late spring after the last frost or early fall before temperatures drop consistently below 50°F.
Troubleshooting Seal Failures and Reapplication

Even properly applied sealant can fail eventually, and some failures happen quickly due to application mistakes. Understanding why seals fail helps you fix the problem instead of just covering it again.
The most common mistake is applying sealant to a wet or dirty surface. Moisture or contamination prevents the chemical bond from forming, so the sealant just sits on top of the gutter instead of adhering to it. Insufficient drying time before rain exposure is the second most frequent error, usually because someone rushed the job ahead of forecasted weather. Using the wrong sealant type for your gutter material causes failures too. For example, using a rigid sealant on aluminum gutters that expand and contract significantly.
After the recommended cure time passes, test your repair by running water through the gutter with a hose set to moderate flow. Watch the sealed joints from below, looking for any drips, seepage, or streams.
Common failure symptoms and their causes:
- Peeling at edges usually means the surface wasn’t clean or the sealant didn’t cure fully before weather exposure.
- Cracking through the middle indicates the sealant lacks flexibility for the joint movement or was applied too thin.
- Gap formation where sealant pulls away happens when surface prep was inadequate or thermal expansion exceeded the sealant’s capacity.
- Continued leaking at the same spot means incomplete coverage or a structural problem with the joint beyond what sealant can fix.
- Discoloration or chalking shows UV degradation from using an interior grade product outdoors.
- Complete loss of adhesion where the sealant falls out points to contamination on the surface or application to a wet area.
Reapplication requires removing all traces of the failed sealant before applying new material. Scrape it out with a putty knife, use a wire brush on stubborn residue, and clean the joint thoroughly. You’re basically starting the prep process over. Don’t apply new sealant over old, even if the old material seems mostly intact. The bond between old and new sealant is always weaker than a fresh seal on clean material.
Longevity expectations depend on sealant quality, application technique, and environmental conditions. Budget butyl rubber products may last 3 to 5 years. Quality silicone or polyurethane should give you 7 to 10 years. Some premium formulas claim 20 year performance, though most homeowners reseal as part of regular gutter maintenance every 5 to 7 years regardless. Watch for replacement timeline indicators like visible cracking, flexibility loss where the sealant feels hard and brittle, or recurring leaks after patching. When multiple sealed joints in your gutter system start failing around the same time, it usually means the product has reached the end of its service life across the entire installation.
Product Shopping Guide: Coverage, Pricing, and Where to Buy

Standard gutter sealant tubes hold 10 ounces, which covers about 24 to 30 linear feet of seam when applied in a 1/4 inch bead. That’s enough for most single-story homes with 2 to 3 problem joints.
| Product Type | Typical Price Range | Coverage per Tube | Best Application |
|---|---|---|---|
| Silicone Sealant | $8 to $15 per 10 oz tube | 24 to 30 linear feet | Aluminum gutters, extreme temperature areas |
| Polyurethane Sealant | $12 to $18 per 10 oz tube | 20 to 28 linear feet | Steel gutters, multi-material bonds, fast repairs |
| Butyl Rubber | $6 to $12 per 10 oz tube | 25 to 35 linear feet | Vinyl gutters, budget-friendly repairs |
| Epoxy Putty | $10 to $20 per stick | Patches 2 to 4 holes or cracks | Punctures and structural damage in metal gutters |
For bulk purchasing when you’re sealing an entire gutter system or doing multiple homes, consider buying three or four tubes at once. You’ll use more than you expect once you start finding additional problem areas. Brand recommendations include Hercules Plastic Seal for polyurethane applications, which is multi-purpose, odorless, crack-proof, and adheres to most metals. Oatey makes a quality silicone sealant that’s specifically good for aluminum gutters and handles the full temperature range you’ll encounter. Hercules ProPoxy 20 is a two-part epoxy putty for patching holes or cracks in metal gutters when you need more than a sealant bead.
You’ll find gutter sealants at home improvement stores like Home Depot and Lowe’s, usually in the building materials or roofing section rather than the general caulk aisle. Hardware stores carry them, though selection may be limited compared to big-box retailers. Online purchasing through Amazon or direct from manufacturer websites gives you access to professional grade products not stocked in local stores. Roofing supply stores that cater to contractors often stock commercial grade sealants in larger quantities. Some sealants come in multiple colors (white, brown, gray) to match common gutter colors. If exact color matching matters, look for paintable formulas. Most polyurethane and some silicone sealants accept exterior paint after they’re fully cured.
Long-Term Performance and Inspection Schedule
Prevention catches small problems before they become expensive repairs. A systematic inspection approach lets you spot seal degradation early when a simple touch up prevents water damage.
Look for water stains on fascia boards, which indicate leaking happened at some point even if it’s not actively dripping when you’re looking. Foundation pooling near downspouts or at corners suggests water isn’t staying in the gutter system. Seal discoloration where the sealant turns chalky white or develops cracks visible from the ground means UV exposure is breaking down the material.
- Spring inspection after freeze-thaw cycles. Check every sealed joint for cracks or gaps caused by winter expansion and contraction, and verify no ice damage occurred at corner pieces or end caps.
- Pre-winter sealing check in late fall. Repair any compromised seals before freezing weather stresses them further, and ensure all joints are watertight before snow and ice season.
- Twice yearly cleaning schedule (spring and fall). Remove debris from gutters and downspouts to prevent buildup at seams that can trap moisture and degrade sealant.
- Downspout attachment verification. Make sure the connection between gutter outlet and downspout remains sealed, as this high flow area sees significant stress.
- Roof drainage flow testing. Run water through gutters with a hose after cleaning to confirm proper pitch and identify any new leaks at joints before the rainy season begins.
Early leak prevention is cheaper and easier than waiting for obvious failures. When you catch a seal that’s starting to separate at one edge but hasn’t failed completely, a quick bead of fresh sealant over that spot takes five minutes and prevents water intrusion. Once water gets behind the gutter and soaks the fascia board, you’re looking at wood repair plus gutter resealing. A much bigger project. Routine inspection and prompt resealing when you see degradation keeps your gutter system working for decades instead of requiring full replacement every ten years.
Alternative and Specialty Sealing Solutions
Beyond the three main sealant types, specialty products handle specific situations where standard formulas struggle.
Gutter-specific caulk formulations are engineered for constant water flow exposure and the unique stresses of horizontal joints that sit full of water during heavy rain. These products cure to a slightly more elastic consistency than general purpose sealants and resist wash-out better during the curing process. They cost a few dollars more per tube but make sense for homes in high rainfall areas.
Liquid rubber sealants create a thick, self leveling barrier that’s particularly effective for larger overlap sections where standard bead application would require multiple passes. You brush or trowel it on in a layer about 1/8 inch thick. It dries to a flexible rubber membrane that moves with temperature changes and handles significant joint movement. The coverage rate is lower than tube sealants. One quart typically covers about 10 to 15 linear feet of seam. But the seal tends to be more durable on problem joints that have leaked repeatedly.
Foam sealants like expanding polyurethane can fill larger gaps, but they work best as supplemental products combined with a surface sealant. The foam fills voids and provides backing material that prevents sag in the primary seal. Don’t use expanding foam as your only sealant. It degrades quickly under UV exposure and doesn’t bond well to wet metal.
Eco-friendly options with low VOC content appeal to homeowners concerned about chemical exposure. These formulas typically use water-based carriers instead of solvent carriers, which reduces odor and environmental impact. They perform comparably to standard sealants in moderate climates but may have reduced flexibility in extreme cold. Chemical resistance matters if you’re near industrial areas or coastal environments where salt spray or acidic rain can attack standard sealants. Specialty formulas resist these conditions better. For seamless installation applications where sections are custom fabricated, professional contractors use commercial grade sealants with superior adhesion and longer working time that aren’t typically available in retail stores.
Final Words
Sealing gutter joints and connections isn’t complicated, but it does require the right gutter seam sealer and clean, dry surfaces to work.
Pick a product that matches your gutter material and climate. Prep thoroughly. Apply evenly. Let it cure completely.
Check your seams twice a year, especially after winter freeze-thaw cycles and before heavy rain seasons. Catching a small crack early saves you from foundation repair bills later.
Most DIY sealing jobs take an afternoon and cost under $20 in materials. That’s a solid trade for keeping water where it belongs.
FAQ
What is the best way to seal gutter seams?
The best way to seal gutter seams is to clean the joint completely, remove all debris and old sealant with a wire brush, dry the surface fully, then apply a continuous bead of silicone or polyurethane sealant along the inside seam where sections meet.
What is the best gutter seam sealer?
The best gutter seam sealer depends on your gutter material. Silicone sealant works well for aluminum gutters with flexibility and weather resistance. Polyurethane sealant provides superior adhesion for galvanized steel and most metals with rapid curing and crack-proof performance.
Should gutter joints be sealed?
Gutter joints should be sealed because these connection points are where most leaks start. Sealing miter joints, corner pieces, end caps, and overlap sections prevents water damage to your foundation, roof, fascia boards, and landscaping by stopping leaks before they spread.
Can you caulk outside the seam of a gutter to prevent leaks?
You can caulk outside the seam of a gutter as additional protection, but inside application is essential for stopping leaks. Apply sealant along the inside joint first for waterproofing, then add an outside coating if extra reinforcement is needed for exposed or high-stress seams.
How long does gutter seam sealer last?
Gutter seam sealer lasts between 3 to 10 years depending on the product type, weather exposure, and application quality. Silicone and polyurethane sealants offer longer durability than butyl rubber or temporary solutions like Flex Seal, which work best for emergency fixes only.
What temperature is best for applying gutter sealant?
The best temperature for applying gutter sealant is between 50°F and 80°F in dry weather conditions. Moderate temperatures ensure proper curing and adhesion. Avoid application during extreme heat, cold, or when rain is forecast within 24 hours of sealing to prevent seal failure.
How do you know if gutter seam sealer has failed?
You know gutter seam sealer has failed when you see peeling, cracking, gap formation, continued leaking during rain, discoloration, or loss of adhesion at joints. Water stains on fascia boards or foundation pooling near the house also indicate seal degradation requiring reapplication.
Can you seal gutters in the rain?
You cannot seal gutters in the rain because sealant requires a clean, completely dry surface for proper adhesion. Moisture prevents bonding and causes immediate seal failure. Wait for dry weather with no rain forecast for at least 24 hours after application.
Do I need to remove old sealant before reapplying?
You need to remove old sealant before reapplying because new sealant won’t bond properly over deteriorated material. Use a putty knife or wire brush to scrape away failed sealant, clean the surface completely, dry the joint fully, then apply fresh sealant for permanent bonding.
How much does gutter seam sealer cost?
Gutter seam sealer costs typically range from $5 to $15 per 10-ounce tube depending on the product type. One standard tube covers approximately 50 to 100 linear feet of seam depending on bead thickness. Professional installation adds labor costs of $200 to $500 for full gutter system resealing.
When should I call a professional for gutter leaks?
You should call a professional for gutter leaks on multi-story homes requiring ladder safety equipment, when extensive damage affects multiple seams or structural components, or when leaks persist after DIY resealing attempts. Sagging sections or wood rot also require contractor assessment and repair.
How often should I inspect gutter seams?
You should inspect gutter seams twice yearly, once in spring after freeze-thaw cycles and again before winter weather arrives. Regular inspection catches seal degradation early through visual checks for water stains, discoloration, cracking, or foundation pooling before major damage occurs.