
You’ve probably stared at that grimy, cracked caulk line around your bathtub and thought, “I should fix this someday.” That someday is now. Mold, mildew, and water damage hiding behind failing caulk won’t fix themselves, and waiting only makes the problem worse. But here’s the good news: recaulking a bathtub isn’t complicated, and it doesn’t require special skills. With a few basic tools and about two hours, you can restore that waterproof seal and make your bathroom look cleaner instantly.
When to Recaulk and Signs Your Bathtub Needs Fresh Sealant

Most bathtub caulk lasts three to five years, but that window shifts depending on shower frequency, ventilation quality, and how much moisture sits on the seal. Even high quality silicone breaks down eventually from constant water exposure, soap residue, and temperature swings.
Watch for these signs that tell you it’s time:
Cracks running through the bead. Small hairline splits that let water seep behind the seal.
Gaps where the caulk pulled away from the tub or wall, creating visible openings.
Discoloration that won’t clean off. Yellowing, browning, or gray staining that stays after scrubbing.
Black or green mold spots that keep coming back even after you clean with bathroom spray.
Peeling or lifting edges where the caulk doesn’t stick anymore.
Shrinkage where the bead looks thinner or sunken compared to when it was fresh.
Hard, brittle texture instead of the slight flexibility silicone should have.
These aren’t just cosmetic problems. Once cracks or gaps appear, water starts working its way behind your tub and into the wall cavity. That hidden moisture creates the perfect environment for mold to grow where you can’t see it. Over months and years, trapped water can rot wood framing, damage drywall, and lead to expensive structural repairs that cost way more than a tube of caulk and an hour of your time.
Preventive recaulking makes sense even before major problems show up. If your bathroom gets heavy use or has ventilation issues, inspect the caulk every year and plan to recaulk every three years regardless of visible damage. Fresh white caulk also makes your whole bathroom look cleaner. That crisp seal line around your tub instantly brightens the space and gives everything a polished finish, even if the rest of the bathroom is dated.
Essential Tools and Materials for Recaulking Your Bathtub

Having everything within reach before you start prevents mid project trips to the hardware store and keeps the work moving at a good pace. Buying the right type of caulk the first time saves you from having to scrape it all out and start over in six months.
Use 100% silicone caulk for bathtub applications. Not “siliconized acrylic,” not “acrylic latex with silicone,” but pure silicone. Silicone stays flexible as it expands and contracts with temperature changes, creates a truly waterproof seal, and resists mold growth far better than any acrylic product. Acrylic latex caulk is fine for trim work and projects where you’re painting over it, but it absorbs water over time and fails quickly in constant wet conditions. Look for formulas labeled “mildew resistant” or “bathroom and kitchen.” These include additives that slow mold growth. Low VOC options reduce fumes if you’re sensitive to chemical smells, though all silicone has some odor during application and curing.
For color, white is standard and matches most tubs and surrounds. Clear silicone works if you’re caulking between colored tiles and want the grout color to show through, though it yellows faster than white. If your tub or tile is almond, bone, or another off white shade, look for color matched caulk or go with clear. One standard tube (10 ounces) covers the perimeter of one typical bathtub with a bit left over. If you’re doing a tub and a separate shower, buy two tubes.
Materials needed:
100% silicone caulk (one 10 ounce tube for a standard bathtub), painter’s tape (1 inch or 1.5 inch width), isopropyl alcohol (70% or higher concentration), white vinegar as cleaning alternative to alcohol, non abrasive sponge or soft scrub pad, lint free rags or paper towels (several), baby wipes unscented (optional but convenient for smoothing), mineral spirits for stubborn residue removal (optional), liquid caulk remover chemical gel (optional, for thick old caulk), nitrile or latex gloves to keep your hands clean.
Tools required:
Caulking gun (ratchet or smooth rod style), utility knife with fresh sharp blade, caulk removal tool with angled pointed end, 1.5 inch stiff putty knife as alternative scraper, 5 in 1 painter’s tool with sharp edge, razor blade scraper for stubborn spots, shop vacuum or handheld vacuum for debris removal, cardboard scrap for testing caulk flow.
A few optional items make the process easier and faster. A shop vac pulls debris out of the joint better than wiping. A hairdryer speeds up the drying process if you need to finish the project in one day. Baby wipes are perfect for smoothing because they’re pre moistened and disposable. An ice cube works surprisingly well as a smoothing tool since caulk won’t stick to it. Expect to spend $20 to $35 total if you’re starting from scratch with no tools, or around $8 to $12 if you already have the basics.
Removing Old Caulk from the Bathtub
Complete removal isn’t optional. New caulk won’t bond to old caulk, silicone residue, soap scum, or mold. If you try to caulk over existing material, the new bead will peel off within weeks or months, and you’ll be back here starting over. This step takes the most time in the whole project, but doing it thoroughly means your new caulk will actually last.
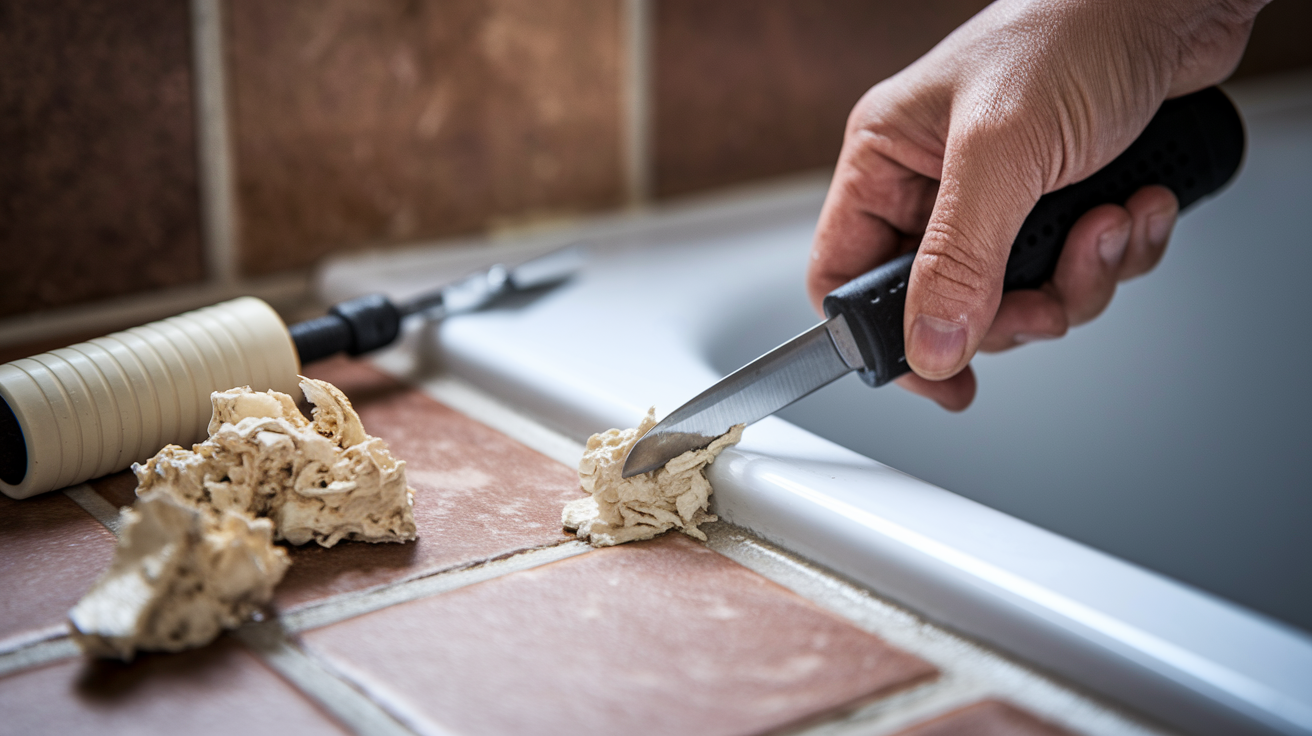
Start by scoring both edges of the old caulk bead with your utility knife. Hold the knife at a low angle and run it along where the caulk meets the tub, then repeat where the caulk meets the wall or surround. You’re not trying to cut through the caulk completely in one pass. You’re just breaking the seal on both sides so your scraping tool can get underneath. This scoring makes the actual removal much easier and reduces the risk of gouging the tub or tile as you pry.
Switch to your caulk removal tool, putty knife, or 5 in 1 tool for the actual scraping. Work the pointed end under the caulk bead and push forward to lift sections out of the joint. Go slowly and work in manageable sections rather than trying to peel out the entire bead in one piece. The old caulk will probably come out in chunks and small pieces, which is normal. Get your tool down into the joint itself, not just along the surface, to dig out caulk that’s sitting in the gap between the tub and wall.
Before you get aggressive with scraping, test your tool on a small inconspicuous area, maybe behind where the showerhead would hide a mark. Porcelain tubs are pretty durable, but fiberglass and acrylic surfaces scratch more easily. Adjust your pressure and angle if you see any surface damage. A plastic scraper causes less damage than metal if your tub is fiberglass.
After scraping, vacuum up all the debris and loose pieces. A shop vac or handheld vacuum works better than wiping because it pulls fragments out of the joint instead of just pushing them around. Check corners and the back edge where the tub meets the wall, places where small bits tend to hide. Run your finger along the joint. If you feel any remaining chunks or ridges, keep scraping until the surfaces are smooth and clean.
Now clean the area with isopropyl alcohol or white vinegar. Pour some onto a non abrasive sponge or lint free rag and scrub the entire joint area, including about an inch of the tub and wall on either side of where you removed the caulk. The alcohol disinfects, kills surface mold, and dissolves any silicone residue or oils that would prevent the new caulk from sticking. White vinegar does the same job and costs less. For stubborn residue or sticky spots, mineral spirits on a rag cuts through it. If you see black mold staining deep in a porous grout line or textured surface, hit it with a bit of diluted bleach on a cotton swab, let it sit for a few minutes, then wipe clean.
The surface must be completely dry before you apply new caulk. Silicone won’t adhere properly to damp surfaces. Wipe everything down with a dry lint free rag, then let the area air dry for several hours. Overnight is ideal. If you’re in a hurry, use a hairdryer on a cool or warm setting (not hot, which can damage some tub materials) and blow air along the joint until it feels completely moisture free to the touch. Run your dry hand along the area. If it feels even slightly damp or cool, keep drying.
Applying Painter’s Tape for Professional Bathtub Caulk Lines

Painter’s tape is what separates a clean, pro looking caulk line from the wavy, messy beads that scream “amateur DIY project.” It contains the caulk exactly where you want it, prevents smears on the tub and wall, and gives you confidence to move quickly without worrying about mistakes.
Position two parallel strips of painter’s tape along the joint, one on the tub and one on the wall or surround, leaving approximately 1/8 inch of exposed surface on each side. That 1/4 inch total gap is the width your caulk bead will fill. Press the tape edges down firmly so caulk can’t sneak underneath. The goal is to create guide rails that keep your bead straight and uniform.
Run continuous strips of tape around the entire perimeter of the tub without stopping or overlapping. At corners where the walls meet, two strips will intersect at an angle. Press both pieces down firmly right up to where they touch. You’ll deal with that corner transition when you’re applying the caulk. Don’t stress about making the tape perfectly perfect. As long as both strips are roughly parallel and the gap between them stays consistent, you’re fine.
For tub surrounds and tile interfaces, make sure the tape adheres to both surfaces without any gaps or bubbles along the edges. If you’re working with textured tile, press the tape down extra carefully into the low spots. A small gap under the tape edge will let caulk squeeze through and create a messy line you’ll have to scrape off.
Bathtub Caulk Application Technique Step by Step

Before loading your caulk gun, prepare the tube nozzle. Use your utility knife to cut the tip at a 45 degree angle. Start with a 1/4 inch opening, which matches the gap you created with your painter’s tape. If you cut the opening too small, you can always trim more off. Cut too large and you’ll get too much caulk with every pass. After cutting the tip, puncture the inner seal by sticking a long nail or the wire on the caulk gun into the nozzle opening and pushing until you break through.
Load the tube into your caulking gun and test it on a piece of cardboard first. Squeeze the trigger a few times to get the caulk flowing and check the bead size. Practice moving at a steady speed while maintaining even pressure. This 30 second test run on cardboard saves you from learning on the bathtub itself.
Fill the bathtub with several inches of water before you start caulking. This step confuses people, but it’s important. The water weighs the tub down slightly, settling it into its natural loaded position. When you shower or bathe later, the weight of the water causes tiny movements in the tub. If you caulk an empty tub and then fill it the first time, that movement can stretch and crack your fresh caulk line. Caulking with the tub full prevents this problem.
Hold the caulk gun at a consistent angle, about 45 degrees to the joint, with the cut tip leading the way. Start at one corner and apply steady, even pressure to the trigger while moving the gun along the joint at a moderate, constant pace. Don’t go too slow or caulk will pool and create fat, uneven spots. Don’t go too fast or the bead will be thin, might break, or won’t fill the gap completely. Think of it like drawing a thick marker line. You want continuous flow without pausing, speeding up, or slowing down.
If your bead breaks or you create a gap, stop and restart by overlapping the last good section slightly. Keep moving until you reach the next corner. At corners, release trigger pressure as you approach, then reposition and start the next wall with a slight overlap at the corner joint.
For inside corners where two walls meet the tub, apply caulk to one side first, smooth it, then do the adjacent side. For outside corners on surrounds with separate panels, tool one side first and let the corner joint itself happen naturally where the two beads meet.
Smoothing and Tooling the Caulk Bead

You have roughly five to ten minutes after applying the caulk bead to smooth it before the surface starts to skin over and becomes difficult to tool. Don’t take a break between application and smoothing.
Pick your smoothing tool based on what you have and what feels comfortable. A wet finger gives you the most control and lets you feel the joint, but it’s messy and caulk sticks to skin. A damp cloth or paper towel works well and wipes excess away as you smooth. Baby wipes are convenient because they’re pre moistened and disposable, plus unscented wipes won’t leave residue. An ice cube is surprisingly effective because caulk won’t stick to it at all, and as it melts slightly, the cold water and smooth ice surface create a perfect concave shape. Whichever you choose, the principle is the same. Moisture prevents sticking.
Run your smoothing tool along the fresh caulk bead in one continuous motion, pressing lightly to push the caulk into the joint and create an even, slightly concave surface. Don’t press hard enough to squeeze most of the caulk back out. Just firm enough to shape it and remove excess. Keep a rag right next to you and wipe your finger or tool clean after every pass or two.
Do the entire length of one wall in a single smooth stroke if possible, without stopping mid wall. If you must stop, overlap your restart point slightly to blend it. The finished surface should have a gentle concave curve, kind of like the inside of a very shallow spoon, running evenly from start to finish.
If you see a spot that looks wrong or uneven right after smoothing, you can fix it immediately. Wipe it away completely with a rag, reapply a bit of caulk, and smooth again. Don’t try to fix problems after the caulk starts to set. You’ll just make it worse.
Removing Tape and Final Cleanup for Your Bathtub Caulk

Remove the painter’s tape immediately after smoothing, while the caulk is still wet. Waiting until it dries means the caulk edge will tear when you pull the tape, ruining your clean line.
Grab the end of one tape strip and pull it slowly away from the joint at a 45 degree angle, not straight up and not straight out. Pull steadily without jerking. The tape should peel away cleanly, leaving a crisp caulk edge. Do all the tape strips around the entire tub perimeter.
Inspect the line closely as soon as the tape is off. Look for any places where the tape pulled the caulk edge or left a small blemish. If you see a problem spot, wet your finger and smooth just that area gently to fix it. You have a minute or two to make minor corrections before the surface starts skinning.
Wipe your tools clean with paper towels right away, before the caulk dries on them. Silicone that dries on your caulking gun, utility knife, or scraper is annoying to remove later. Toss all your used rags, tape strips, and debris into a garbage bag. Check the tub edge and floor for any caulk drips or fingerprints and wipe them up immediately with a damp cloth.
Open a window or turn on the bathroom exhaust fan to ventilate while the caulk cures. Silicone releases acetic acid (vinegar smell) as it dries, and moving that air out makes the bathroom more comfortable and speeds curing slightly. The smell fades within a few hours.
Curing Time and When You Can Use Your Bathtub

Don’t use your bathtub or shower for a minimum of 24 hours after applying fresh caulk. This isn’t negotiable.
Caulk will feel dry to a light touch within 30 to 60 minutes. That’s called “skin over” or “tack free time.” The surface has formed a thin skin, but underneath, the caulk is still soft and wet. Full cure means the silicone has reacted with moisture in the air all the way through and reached maximum strength and adhesion. For most bathroom silicones, full cure takes 24 to 48 hours depending on conditions.
Temperature, humidity, and ventilation all affect curing speed. Warm temperatures (70 to 80 degrees) and moderate humidity (40 to 60 percent) cure faster. Cold bathrooms or very dry air slow the process. Good ventilation helps by moving fresh air across the caulk surface, bringing the moisture silicone needs to cure. Thick caulk beads take longer than thin ones because the interior material is farther from air exposure.
Keep a fan running or the bathroom door open during the curing period to maintain airflow. Don’t crank the heat trying to speed it up. High heat can cause the caulk to cure unevenly or develop surface problems.
If you use the bathtub too early, before the caulk has fully cured, water exposure can compromise the waterproof seal and the bond to the surfaces. The caulk might look fine initially but fail weeks later, forcing you to scrape it out and start over. Don’t risk it. Wait the full 24 hours minimum, and if your bathroom is cold or you applied a thick bead, wait 48 hours to be safe.
Test readiness by pressing your fingernail gently into an inconspicuous spot. Fully cured caulk should feel firm and rubbery with no tackiness. If it still feels soft or sticky, give it more time.
Common Bathtub Caulking Mistakes and How to Avoid Them

Most failed caulk jobs come from a handful of preventable mistakes that beginners make because they seem like they should work, or because they’re trying to save time.
Applying new caulk over old caulk. It won’t stick, no matter how good it looks at first. The new silicone can’t bond to the old, and it’ll peel off in sheets within weeks. Remove everything first.
Not cleaning the surface thoroughly. Soap scum, body oils, mildew, and old silicone residue prevent adhesion. If you skip the alcohol or vinegar cleaning step, your fresh caulk won’t bond properly and will fail quickly.
Caulking before the area is completely dry. Silicone needs a dry surface to form a proper seal. If even a little moisture remains in the joint, the caulk won’t stick correctly. Touch the surface. If it feels even slightly damp or cool, keep drying.
Using acrylic latex caulk instead of 100% silicone. Acrylic is cheaper and easier to tool, which is why hardware stores push it. But acrylic absorbs water, shrinks, cracks, and grows mold in bathroom conditions. Silicone costs a few dollars more and lasts years longer.
Applying too much caulk in one pass. More isn’t better. A fat, oversized bead takes forever to cure, sags under its own weight, wastes material, and looks unprofessional. A 1/4 inch bead is all you need.
Inconsistent gun pressure and speed. Moving too slowly creates puddles and fat spots. Moving too fast creates thin areas or breaks in the bead. Practice on cardboard first to find your rhythm.
Removing the painter’s tape too late. Once the caulk skins over, pulling tape tears the edge and ruins your clean line. Remove it immediately after smoothing while everything is still wet.
Using the bathtub too soon. Waiting feels like forever when you want your shower back, but using it before 24 hours risks undoing all your work.
The single biggest mistake is not removing old caulk completely. People think they can save time by caulking over a small remaining section or a stubborn silicone residue spot. They can’t. That one shortcut guarantees failure. Spend the extra ten minutes scraping and cleaning. The new caulk will only bond to completely clean, dry surfaces, not to old material, no matter how thin.
The second most common mistake is trying to caulk damp surfaces because you’re in a hurry. Moisture destroys the bond. If you’re not sure whether it’s dry enough, it’s not. Keep drying or wait overnight.
Application speed problems trip up a lot of beginners. Too slow, and the caulk pools into uneven thick spots that take days to fully cure and look bad. Too fast, and you get thin areas or breaks where water can penetrate. Watch experienced people caulk and you’ll notice they move at a constant, moderate pace without pausing. That consistent motion creates uniform beads. Practice on cardboard or a scrap board until your speed and trigger pressure feel natural.
Tips for Different Bathtub Materials and Configurations
The basic technique works for every bathtub, but a few materials need extra attention, and some configurations require slight adjustments.
Fiberglass tubs and surrounds are more flexible than porcelain or tile. That flexibility is exactly why filling the tub with water during caulking matters so much here. Fiberglass moves and flexes slightly when loaded with water and a person, and if you caulk an empty tub, that first use will stress the caulk line. When scraping old caulk off fiberglass, test your tools gently first. Fiberglass scratches more easily than porcelain, and once scratched, those marks are permanent and show through fresh caulk. Plastic scrapers or very light pressure with metal tools work best. When cleaning, avoid abrasive pads that might dull or scratch the surface. Soft sponges and microfiber cloths are safer.
Porcelain enamel and cast iron tubs are rigid and durable. You don’t need to worry much about scratching these surfaces during caulk removal, though testing your scraper first is still smart. The hard, non porous surface cleans easily with rubbing alcohol or vinegar. These tubs don’t flex under load the way fiberglass does, but filling with water during caulking still helps by settling everything into final position. Porcelain and enamel are also less forgiving about surface prep. Any residue or soap scum you leave behind will definitely prevent good adhesion because these smooth surfaces don’t give caulk much to grip.
Tile surrounds require understanding where to use caulk versus where to use grout. Use caulk where the bathtub meets the tile wall, at inside corners where two tile walls meet, and around fixtures. Don’t use caulk between tiles themselves, that’s grout’s job. Caulk stays flexible and handles the slight movement between tub and wall. Grout is rigid and would crack at those joints. If your tile is colored, consider matching your caulk to the grout color rather than using white, especially if you’re using clear silicone. When applying tape, press firmly into grout lines if they’re nearby to prevent caulk from flowing into the texture.
Corner techniques need a bit of patience. At inside corners where two walls meet the tub, caulk one wall completely first, smooth it, remove that tape, then do the adjacent wall. Overlap slightly at the corner itself and smooth the intersection carefully. For three piece tub surrounds with separate wall panels, those vertical seams between panels usually come pre caulked from the factory, but if you’re recaulking everything, treat those vertical joints the same way you treat the horizontal tub seam.
Shower tub combinations and surrounds with built in seats or shelves have extra joints where water can penetrate. Walk around and identify every seam where two different surfaces meet, and caulk each one with the same care you used on the main tub line.
Maintaining Your Bathtub Caulk for Maximum Longevity
Proper care extends caulk life from the typical three years to five years or more, and prevents small problems from becoming water damage that requires major repairs.
Clean weekly with non abrasive bathroom cleaner. Regular cleaning prevents soap scum and body oil buildup that feeds mold and discolors caulk.
Squeegee water off the tub and walls after every shower or bath. Less standing water means less opportunity for mold growth and less moisture sitting on the caulk line.
Address mold spots immediately when they appear. Scrub small spots with bathroom cleaner or a paste of baking soda and water. Catching mold early prevents it from spreading and staining.
Avoid harsh chemicals and bleach heavy cleaners. Bleach degrades silicone over time, making it brittle and shortening its life. Occasional use is fine, but daily bleach sprays slowly destroy caulk.
Inspect the caulk line every few months. Look for small cracks, gaps, or areas where it’s pulling away from the surface. Catching problems early means you can often fix a small section instead of redoing the whole tub.
Keep the bathroom dry between uses. Open windows, run the exhaust fan during showers and for 20 minutes after, and don’t let wet towels pile up. Constant high humidity accelerates mold growth and caulk degradation.
Clean your caulk with the same products you use on the rest of your tub. Gentle bathroom spray cleaners, diluted all purpose cleaner, or even dish soap and water work fine. Spray it on, let it sit for a minute, scrub gently with a soft sponge or cloth, and rinse. Don’t use abrasive scrubbers or scouring powders that might scratch the caulk surface and create tiny grooves where dirt and mold can hide.
Ventilation plays a bigger role in caulk longevity than most people realize. Bathrooms without windows or with weak exhaust fans stay humid for hours after showers, creating perfect conditions for mold to take hold in the caulk. If your fan is weak or loud (which makes people not want to use it), upgrading to a better, quieter model is worth the investment. If you have no fan at all, crack a window or door during and after showers, and consider running a small portable fan aimed at the tub area to move air. Dry bathrooms have caulk that lasts longer, looks cleaner, and requires less frequent replacement.
Final Words
Recaulking a bathtub protects your bathroom from water damage while instantly improving how it looks.
The job takes about an hour of hands-on work, plus a full day for curing. Complete old caulk removal and proper surface prep make the difference between a seal that lasts five years and one that fails in six months.
Use 100% silicone, fill the tub with water before you start, and pull the tape while the caulk is still wet.
Follow these steps on how to recaulk a bathtub and you’ll have a waterproof seal that keeps moisture where it belongs.
FAQ
Is it easy to recaulk a bathtub myself?
Recaulking a bathtub yourself is easy for most DIYers if you take your time with prep work and follow the steps carefully. The actual caulking takes about an hour of active work, but removing old caulk and cleaning the surface is the most time-consuming part. You’ll need basic tools like a utility knife, caulking gun, and painter’s tape, and you should plan for 24 hours of cure time before using the tub again.
How do you remove old caulking from a bathtub?
You remove old caulking from a bathtub by scoring both edges with a utility knife, then scraping it out with a putty knife or caulk removal tool. After removing all the old material, vacuum the debris, clean the surface with isopropyl alcohol or white vinegar to remove residue and mold, and let it dry completely before applying new caulk. Never apply new caulk over old because it won’t stick or last.
What are common mistakes when caulking?
Common mistakes when caulking include applying new caulk over old caulk, starting before the surface is completely dry, using acrylic latex instead of 100% silicone in wet areas, and removing painter’s tape too late. Other frequent errors are applying caulk too slowly which causes pooling, moving too fast which creates gaps, and using the bathtub before the 24-hour cure time is complete.
How long does it take to recaulk a bathtub?
Recaulking a bathtub takes approximately one hour of active work plus 24 hours of curing time before you can use the tub. Removing old caulk is the most time-consuming part of the active work, often taking 30 to 45 minutes depending on how much buildup exists. You can touch the caulk after 30 to 60 minutes, but full waterproof cure requires a minimum 24-hour wait.
Why should I use 100% silicone caulk instead of acrylic latex?
You should use 100% silicone caulk instead of acrylic latex because silicone provides flexibility, waterproofing, and mold resistance that wet bathtub environments require. Acrylic latex caulk is designed for woodworking projects and fails quickly in constantly damp areas, cracking and allowing water penetration behind walls. Look for bathroom-specific 100% silicone with mildew-resistant formulations for longest-lasting results.
How do I know when my bathtub caulk needs replacing?
Your bathtub caulk needs replacing when you see cracks, gaps, discoloration, mold that won’t clean off, peeling edges, or noticeable shrinkage. Fresh caulk typically lasts 3 to 5 years depending on usage and ventilation, but these visible signs mean water can penetrate behind walls and cause hidden damage. If the caulk has lost flexibility and feels hard or brittle, it’s time to recaulk.
Should I fill the bathtub with water before caulking?
You should fill the bathtub with water before caulking to weight it down and prevent the caulk line from pulling during future use. The water’s weight simulates the tub’s position under normal load, so the caulk cures in the correct position without stretching later. This simple step significantly reduces cracking and separation over time.
When should I remove painter’s tape after caulking?
You should remove painter’s tape immediately after smoothing the caulk bead, typically within 5 to 10 minutes before the caulk skins over. Pull the tape slowly at a 45-degree angle away from the joint to avoid tearing the fresh caulk edge. Waiting too long causes the tape to bond with cured caulk, ruining your clean line when removed.