
That slightly brown ring on your ceiling after a quick bathroom overflow isn’t going to fix itself, and ignoring it means you’ll be dealing with mold and crumbling drywall in a few weeks instead of a simple patch job today. Water damage in drywall hides at first, then spreads quietly behind paint until suddenly the whole ceiling’s sagging or black spots bloom across your wall. This guide shows you exactly what to look for, where damage hides, and how to tell if what you’re seeing needs a quick cleanup or serious intervention before things get expensive.
How to Check for Water Damage in Drywall
Water damage leaves clues you can spot with your eyes, hands, and nose. Catching them early keeps small moisture issues from snowballing into expensive repairs and mold problems.
What to look for when checking drywall:
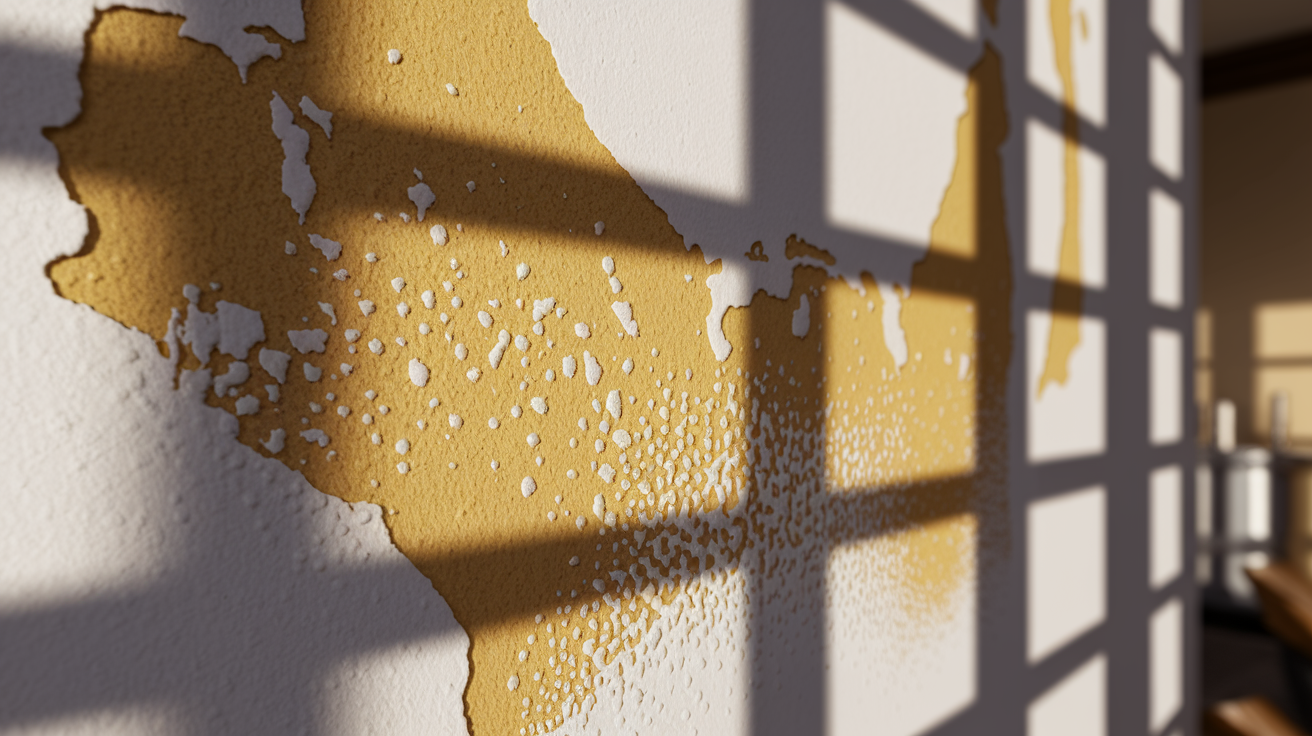
- Discoloration in yellow, brown, copper, or dark gray that spreads across walls or ceilings in weird shapes
- Stains that look like drips, streaks, or rings showing where water ran down
- Paint that’s bubbling, blistering, flaking, or peeling where moisture pushed up from behind
- Soft, spongy texture when you press on the wall instead of firm resistance
- Dull, muffled sound when you tap with your knuckles versus the normal hollow ring
- Warping, sagging, or bulging where the surface doesn’t sit flat anymore
- Uneven spots you can see by squatting to eye level or holding something straight against the wall
- Musty, damp, earthy smells that stick around even after wiping surfaces down
- Visible mold showing up as black, green, or white fuzzy or powdery patches
- Crumbly, chalky, or powdery feel when you rub stained areas gently
- Water marks with sharp edges or rings like coffee stains on a table
- Cold or clammy feeling when you touch suspected wet spots compared to dry areas nearby
When you find several signs clustered together, that’s confirmed water damage needing fast action. One warning sign might just be old damage that already dried out. But combinations like soft texture plus musty smell plus discoloration? That means active moisture is trapped in your wall right now.
Understanding the Causes Behind Drywall Water Damage

Finding the water source matters just as much as spotting the damage, because fixing drywall without stopping the leak means you’ll be doing this again in six months.
Where water comes from:
- Supply lines, drain pipes, or connections hiding behind walls and under floors that leak or burst
- Roof leaks from damaged shingles and bad flashing around chimneys and vents
- Gutters and downspouts that clog up, overflow, and dump water down exterior walls
- Failed seals around toilets, tubs, sinks, and shower pans letting water seep through grout and caulk
- HVAC drip pans that overflow or drain lines that back up
- Water heaters with corroded tanks, dishwashers with worn gaskets, washing machine hoses that crack
- Foundation cracks and basement gaps where groundwater gets through after heavy rain
- Ice dams on roof edges forcing melting snow backward under shingles into the attic
- Poor bathroom and kitchen airflow creating condensation on cold walls
- Flooding from storms, sewer backups, or broken sump pumps
Stop the water first, assess the drywall second. Even perfect repairs will fail again if moisture keeps coming. Track backward from the stain to figure out if water traveled down from above, sideways from plumbing, or up from below.
Where Water Damage Hides in Your Walls and Ceilings

Water follows gravity, plumbing routes, and building weak spots. You can skip most of your house and focus where problems actually show up.
Places to check first:
- Ceilings under bathrooms, especially below tubs and toilets on upper floors, and near roof valleys
- Walls around showers, tubs, and sinks where water splashes and humidity builds daily
- Kitchen walls behind the sink, under counters near dishwashers, and around refrigerator water lines
- Laundry room walls near washing machine valves, behind the machine, and along exterior walls if dryer vents leak
- Basement walls at floor level, in corners, and where utilities enter the house
- Exterior walls below and beside windows and door thresholds where flashing can fail
- Inside corners where walls meet ceilings, since leaks often travel along framing first
- Walls and ceilings near HVAC vents and around air handlers or furnaces
- Drywall next to water heaters, looking behind the tank and at floor connections
These spots get hammered because they sit directly in plumbing paths, collect roof runoff, have temperature swings causing condensation, or let water sneak in from outside. A bathroom ceiling takes steam hits every day while a basement wall sits against damp soil pushing groundwater through tiny cracks.
Using a Moisture Meter to Detect Drywall Water Damage

Moisture meters give you actual numbers instead of guessing if something feels damp. Basic models read from 5% (dry) to 40% (soaked), and anything over 17% in drywall means you’ve got moisture that won’t dry on its own.
Pin meters use two metal probes you push through paint into drywall. They measure electrical resistance between pins since wet stuff conducts better than dry. You get a precise reading at that exact spot, which helps when you need to know how deep moisture soaked in. The catch? Those pins leave small holes you’ll patch later.
Pinless meters press flat against the wall and use sensor pads to detect moisture without breaking through paint. They scan a palm-sized area in one reading, perfect for quickly checking multiple spots to map wet zones. No penetration means no holes to fix, but the reading averages moisture across the sensor pad rather than showing depth.
For a single incident, renting a basic meter for $30 to $100 makes sense if you want to track drying over several days. Professional meters offering better accuracy and deeper reads run $500 to $3,000, which tips things toward just hiring a restoration company that already owns the gear and knows how to read borderline results.
Recognizing the Smell of Water-Damaged Drywall

That musty, earthy smell like wet cardboard in a damp basement often hits before you see stains, especially when moisture’s trapped inside wall cavities.
The odor gets stronger when you close up a room, open a closet, or come home after being gone a few days because mold colonies release compounds as they digest the paper facing and gypsum in drywall. You might clean visible mold with bleach and still smell that funk an hour later, telling you the real problem’s behind the drywall where cleaning can’t reach.
When the smell won’t quit despite open windows and fans, you’ve confirmed active moisture feeding growth inside your walls. The odor itself becomes a tool pointing toward hidden damage requiring you to cut into drywall to find it. If you’re noticing the smell mostly in bathrooms, laundry rooms, or basements with bad air circulation, those spaces create the exact conditions where mold thrives on damp materials.
How to Assess the Severity of Drywall Water Damage

The line between minor damage you can tackle and major damage needing pros comes down to affected area size, whether drywall lost structural integrity, and how long water’s been there.
| Severity Level | Signs | Action Required |
|---|---|---|
| Minor | Small stains, surface discoloration, no soft spots | Clean, dry, monitor |
| Moderate | Bubbling paint, soft areas under 2 square feet, musty smell | Dry thoroughly, replace affected sections, address source |
| Severe | Sagging, large soft areas, visible mold, crumbling material, structural compromise | Professional restoration, mold remediation, structural repairs |
Severe damage crosses into dangerous territory where ceilings can collapse once gypsum turns to mush and loses its ability to hold fasteners. A ceiling sagging even half an inch has already started failing. Widespread mold creates airborne contamination affecting indoor air quality throughout your home, with health risks for kids, elderly people, and anyone with respiratory issues or weakened immunity. Minor problems you catch within a day or two after a leak often stay in the “clean and monitor” zone if you dry everything completely and fix the source. But that same small stain left wet for a week moves up into moderate damage needing material replacement.
Immediate Steps After Discovering Water Damage in Drywall
Speed beats perfection in the first 24 to 48 hours because wet drywall staying damp gives mold spores ideal conditions to start colonizing paper facing and gypsum.
What to do right away:
- Stop the water by shutting off the supply valve, tightening a loose connection, or putting a bucket under an active drip until help arrives
- Kill power at the breaker to any rooms where water’s near outlets, switches, or fixtures to prevent shocks
- Remove standing water immediately using towels, a mop and bucket, or a wet-dry vac before it soaks deeper into floors and walls
- Move furniture, rugs, stored stuff, and anything touching wet walls away so air can flow
- Open all windows and doors in the affected area for cross-ventilation and start pulling moisture out through air exchange
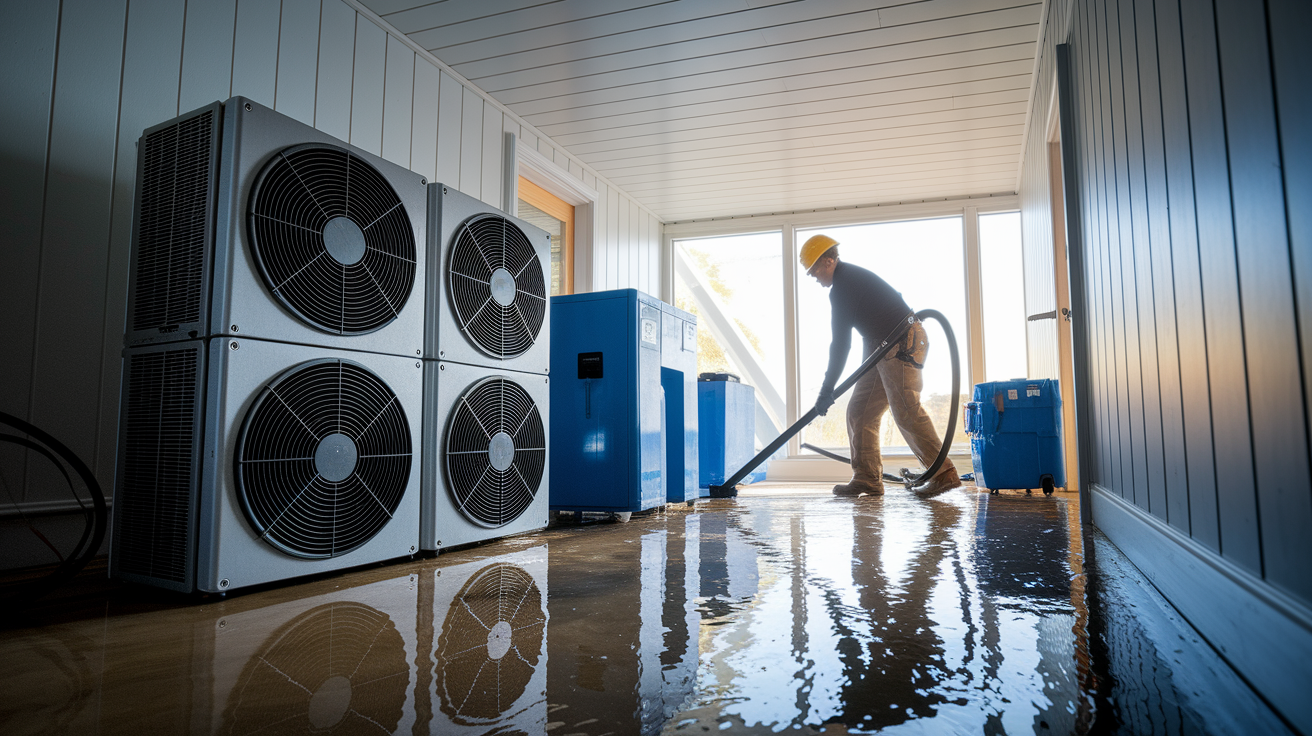
- Aim box fans or floor fans directly at wet drywall and run a dehumidifier to pull moisture from the air
- Document everything with photos showing damage extent, close-ups of affected areas, and the suspected source for insurance
These actions stop damage from spreading and buy time to assess whether you’re dealing with something you can handle after drying or need to call pros for extraction and structural drying. They don’t replace repair work but minimize how much repair you’ll need by stopping secondary damage before it compounds the original problem.
When DIY Fixes Work and When to Call a Professional

The repair decision splits along clear lines based on damage size, location risks, and whether moisture created conditions only specialized equipment can fix.
Not everything needs pros. Small, contained problems often respond well to homeowner repairs if you move fast and have basic skills.
DIY works for:
- Small surface stains under one square foot with no soft spots when you press firmly
- Minor paint bubbling on completely dried drywall where moisture evaporated and you’re just fixing cosmetic stuff
- Small repairs like patching, sanding, and repainting after a pro already dried the structure
- Monitoring new stains and documenting their size, color, and location over days to see if they’re growing
- Surface cleaning of dried areas showing old stains but testing dry on a moisture meter
Call a pro for:
- Soft, sagging, or crumbling drywall over 2 square feet or any ceiling damage that lost structural integrity
- Any visible mold beyond tiny surface spots, or persistent musty odors indicating hidden colonies
- Water damage within 6 inches of outlets, switches, wiring, or electrical panels where moisture and electricity mix dangerously
- Ceiling damage, especially on lower floors with living space above where framing may be compromised
- Hidden moisture trapped behind walls, under flooring, or in crawl spaces you can’t see without cutting into finishes
- Gray water from washing machines or dishwashers, or black water from sewage containing contaminants
- Situations where you need confirmation of complete drying before closing walls back up
Restoration pros bring thermal cameras detecting temperature differences from moisture evaporation, showing exactly where wet areas extend past visible stains. They use meters that penetrate deeper and give more accurate readings than homeowner models. For a one-time check, hiring someone who already owns this gear and knows how to read the data costs less than buying the tools yourself, especially when thermal cameras run several thousand dollars and need training to use right.
The Connection Between Water Damage and Mold Growth
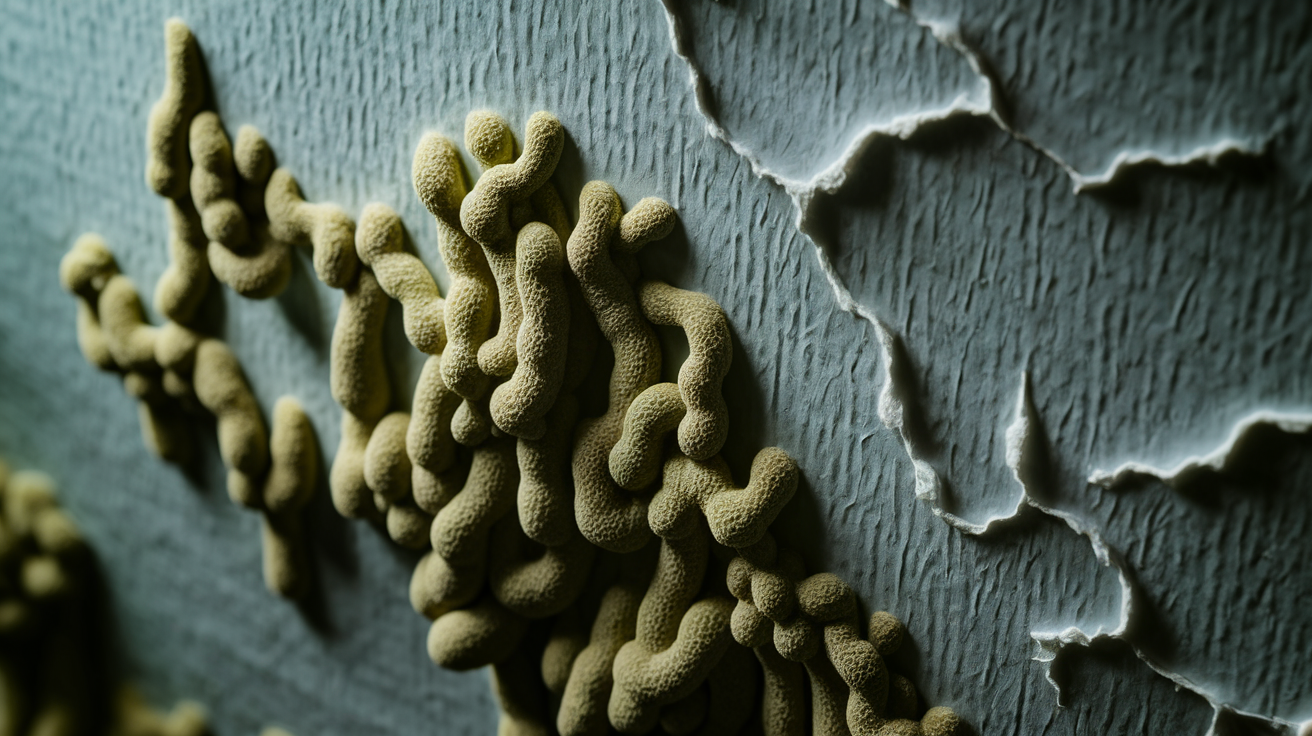
Mold spores float through every house all the time, waiting for the right conditions to settle and start growing. Water-damaged drywall gives them exactly what they need.
Within 24 to 48 hours of drywall getting wet, those dormant spores land on damp surfaces and start germinating. They send out threads that digest the paper facing and organic compounds in gypsum, spreading colonies that look like black, green, or fuzzy white patches. Mold loves drywall’s porous texture because moisture wicks in and stays there. Darkness behind walls or inside cabinets combined with stagnant air in bathrooms, basements, and utility rooms creates perfect breeding grounds where mold expands without disruption.
Health problems from mold in your home:
- Respiratory issues including persistent coughing, wheezing, and trouble breathing
- Allergic reactions like runny nose, itchy eyes, sneezing, and sinus congestion that won’t clear
- Asthma attacks triggered or worsened by airborne spores, especially in people already having asthma
- Skin irritation, rashes, and hives from direct contact or allergic response
- Higher risk and worse symptoms for kids, elderly people, pregnant women, and anyone with compromised immunity or chronic lung conditions
Tackling water damage in the first day or two prevents mold from establishing colonies needing expensive remediation. Once mold colonizes, you can’t just wipe it away because roots penetrated the material. Then you’re cutting out and tossing affected drywall, treating framing with antimicrobial solutions, and replacing materials to fully eliminate contamination.
Documenting Water Damage for Insurance Claims

Taking the right photos and notes now protects you financially later by creating evidence the adjuster needs to approve your claim and prevents fights about what got damaged or when it happened.
How to document everything:
- Photograph all visible damage from multiple angles, wide shots showing the whole affected area and how it relates to room layout
- Get extreme close-ups of water stains, paint bubbling, soft spots, mold growth, and texture changes so details are crystal clear
- Document the suspected source with photos of the leaking pipe, roof damage, failed appliance connection, or wherever water entered
- Record measurements of affected areas in feet and inches using a tape measure, noting wall height and stain width
- Keep every receipt for emergency supplies like fans, dehumidifiers, cleaning products, plastic sheeting, and any pro services you hired immediately
- Write detailed notes including date and time you discovered damage, weather if relevant, what you heard or smelled, and initial observations about moisture
Contact your insurance claims department within 24 hours of discovering damage instead of waiting until repairs finish. Ask the rep specifically what documentation format they need, whether they’re sending an adjuster to inspect in person, and if they need contractor estimates before scheduling repairs. Some policies require you to prevent more damage but ban major repairs until after the adjuster visits, so clarify those rules before you start cutting out drywall.
Preventing Future Water Damage to Your Drywall
Routine maintenance and proactive checks catch small problems while they’re still cheap and easy, long before they turn into emergencies forcing you into expensive restoration.
Prevention steps that stop damage before it starts:
- Check plumbing fixtures, supply lines under sinks, toilet connections, and washing machine hoses every three months for corrosion, buildup, cracks, or bulging
- Clean gutters and downspouts twice yearly in spring and fall, making sure downspouts send water at least 6 feet from foundation walls
- Make sure grading around your foundation slopes down and away from the house at 6 inches over the first 10 feet
- Run dehumidifiers in basements and crawl spaces, keeping relative humidity below 50% to prevent condensation
- Improve bathroom ventilation by running exhaust fans during showers and for 20 minutes after, same for kitchens when cooking makes steam
- Seal exterior cracks in foundation, around windows, and beside doors using appropriate caulk or hydraulic cement for below-grade fixes
- Check roof condition yearly and after bad weather, looking for lifted shingles, damaged flashing, and wear signs on older roofs nearing replacement
- Replace old galvanized steel or corroded copper pipes before they fail catastrophically, especially if your house is over 50 and still has original plumbing
- Watch monthly water bills for unexplained jumps of 10% or more that might mean hidden leaks between the meter and your house
- Install leak detectors with alarms near water heaters, under sinks, beside washing machines, and in basements where small leaks might go unnoticed for days
- Check caulking around tubs, showers, and sinks yearly, scraping out and replacing bad caulk before water seeps through gaps into walls
Prevention costs a fraction of restoration because you’re buying caulk tubes and spending Saturday mornings on ladder work instead of writing five-figure checks to repair companies. Beyond money, you’re protecting your family from mold health impacts and avoiding the mess of having contractors tear apart your house to fix damage that started from a worn-out washer you could’ve replaced in ten minutes.
Final Words
Knowing how to tell if drywall has water damage comes down to using your eyes, hands, and nose together.
Discoloration, soft spots, peeling paint, and that unmistakable musty smell are your main warning signs.
Catch them early, stop the water source fast, and you’ll save yourself from bigger headaches down the road. If multiple signs show up together or the damage feels bigger than a quick patch, call in a pro.
Your walls will thank you.
FAQ
What does water damage look like on drywall?
Water damage on drywall looks like discoloration (yellow, brown, or copper spots), bubbling or peeling paint, visible staining with irregular drip patterns, and warped or bulging surfaces that appear uneven compared to surrounding areas.
Is drywall ruined if it gets wet?
Drywall is not always ruined if it gets wet. Minor surface moisture caught early can dry completely without replacement, but drywall becomes ruined when it stays wet for 24-48 hours, feels soft or spongy, shows mold growth, or loses structural integrity.
What does wet drywall feel like?
Wet drywall feels soft, spongy, or mushy when you press firmly on it, compared to the normal firm resistance of dry drywall. It may also feel cool or damp to the touch and can crumble under light pressure in severe cases.
How wet can drywall get before it needs to be replaced?
Drywall needs replacement when it stays saturated beyond 48 hours, develops soft spots larger than 2 square feet, shows visible mold growth, crumbles when touched, or sags and loses structural integrity even after drying attempts.
How long does it take for mold to grow on wet drywall?
Mold begins growing on wet drywall within 24 to 48 hours of moisture exposure. Quick drying within this window prevents mold establishment, but delays create ideal conditions for spore colonization on the porous paper facing.
Can I paint over water-damaged drywall?
You cannot paint over water-damaged drywall until the surface is completely dry, the source is fixed, and soft or moldy sections are replaced. Painting over active damage traps moisture and causes paint failure, bubbling, and continued deterioration.
What causes water damage in walls?
Water damage in walls comes from leaking pipes, roof leaks, clogged gutters, appliance failures, HVAC condensation issues, foundation cracks, flooding, ice dams, and poor ventilation. Identifying the specific source prevents recurring damage after repairs.
How do professionals detect hidden water damage?
Professionals detect hidden water damage using thermal imaging cameras that reveal temperature differences from moisture evaporation, professional-grade moisture meters that measure water content percentages, and infrared cameras that highlight wet areas without cutting into walls.
When should I call a professional for water damage?
Call a professional when damage exceeds 2 square feet, shows visible mold, involves electrical areas, includes ceiling damage or sagging, originates from sewage or contaminated sources, or persists despite drying efforts over 48 hours.
Does insurance cover water damage to drywall?
Insurance typically covers sudden water damage from burst pipes or storm events but often excludes gradual damage from neglected maintenance or long-term leaks. Document all damage immediately with photos and contact your insurer before starting major repairs.