
Ever stood under your roof overhang during a storm and noticed water dripping right where your gutters meet at the corner? That’s not bad luck. It’s actually the most predictable spot for gutter failure. Corners force two separate pieces to hold a watertight seal while water from two directions slams into that joint with double the pressure. Sealant degrades, metal shifts, and those seams become weak points that leak way before the rest of the gutter shows wear. Here’s what causes corner leaks and how to fix them before they rot your fascia boards.
Diagnosing the Source of Your Gutter Corner Leak

Proper diagnosis prevents wasted time. You don’t want to spend an afternoon caulking symptoms while the actual problem sits there untouched. Skip the inspection and jump straight to sealing, and you’ll probably find yourself back on that ladder in three months when the leak shows up again.
Here’s how to pinpoint what’s actually failing:
Examine corners during or right after rainfall. Watch where water escapes. Active leaks show you exactly which seam is compromised and whether water’s dripping from joints or just overflowing from the top.
Check for water stains on fascia boards behind corners. Brown or dark streaks on wood directly behind miter joints tell you where water’s been running down repeatedly, even if you don’t catch it dripping during inspection.
Look for visible gaps or separations where miter pieces connect. Get close enough to see if daylight shows through seams or if the two gutter sections have physically pulled apart.
Inspect sealant for cracks or missing sections. Old caulk develops hairline cracks, pulls away from metal surfaces, or disappears entirely, leaving gaps where water flows through freely.
Test gutter slope by pouring water and watching for pooling at corners. Use a bucket to dump water into the gutter section. Water should move steadily toward downspouts. If it sits still at corners, slope’s wrong.
Remove debris from corners and check if standing water remains. After clearing leaves and sludge, any water that stays pooled in the corner indicates a slope problem that’ll break down sealants continuously.
Verify downspouts are clear by running water through system and watching drainage at bottom. Start water flow at the top of the downspout. If water backs up or drains slowly, clogs are forcing pressure on corner seams higher up.
Check for rust spots or corrosion at corner seams. Small orange or brown spots indicate metal deterioration that prevents sealants from bonding properly. No amount of caulk will create a lasting seal on corroded metal.
Clogs cause water to overflow from the top edge of gutters, spilling over in sheets. Actual seal failures let water drip or run from the seam itself underneath the gutter edge. This distinction matters because overflows need cleaning and slope adjustment, while drips from seams need new sealant and possibly structural repairs.
Spring and fall are optimal inspection windows. Spring reveals winter damage from ice expansion and freeze cycles. Fall inspections happen before leaves drop completely, showing you where debris accumulates and which corners will face the most pressure when gutters fill.
Take photos of each corner during inspection. Date stamped images create a visual record of deterioration patterns, help you spot changes between seasons, and give contractors clear information if you decide professional help makes more sense than DIY repairs.
DIY Gutter Corner Repair Methods and Materials

DIY corner repairs work when you’ve identified the specific failure and addressed any underlying slope or clogging issues first. Slapping caulk over problems without fixing root causes just wastes your time and materials.
Follow this repair sequence for the most durable seal:
Gather materials. You need a putty knife, wire brush, silicone sealant (Geocel 2320 performs well for gutter repairs), clean rags, a stable ladder, and work gloves. Don’t skip safety equipment.
Remove all old sealant completely with putty knife. Scrape every bit of old caulk from both metal surfaces. New sealant won’t bond properly to old material, so this step determines whether your repair lasts two months or two years.
Clean corner joint thoroughly with wire brush. Remove dirt, oxidation, and any remaining residue until you see clean metal. Sealant needs bare aluminum to create a proper bond.
Dry area completely and choose a warm, dry day for repairs. Silicone clings best to warm metal (above 50 degrees). Don’t attempt repairs in cold weather, damp conditions, or when rain threatens within 24 hours.
Apply generous bead of silicone sealant between miter pieces. Fill the gap where the two gutter sections meet. More is better than less at this stage.
Press joint firmly together. Push the two pieces tight against each other so sealant fills all gaps and creates full contact between surfaces.
Remove excess sealant with rag. Wipe away squeeze out immediately before it skins over. Smooth the visible bead for a cleaner look.
Apply second bead around outer edges of seam. Run another line of caulk along the outside of the joint for backup protection and to seal any gaps you couldn’t reach from inside.
Allow proper cure time before testing with water. Most silicone sealants need 24 to 48 hours to cure fully. Check the tube label and wait the full time before running water through the system.
| Material | Purpose | Estimated Cost |
|---|---|---|
| Silicone sealant (Geocel 2320 or equivalent) | Primary waterproof seal between miter pieces | $8-12 per tube |
| Putty knife | Removing old sealant and preparing surface | $5-8 |
| Wire brush | Cleaning oxidation and debris from metal | $6-10 |
| Metal flashing patches | Covering holes or rust damage | $10-15 for sheet |
| Roofing cement | Sealing patch edges and small holes | $8-12 per tube |
Repairs only work if you’ve corrected root causes first. If poor slope leaves standing water at corners, or if chronic clogs keep soaking the seams, your fresh sealant will fail just as fast as the old stuff. Fix drainage problems before you fix leaks.
DIY corner sealing can extend gutter life one to two seasons when damage isn’t extensive. But if you’re repairing the same corner for the third time, or if gutters are approaching 25 years old, repeated DIY fixes just delay the inevitable replacement. At that point, professional assessment makes more financial sense than buying another tube of caulk.
Why Gutter Corners Leak: 8 Common Causes
Corners are the most vulnerable points in gutter systems because they force two separate pieces to meet and maintain a watertight seal under constant water flow. Unlike straight runs cut from single continuous sections, miter corners create an intentional weak point where seams are unavoidable.
Water flow patterns make corners even more problematic. When rain runs along a straight section, it moves at a steady pace and spreads across the bottom surface. At corners, flow from two directions converges, doubling the volume passing through that joint. This concentrated pressure tests seals continuously and exposes any weakness faster than it would show up in straight sections.
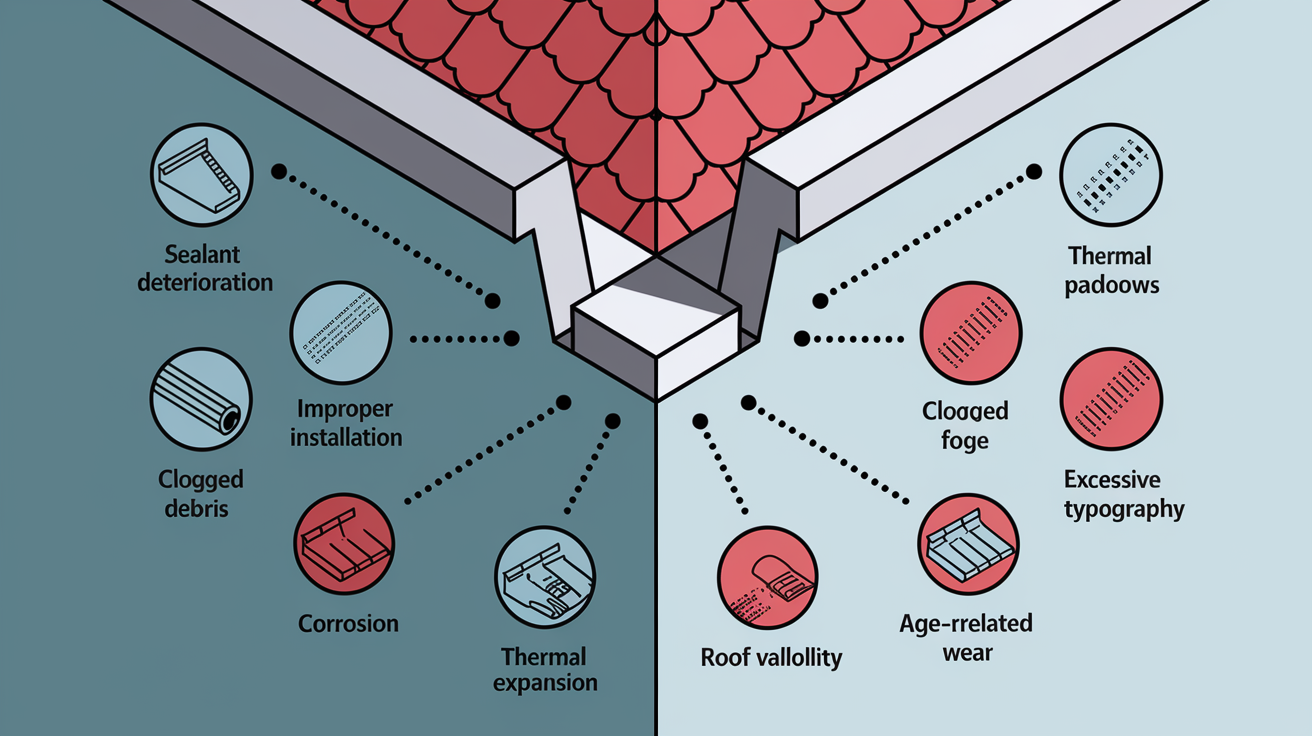
Here’s what typically fails at these vulnerable connection points:
Sealant deterioration. Caulk and silicone degrade from UV exposure, temperature swings between summer heat and winter cold, and endless wet dry cycles. Aluminum gutters last 20 to 30 years, but the sealants holding corner joints together typically give out in 10 to 20 years. The metal structure stays solid while the seal fails, creating drips that look like the gutter is broken when really just the caulk is done.
Improper installation. Insufficient sealant application leaves gaps from day one. Some installers skimp on caulk between miter pieces, or they don’t seal fastener holes where screws penetrate metal. Incorrect cuts create uneven edges that can’t fit tight together. Using fasteners shorter than seven inches (eight is better) means screws don’t grip well, letting corners sag and open seams.
Improper gutter slope. Gutters need about a quarter inch drop per section to drain properly. When slope is wrong, water sits at corners instead of flowing to downspouts. Standing water continuously submerges seams and breaks down sealants rapidly. What should last 15 years might fail in 5 when constantly soaked.
Clogged corners causing water backup. Debris accumulation creates blockages that trap water specifically at corner seams. When downspouts can’t drain fast enough because they’re partially clogged, water backs up and finds the weakest exit point, which is always the corner joint.
Thermal expansion loosening joints. Metal gutters expand when temperatures rise and contract when they drop. This constant movement gradually works joints open. Winter might tighten seams, summer loosens them, and after thousands of cycles over years, gaps develop that sealant can’t bridge anymore.
Corrosion damage at seams. Aluminum develops surface oxidation from tree pollen that’s surprisingly acidic, or from galvanic reactions when aluminum touches copper, steel, or nickel fasteners. Gutters approaching 25 to 30 years old often show porous or pocketed surfaces where corrosion has created texture that prevents smooth sealant adhesion. You’re trying to waterproof rough, degraded metal that caulk just can’t grip properly.
Excessive roof valley water flow at inside corners. Inside corners positioned directly below roof valleys receive concentrated flow from large roof sections all funneling to one point. This continuous high volume stream submerges the seam constantly during rain, creating conditions that break down even fresh sealant fast. Think of it like the difference between a garden hose drip and a firehose blast hitting the same spot.
Age related deterioration of materials. Older systems develop brittleness. Metal that’s been through decades of expansion, contraction, UV exposure, and weather stress doesn’t flex the same way new aluminum does. Brittle materials crack more readily, and degraded surfaces can’t hold sealant even when you apply it correctly.
Corner leaks usually indicate larger system issues rather than isolated bad luck. When one corner starts dripping, check whether slope problems, chronic clogging patterns, or overall age issues affect multiple points. Successful repairs require addressing underlying causes like drainage deficiencies or tree debris patterns, not just caulking over symptoms.
When Corner Gutter Leaks Require Professional Help

DIY repairs make sense for systems under 20 years old with isolated leaks at one or two corners, repairable slope issues, no rust present, and no history of previous failed repairs. When you catch problems early on relatively new gutters, a weekend afternoon with proper sealant can add years of service.
Professional replacement becomes necessary when gutters reach 25 to 30+ years old and develop porous surfaces where sealants no longer bond properly. At that age, aluminum shows microscopic surface degradation that prevents adhesion no matter how carefully you prepare and apply caulk.
Multiple previous repairs indicate systemic failure rather than isolated problems. If you’ve sealed the same corners twice and leaks return, the issue isn’t your technique or material choice but rather structural problems that patching can’t solve.
Widespread rust or corrosion signals material failure. Where one rust hole exists, more typically follow because the conditions causing corrosion affect the entire system. Systems installed with spikes instead of modern screw in hangers face inherent stability problems because spikes work loose over time and can’t maintain proper slope. Multiple failing corners throughout the system point to structural deficiencies or installation errors that affect the whole setup, not just a few weak spots.
Professional inspections twice yearly catch problems before they escalate into expensive damage. Contractors spot early sealant deterioration, minor slope issues, and developing rust that homeowners typically miss until actual leaks start. An inspection might run $75 to $150 but prevents $3,000+ fascia replacement projects or foundation repairs that start when water runs down walls for months unnoticed.
Professionals can assess whether isolated corner leaks indicate broader system failure requiring complete replacement, or whether targeted repairs will provide lasting solutions. Sometimes what looks like three separate corner problems actually stems from one uphill slope issue causing water to back up at multiple points. Experienced eyes distinguish between “this one corner needs resealing” and “this 28 year old system is at the end of its functional life.”
Preventing Future Leaks at Gutter Corners

Prevention costs less than repeated repairs and extends gutter life significantly. An hour of maintenance twice a year prevents hundreds or thousands in damage repairs.
Here’s what keeps corners sealed and functional:
Clean gutters bi annually in spring and fall at minimum. Spring removes winter debris and ice damage. Fall clears leaves before they decompose into sludge that traps moisture against seams year round.
Install gutter guards in tree heavy areas. Mesh covers reduce debris accumulation by 80 to 90% in neighborhoods with lots of deciduous trees, taking pressure off corners by preventing the clogs that cause water backup.
Inspect corner seals during each cleaning for early signs of deterioration. Look for hairline cracks in caulk, slight gaps developing between pieces, or areas where sealant is pulling away from metal. Catching problems at this stage means quick touch ups instead of major repairs.
Verify proper slope is maintained and adjust hangers if sagging develops. Pour water in the gutter and watch how it moves. Any standing water at corners means you need to reposition hangers before the slope problem breaks down seals.
Clear roof valleys that drain to inside corners. Sweep accumulated leaves and debris from roof sections above inside corner locations to prevent excessive flow from overwhelming those vulnerable spots.
Ensure downspouts drain freely by testing with water during each inspection. Run water at the top of each downspout and watch drainage at the bottom. Slow drainage means partial clogs that will eventually force water backward to corner seams.
Reseal corners proactively every 10 to 15 years before failures occur. Don’t wait for drips. If sealant looks degraded or gutters are approaching 15 years old, preventive resealing costs $50 to $100 in materials versus emergency repairs plus water damage cleanup.
Sweep heavy loads of fallen leaves off roof before they enter gutters. After big storms or heavy fall leaf drop, clear roofs before rain washes debris directly into gutters where it packs corners tight.
Homes with excessive tree coverage need quarterly cleaning instead of bi annual maintenance to prevent debris related damage. Three large oaks dropping leaves continuously from September through November will pack gutters solid if you only clean twice yearly. Quarterly checks keep corners clear during heavy deposit periods.
Document inspection dates and findings in your phone or home maintenance log. Note which corners show minor sealant cracking, where slight gaps are developing, and any areas with early rust spots. Tracking changes between inspections reveals patterns and shows whether problems are progressing slowly or accelerating, which helps you time repairs before failures happen.
Small preventive investments protect against water damage to fascia boards, siding, foundations, and landscaping that cost exponentially more to repair than the gutter system itself. Spending $200 on annual professional cleanings or three hours twice yearly doing it yourself prevents $5,000 to $15,000 in structure repairs that start when corners leak unnoticed for months.
Water Damage Risks From Leaking Gutter Corners
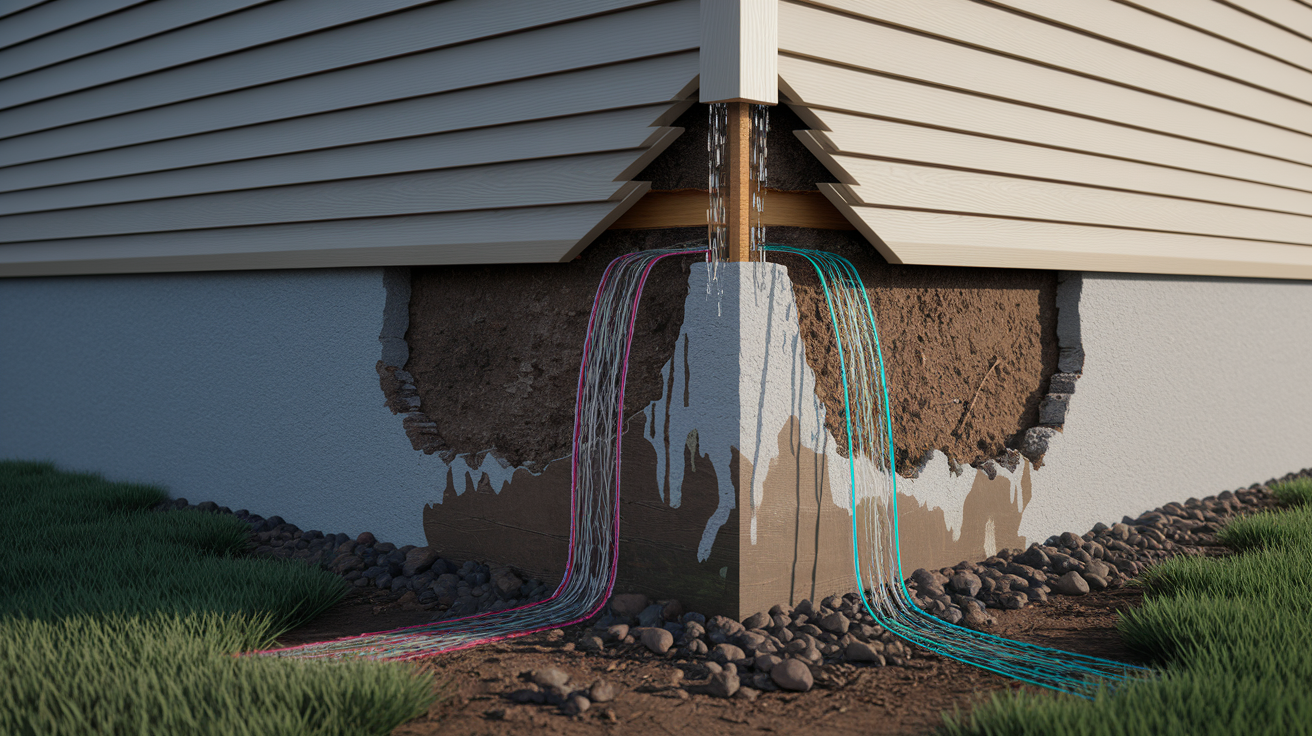
Water escaping at corners runs directly down fascia boards, soaking wood that’s only protected by a layer of paint. Repeated wetting causes paint to peel, wood to swell and rot, and creates conditions for mold growth in wall cavities behind siding. Fascia board replacement typically runs $600 to $2,000 depending on how much rotted wood needs cutting out and whether damage spread to rafters behind the fascia.
Repeated overflow at corners creates distinct erosion patterns in soil near foundations. Water falls from the same spot every rain, gradually washing away dirt and creating channels that direct water straight to foundation walls. Over time, this causes settlement issues where one corner of the house drops slightly, basement seepage through cracks in foundation walls, and structural concerns that compromise home stability. Foundation repairs start around $3,000 for minor crack sealing and can exceed $15,000 when settlement requires foundation sections to be lifted and re leveled.
Corner leaks damage siding, trim, soffit, and landscaping directly below the failure point. Water streaks stain vinyl siding, warp wood siding boards, and destroy paint on trim. Shrubs planted near corners suffer from constant overwatering while erosion washes away mulch and topsoil, creating bare spots and exposed plant roots.
Corner leak repairs typically cost under $200 for DIY fixes or $300 to $500 for professional resealing, which makes them vastly cheaper than foundation repairs ($3,000 to $15,000), fascia replacement ($600 to $2,000), or mold remediation ($1,500 to $6,000) resulting from months of neglected leaks. Prompt attention to corner leaks is a sound financial decision because water damage compounds quickly. What starts as a drip becomes rotted wood within a season, and structural problems within a year or two if water reaches foundations consistently.
Final Words
Corner leaks happen because gutters meet at natural weak points where sealants age, debris collects, and water flow concentrates.
The good news? Most corner leaks respond well to DIY repairs when you address root causes first.
Clean out those corners, check your slope, remove old sealant completely, and apply fresh silicone on a warm, dry day. If your system is older than 25 years or showing rust in multiple spots, replacement usually beats another patch job.
Regular spring and fall inspections catch small problems before they turn into fascia rot or foundation issues. Understanding why gutters leak at corners helps you fix them right the first time and keep water flowing where it belongs.
FAQ
How do you stop gutter corners from leaking?
To stop gutter corners from leaking, you need to remove all old sealant completely with a putty knife, clean and dry the corner joint thoroughly, then apply fresh silicone sealant like Geocel 2320 between miter pieces, press the joint firmly together, and apply a second bead around outer edges.
What is the average lifespan of gutters?
The average lifespan of aluminum gutters is 20 to 30 years under normal conditions, though the sealant at corner joints typically lasts only 10 to 20 years, meaning corners often need resealing or repair before the entire gutter system requires replacement.
How do you seal the corner of an eavestrough?
To seal the corner of an eavestrough, you remove existing sealant completely with a putty knife, clean the joint with a wire brush, dry the area thoroughly on a warm day, apply silicone caulk between the miter pieces, press the connection tightly together, and apply another bead around the outer edges.
Is gutter damage covered by homeowners insurance?
Gutter damage is typically covered by homeowners insurance only when caused by sudden, covered events like storm damage or falling trees, not when it results from normal wear, lack of maintenance, gradual deterioration, or age-related sealant failure at corners.
Why are gutter corners the most common leak points?
Gutter corners are the most common leak points because they consist of two separate pieces meeting at a natural weak point where seams create potential failure zones, and they experience concentrated water flow that adds stress to joints compared to straight gutter runs.
How often should you inspect gutter corners for leaks?
You should inspect gutter corners for leaks bi-annually in spring and fall at minimum, with homes surrounded by trees potentially requiring quarterly inspections to catch early signs of sealant deterioration, gaps, or water stains before they escalate into serious damage.
Can you repair gutter corners yourself or do you need a professional?
You can repair gutter corners yourself when the system is under 20 years old, leaks are isolated to one or two corners, and no rust is present, but you need a professional when gutters are 25 to 30 years old, show widespread corrosion, or have multiple failing corners.
What happens if you don’t fix leaking gutter corners?
If you don’t fix leaking gutter corners, water runs down fascia boards causing wood rot and paint peeling, creates soil erosion near foundations leading to potential settlement issues, and can damage siding, trim, and landscaping directly below the failure point.
What tools and materials do you need to fix gutter corner leaks?
To fix gutter corner leaks, you need a putty knife, wire brush, silicone sealant like Geocel 2320, clean rags, a ladder, and safety equipment, with optional metal flashing patches and roofing cement for holes or corrosion damage at seams.
How long does gutter corner sealant take to cure before testing?
Gutter corner sealant needs proper cure time before testing with water, which varies by product and temperature but typically ranges from 24 to 48 hours on warm, dry days when silicone adheres best to metal surfaces and achieves full waterproof bonding.