
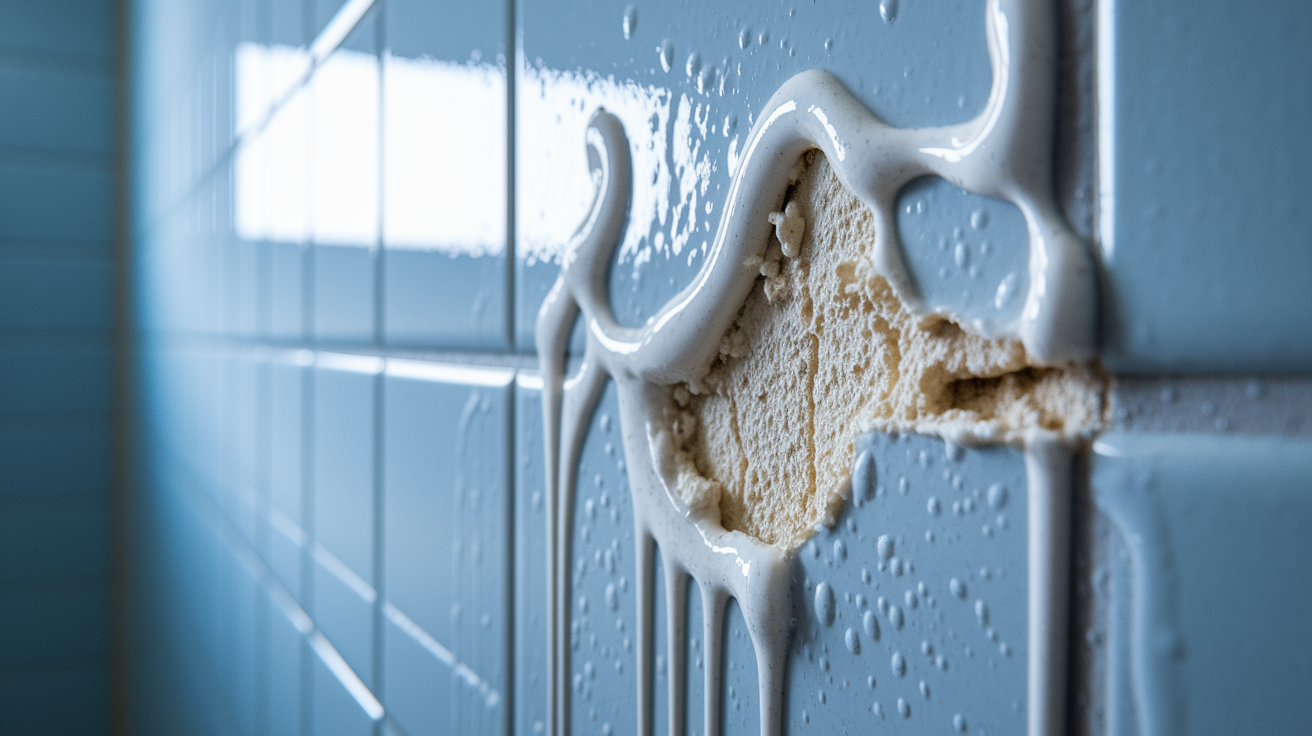
You just wiped steam off the mirror after your shower and noticed paint bubbling near the ceiling corner. Maybe it started small, but now whole sections are peeling like sunburned skin. Bathroom paint peeling isn’t just ugly—it’s a sign that moisture is winning a fight your walls can’t handle. The good news? Once you understand what’s actually causing it (and it’s usually not the paint itself), you can fix it properly and stop the cycle for good.
Identifying the Root Cause of Your Bathroom Paint Peeling

Finding out why your bathroom paint is peeling before you start scraping and repainting is the difference between fixing it once and fixing it three more times. Different peeling patterns point to different problems. Bubbling paint means trapped moisture, widespread flaking usually means humidity issues, and isolated spots near fixtures often signal leaks. You need to know what’s actually causing the damage so you can stop it.
Here’s how to conduct a thorough diagnostic inspection:
- Check for active water leaks around all fixtures (faucets, showerheads, toilet connections) and look for wet spots or discoloration on walls that might indicate hidden leaks behind surfaces.
- Inspect gaps between different surfaces where moisture can sneak in. Look closely at where tiling meets drywall, where skirting boards sit against walls, and around the tub or shower surround edges.
- Look for water stains on walls or ceiling (usually yellowish brown discoloration) that reveal hidden leaks from pipes or roof issues.
- Test your exhaust fan effectiveness by holding a tissue paper square near the vent while it’s running. If the paper doesn’t stick to the vent, your fan isn’t strong enough.
- Examine the peeling patterns carefully. Bubbling or blistering indicates moisture trapped under the paint, while widespread flaking across walls suggests general humidity problems.
- Check for mold or mildew growth (black, green, or brown spots) showing chronic moisture exposure that’s breaking down the paint adhesion.
- Assess whether your ventilation fan requires separate manual switching, which often means it’s not getting used enough to prevent moisture buildup.
- Test old paint areas for cracking or brittleness by gently pressing with your thumb. If it crumbles easily, the existing paint has degraded and won’t hold new paint properly.
- Verify adequate air circulation by checking if steam clears within 15 to 20 minutes after a hot shower with the door closed and fan running.
Moisture and humidity from bathroom steam create the conditions that break paint adhesion. When you shower, hot water vapor rises and condenses on cooler wall and ceiling surfaces. That condensation wedges itself between the paint layers and the wall surface underneath, slowly breaking the bond. The paint starts to lift, bubble, or blister as water literally pushes it away from the substrate.
Once peeling starts, you’re in a cycle that gets worse. Initial damage creates openings where even more moisture can enter. That additional moisture causes more peeling, which creates bigger openings, which allows more moisture in. It accelerates quickly if you don’t catch it early.
Understanding Moisture Sources and Ventilation
Water vapor from showers is the main moisture source. A single 10 minute hot shower can release over a gallon of water into the air. That moisture has to go somewhere. When poor ventilation prevents humid air from escaping, it stays in the bathroom and condenses on every cool surface it touches. Inadequate extractor fan power means the fan can’t expel moist air fast enough, so humidity lingers and builds up. Prolonged condensation leads to mold formation, and mold actually lifts paint from surfaces as it grows and spreads underneath the paint film.
When your diagnostic inspection reveals structural issues like sagging drywall, extensive hidden water damage, or plumbing problems you can’t access easily, you need professional assessment before proceeding with surface repairs. Painting over serious underlying damage just hides problems that will come back worse.
Surface Preparation Problems That Lead to Paint Failure
Surface preparation mistakes cause paint peeling separate from moisture issues. Even in a perfectly ventilated bathroom, paint won’t stick to a dirty wall. Skipping proper cleaning and prep is asking for trouble.
Dirt, grease residue, soap scum, and other contaminants create an invisible barrier between the wall and new paint. The paint bonds to the dirt layer instead of the wall itself. Over time, that contaminated layer breaks down or moisture penetrates it, and the paint peels off in sheets. This happens fast in bathrooms because soap residue and body oils build up on walls from shower steam, even on walls that don’t get directly wet.
Improper application techniques compound the problem. Not allowing adequate drying time between coats is a major culprit. If you apply a second coat before the first has properly cured, the layers don’t bond correctly and moisture trapped between them causes separation. Painting over incompatible surfaces without the right primer (like putting latex paint directly over old oil based paint) creates adhesion failure. Applying paint in thick, uneven coats instead of thin layers traps moisture and solvents that need to escape during drying.
These preparation mistakes make moisture problems worse because contaminated or improperly applied paint is already weak. When bathroom humidity hits it, the paint fails much faster than it would with proper surface prep and application. You end up with peeling that seems sudden but was actually set up by cutting corners during the initial paint job.
Choosing the Right Paint and Primer for High Moisture Bathrooms
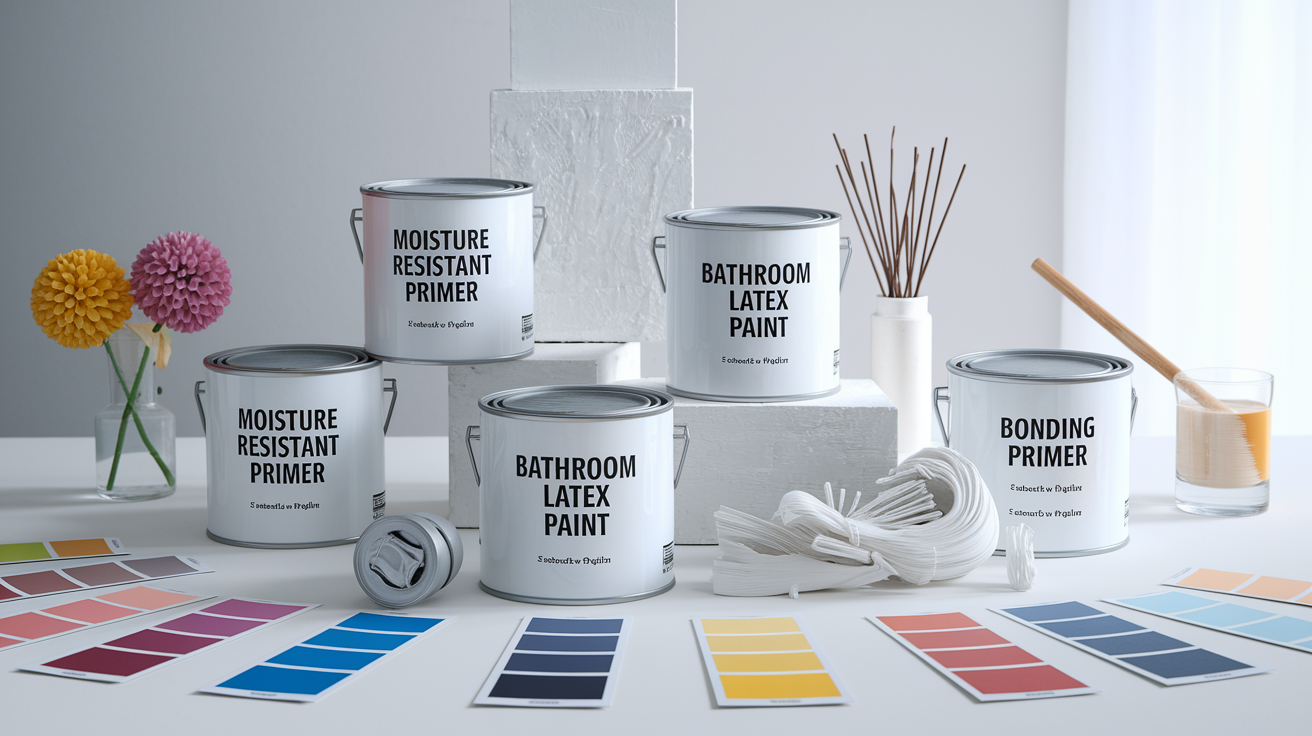
Using the wrong paint in a bathroom is like using indoor furniture on a patio. It’s not built for the conditions it’s facing. Moisture resistant paint formulations are engineered specifically for high humidity environments where regular paint breaks down. Low quality paint might save you a few dollars at purchase, but it contributes directly to peeling because the binders and resins that hold the paint together degrade faster when exposed to constant moisture cycles.
Moisture resistant primer is your first line of defense after you’ve cleaned and prepared the surface. Stain blocking primers seal in any remaining discoloration from previous water damage and prevent it from bleeding through your topcoat. Bonding primers are your choice for problem areas where paint has peeled before or for painting over glossy tile edges. They create a grippy surface that helps topcoats adhere. Always apply primer after proper surface prep, not before cleaning, because primer won’t fix a dirty surface.
| Product Type | Key Features | Finish Recommendation |
|---|---|---|
| Moisture Resistant Primer | Seals surfaces, blocks stains, improves topcoat adhesion, prevents moisture penetration to substrate | Not applicable (primer layer) |
| Bathroom Specific Latex Paint | Mold and mildew resistant additives, enhanced moisture resistance, better durability in humid conditions | Semi gloss, satin, or eggshell |
| Semi Gloss or Satin Finishes | Moisture runs off surface, easier to clean, resists mildew growth, more durable than flat paint | Best for bathrooms (use semi gloss for high moisture areas, satin for overall walls) |
| Standard Flat or Matt Paint | Porous surface absorbs moisture, difficult to clean, promotes mildew growth | Avoid in bathrooms (fails in moisture conditions) |
Paint finish selection matters more in bathrooms than any other room. Semi gloss, satin, and eggshell finishes perform better than flat or matt paint because their slight sheen creates a smoother, less porous surface where moisture beads up and runs off rather than soaking in. Think of it like a raincoat versus a cotton t shirt. These finishes also offer better washability, so you can wipe down walls regularly without damaging the paint surface. The moisture resistance comes from both the formula and the finish working together.
Select dedicated bathroom paint from recognizable brands that specifically label products “kitchen and bath” or “bathroom paint.” These formulations include mold and mildew resistant additives that inhibit growth even in humid conditions. Don’t substitute regular interior paint and hope for the best. The few extra dollars for proper bathroom paint prevents the time and cost of redoing failed paint jobs. Look for products that explicitly mention moisture resistance and mildew protection on the label.
Apply multiple thin coats rather than one thick coat for better adhesion and long term durability. Thin coats dry more evenly, allow proper moisture escape during curing, and build up a more flexible, durable finish. Two or three thin coats outlast one thick coat every time.
Step by Step Bathroom Paint Peeling Repair Process
Before you start, put on safety glasses and a dust mask. Protect your floors with plastic sheeting or a canvas drop cloth. Falling paint chips and dust go everywhere, and wet sanding can create a mess.
Here’s the complete repair and application process:
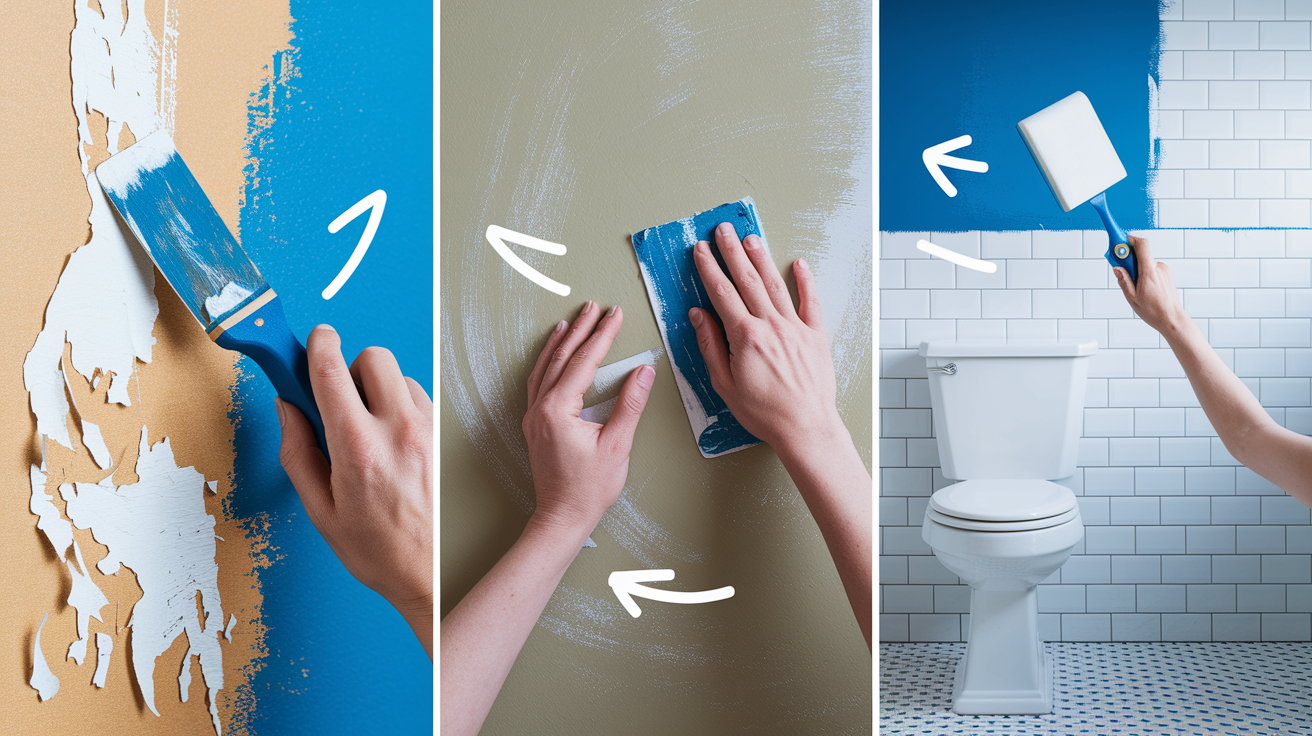
- Scrape off all loose and flaking paint using a paint scraper, moving it back and forth in firm strokes until you meet resistance from sound, well adhered paint.
- Use a utility knife to cut and trim the edges cleanly where your scraping meets sound paint. This creates defined boundaries and prevents further peeling from the edges.
- Sand the area with medium grit sandpaper (100 to 150 grit) to level the transition between scraped areas and existing paint, creating smooth edges that won’t show through your topcoat.
- Fill any gouges or uneven areas with joint compound if needed, apply it thin, and allow it to dry completely per product instructions (usually 2 to 24 hours depending on thickness).
- Clean the entire repair area thoroughly with a mold and mildew cleaner to remove contaminants, soap scum, and any mildew spores.
- Allow the surface to dry completely. Wait 24 to 48 hours in humid conditions before moving forward, because painting over damp surfaces causes immediate adhesion failure.
- Apply moisture resistant primer to the prepared area using thin, even coats with a brush for edges and a small roller for larger areas.
- Allow primer to dry per manufacturer instructions plus extra time for bathroom humidity. Typically 24 to 48 hours, even if it feels dry to touch after 4 hours.
- Apply the first coat of bathroom paint in thin, even layers, using a brush to cut in edges and a roller for the main surface area.
- Wait the full recommended drying time before applying the second coat. Follow manufacturer guidance and add extra time for humid conditions (if the can says 4 hours, wait 6 to 8 in a bathroom).
- Apply the second topcoat using the same thin, even application technique, ensuring complete coverage without runs or thick spots.
You’ll need paint scrapers (both a wide 3 inch and a narrow 1 inch work well), 100 to 150 grit sandpaper or sanding sponge, mold and mildew cleaner, moisture resistant primer, bathroom paint in your chosen finish, quality brushes and rollers, painter’s tape for trim, and your floor protection. A small bucket of water and rags are handy for cleanup.
“Dry to touch” and “ready for recoat” are not the same thing. Paint might feel dry after an hour or two, but that’s just surface drying. The paint underneath is still releasing solvents and moisture as it cures. In humid bathroom environments, this takes much longer than in normal rooms. Rushing between coats traps moisture and solvents between layers, preventing proper adhesion. Those layers separate when bathroom humidity penetrates them, causing the peeling to return. Always add extra drying time beyond label minimums when painting bathrooms.
Application best practices make the difference between paint that lasts years and paint that peels next season. Keep the room temperature consistent during application and drying. Don’t paint if the bathroom is below 50°F or above 85°F. Avoid painting in high humidity conditions when possible (early morning on humid days is better than late afternoon when humidity peaks). Ensure adequate ventilation during the drying process by running the exhaust fan or opening windows, but don’t create strong drafts that dry the paint too fast on the surface while leaving moisture trapped underneath. Apply thin coats with proper roller technique. Load the roller moderately and roll in overlapping W patterns rather than scrubbing back and forth.
The curing process continues long after the paint feels dry. Full cure typically takes 30 days, meaning the paint reaches its maximum hardness and moisture resistance after about a month. During the initial cure period (first week especially), treat your newly painted bathroom gently with minimal water exposure. Avoid scrubbing walls, keep showers short, and use extra ventilation. After the first week, you can return to normal use, but the paint is still gaining strength over the full 30 day cure.
Sealing and Caulking to Prevent Moisture Penetration
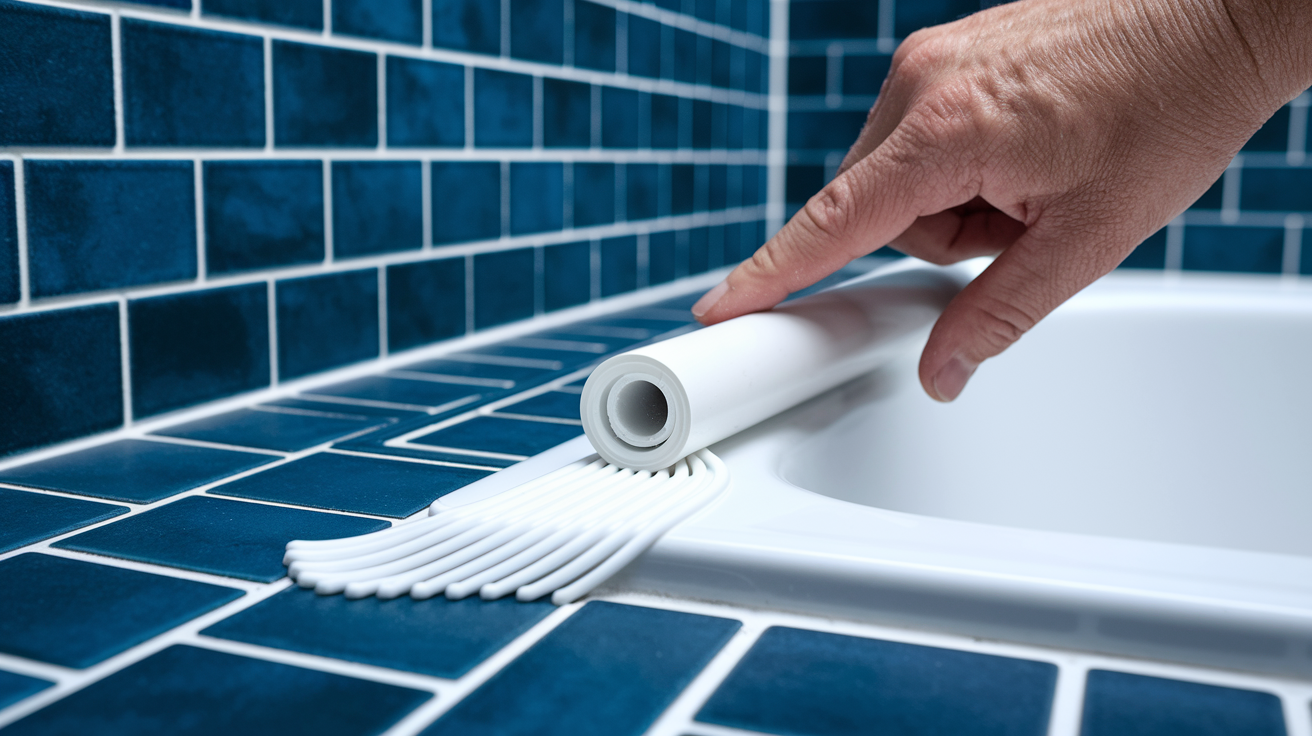
Caulking at moisture prone joints is critical because gaps allow water to reach the wall surface behind your paint. Even perfect paint applied over perfect primer will fail if water sneaks in from the edges. Where walls meet tubs, shower surrounds, and tile edges are the main entry points for moisture that causes paint peeling. The joint between different materials (like drywall meeting a fiberglass tub surround) naturally expands and contracts with temperature changes, creating micro gaps. Water finds those gaps.
Select mildew resistant silicone caulk for joints that might get directly wet (like tub to wall seams) and acrylic latex caulk with mildew resistance for paintable joints away from direct water. Apply caulk in a smooth, continuous bead using steady pressure on the caulk gun. Tool the bead smooth with a wet finger or caulk tool within a few minutes of application, before it starts to skin over. Cut the caulk tube tip at a 45 degree angle and start with a small opening. You can always cut more off if you need a bigger bead, but you can’t make the opening smaller.
Critical areas to caulk:
- Wall to tub joints along the entire length where the wall surface meets the tub deck
- Wall to shower surround seams, especially vertical corners and the bottom horizontal seam
- Around skirting boards or baseboards near moisture sources where gaps allow water to seep behind
- Tile edge transitions where tiled areas meet painted drywall surfaces
- Ceiling to wall joints directly above shower or tub areas where steam condenses and runs down
Inspect and replace old, cracked caulk as part of regular preventative maintenance. Every 6 to 12 months, look at all your caulk lines and recaulk any sections showing cracks, gaps, or mildew discoloration. Old caulk that’s pulling away from surfaces isn’t doing its job anymore.
Ongoing Bathroom Maintenance to Prevent Paint Peeling

Proactive moisture management is the key to preventing future peeling. Proper ventilation expels humid air before it can condense on surfaces and damage paint. This isn’t about occasionally remembering to turn on the fan. It’s about creating consistent habits that keep moisture levels in check. Most bathroom paint peeling develops slowly over months as moisture repeatedly penetrates and retreats, gradually weakening adhesion.
Maintenance and ventilation practices that protect your paint:
- Run the exhaust fan during every shower or bath and continue for 10 to 15 minutes afterward (or up to 30 minutes for thorough moisture removal in larger bathrooms or after long, hot showers)
- Squeegee shower walls, tiles, and glass after each use to remove lingering water. This single habit dramatically speeds evaporation and reduces moisture load on painted surfaces.
- Open windows during and after showers when weather permits, creating cross ventilation that clears humid air faster
- Leave the bathroom door open when showering to reduce moisture accumulation and improve air circulation throughout the space
- Wipe down condensation from walls and ceiling promptly if you see water droplets forming. Don’t let it sit and soak in.
- Clean surfaces monthly to prevent soap scum and mildew buildup that breaks down paint and creates a film that traps moisture
- Use portable dehumidifiers in windowless bathrooms or bathrooms with chronic humidity problems
- Inspect caulk lines every 6 months for cracks or separation and recaulk as needed
- Address any new peeling immediately when noticed before the cycle accelerates. Catching a small spot early prevents major repairs later.
- Monitor for new leaks or moisture sources like dripping faucets or toilet condensation
Assess whether your current exhaust fan is actually adequate for your bathroom size. Fans are rated in CFM (cubic feet per minute), and bathrooms need approximately 1 CFM per square foot of floor space. A 50 square foot bathroom needs at least a 50 CFM fan. If your current fan is undersized, it can’t remove moisture fast enough no matter how long you run it. Humidity sensing automatic fans are a worthwhile upgrade that turn on automatically when moisture levels rise and shut off when humidity returns to normal. They eliminate the “I forgot to turn on the fan” problem. Inadequate fan power or fans requiring separate manual switching contribute to underuse and ongoing moisture problems because convenience matters in daily habits.
Seasonal considerations affect how much ventilation you need. Winter condensation is worse because the temperature difference between hot shower steam and cold wall surfaces is greater. You might need to run your fan longer or crack a window even in cold weather. Summer humidity, especially in humid climates, requires adjusted ventilation strategies because the fan is exhausting humid bathroom air into humid outdoor air. The moisture gradient isn’t as steep. Longer fan run times and use of dehumidifiers helps during muggy summer months.
Regular maintenance is less costly and time consuming than major repainting projects. A few minutes after each shower and monthly cleaning sessions prevent the hundreds of dollars and multiple days of work required to scrape, repair, and repaint bathroom walls.
When to Call a Professional for Bathroom Paint Issues
Recognizing the limits of DIY repair saves you time and prevents making problems worse. Some situations require professional expertise, specialized tools, or access to building components that aren’t reasonable DIY projects.
Scenarios requiring professional help:
- Extensive mold growth (covering more than 10 square feet or penetrating into walls) indicating systemic moisture problems that need professional remediation
- Active plumbing leaks behind walls that require opening wall cavities and professional plumbing repairs
- Damaged or crumbling drywall requiring replacement rather than surface repair
- Peeling affecting large areas (over 50% of walls or ceiling) suggesting underlying structural or moisture barrier issues
- Recurring peeling after proper DIY repair attempts following all correct procedures, which points to hidden problems
- Suspected vapor barrier or insulation issues causing moisture transmission through wall cavities
- Structural water damage like soft, sagging drywall or visible wood rot
Professional moisture assessment and testing with tools like moisture meters and thermal imaging cameras can identify hidden water sources and moisture patterns that aren’t visible to the eye. In persistent or confusing cases where you’ve addressed obvious moisture sources but peeling continues, this testing reveals what you’re missing.
Addressing root causes professionally prevents ongoing damage and repeated repair costs. The investment in proper diagnosis and structural repair is less expensive than multiple rounds of surface repainting, plus you avoid potential health issues from hidden mold or the risk of more serious structural damage from unresolved water intrusion. Professional moisture remediation and repairs typically range based on scope, but catching problems through professional assessment before they become severe always costs less than waiting until damage is extensive.
Final Words
Paint peeling in the bathroom boils down to one main culprit: moisture. Whether it’s steam from showers, hidden leaks, or poor ventilation, water breaks the bond between paint and wall.
The good news? Once you’ve tracked down the source and fixed it, proper prep and the right materials make all the difference.
Scrape, prime with moisture-resistant products, apply bathroom-specific paint, and seal those gaps. Then keep the fan running and the squeegee handy.
A little ongoing maintenance beats scraping and repainting every year.
FAQ
How can you fix peeling paint in a bathroom?
You can fix peeling paint in a bathroom by scraping off all loose paint, sanding the edges smooth, cleaning the surface thoroughly, applying moisture-resistant primer, and finishing with two coats of bathroom-specific paint while allowing proper drying time between each step.
Does peeling paint in the bathroom mean mold?
Peeling paint in the bathroom doesn’t automatically mean mold, but it does indicate trapped moisture which creates conditions where mold can grow. Check behind peeling areas for dark spots, musty smell, or visible mold growth that signals chronic moisture exposure.
Can you just paint over peeling paint?
You can’t just paint over peeling paint because the loose layers will continue lifting and cause new paint to fail quickly. You need to scrape away all flaking paint, sand the edges smooth, and prepare the surface properly before applying primer and new paint.
Does peeling paint mean water damage?
Peeling paint usually means water damage or moisture problems, especially when you see bubbling or widespread flaking patterns. Check for water stains, active leaks around fixtures, gaps between surfaces, and poor ventilation that allows humidity buildup to break paint adhesion.
What causes paint to bubble and peel in bathrooms?
Paint bubbles and peels in bathrooms when moisture from shower steam wedges between paint layers and the wall surface, breaking the adhesion bond. High humidity, poor ventilation, and water penetrating through gaps or old cracked paint make the problem worse over time.
How long should paint dry between coats in a bathroom?
Paint should dry in a bathroom according to manufacturer instructions plus extra time for humidity, typically 24-48 hours between primer and first coat, and another 24-48 hours before the second coat. Rushing this timeframe causes adhesion problems and peeling recurrence.
What type of paint prevents peeling in bathrooms?
Paint that prevents peeling in bathrooms includes moisture-resistant formulas specifically labeled for kitchen and bath use, with semi-gloss, satin, or eggshell finishes that let moisture run off rather than penetrate. Avoid standard flat or matt paint in high-moisture areas.
Should you use primer on bathroom walls before painting?
You should use moisture-resistant primer on bathroom walls before painting to improve adhesion and block stains. Apply stain-blocking or bonding primer after cleaning and preparing surfaces, especially over areas with previous water damage or mold exposure.
How do you prevent bathroom paint from peeling again?
You prevent bathroom paint from peeling again by running the exhaust fan during and for 10-15 minutes after every shower, squeegeeing walls after use, caulking gaps where moisture penetrates, and addressing any plumbing leaks or ventilation problems before repainting.
When should you call a professional for peeling bathroom paint?
You should call a professional for peeling bathroom paint when you find extensive mold growth, active plumbing leaks behind walls, damaged drywall requiring replacement, or peeling that returns after proper DIY repair attempts indicating deeper structural or moisture problems.